Panic Buddy
prusaprinters
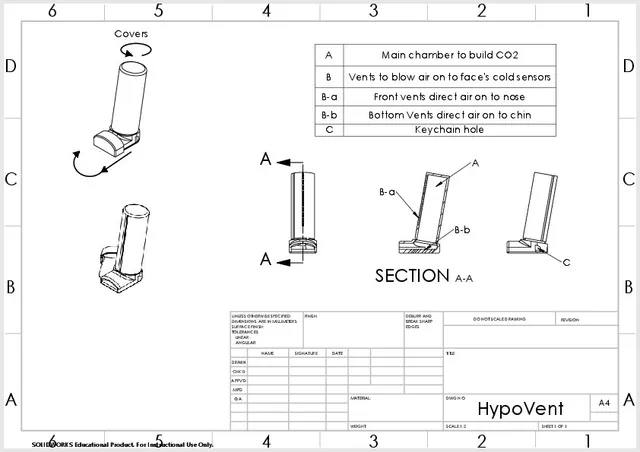
This is what I'm hoping to be the final model of the Panic Buddy, anxiety attack helper. Assembly and opening: Slide the top sleeve on using the grooves on the side of the unit. Make sure that when you're looking at the unit, the main channel is to the left. If you get this wrong, you can simply twist the sleeve to the left until it pops over its catch. To attach the cap, slip it over the mouthpiece, allowing the bottom plate to bend until the peg aligns with the wide end of the slot on the bottom. It should snap in from there. Twist the top sleeve until the channel is in line with the front vents (it should catch at the open point). Slide the bottom cap out until it clears the mouthpiece and the rotate it out of the way (see diagram). Use: Hold the unit like an inhaler and breathe through it, both inhaling and exhaling. If your breathing starts to feel constrained, cease inhaling through the unit, but still exhale to get the airflow to the face. How it works: This unit works to naturally calm your body down if you begin to have an anxiety attack. Upon exhale the vents on the top and bottom of the unit streamline the air and direct it on to the face's cold sensors (the nose and the chin). As you breathe through the unit, the main chambers builds up CO2 and limits oxygen intake, destimulating the body (like a brown paper bag). These in tandem with slow steady breaths have been shown to reduce the impact of an anxiety attack. Cleaning. It's good to take the unit and clean it out every few uses. Just run some soap and water through it, you don't even need to disassemble it. Note that PLA and ABS are not dishwasher safe. Changes: I've added covers for the mouthpiece and vents to prevent debris from getting in the unit. In addition, I've tweaked some edges for ergonomics and added a hole for a keychain in the corner Print Settings Printer Brand: Prusa Printer: i3 MK2S Rafts: Yes Supports: Yes Resolution: .2mm Infill: 20% Notes: The main unit and the sleeve can be printed without supports. And actually printing the main unit with supports turned on will give you a bunch of support material in the main chamber that you can't get out so I wouldn't recommend it. The cap can actually be printed at a 45 degree angle orientation. This sets it so that most of the supports are on the bottom of the unity and not in the cavity where it's really hard to remove. I would recommend having support though. It technically does work with just a raft, but I've had a lot of prints fail that way. Be careful in post processing as getting plastic dust into this is probably not good. Make sure you thoroughly rinse out the unit before use. Category: Other
With this file you will be able to print Panic Buddy with your 3D printer. Click on the button and save the file on your computer to work, edit or customize your design. You can also find more 3D designs for printers on Panic Buddy.
