Panasonic HCV-777 Cage
prusaprinters
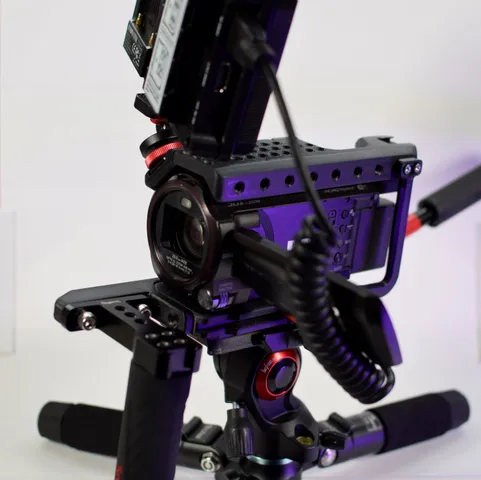
I designed this camera cage for my Panasonic HCV-757 and 777 camcorders, as there are no models of cages available with this formfactor. To design the cage I remodeled the camcorder and built the cage as tightly as possible around it. This way i tried to keep the bulk down, and the camera added cage still fits in my old camera bag.I use it in a mobile life streaming setup to mount mics, transmitters lights, screens and grips to the cameras. Features:full accessibility (to screen, SD-card, battery, ports, buttons or dials)48 printed UNC ¼-20 threads2 shoe mounts (now you can add a mic and still access the zoom and rec. buttonintegrated and folding cable arm to support HDMI cables optional front grip adapteroptional NATO-rail* Required Hardware1x UNC ¼-20 heat-set insert (or more for the base)1x UNC ¼-20 screw (to mount your camcorder)10x M3 heat-set inserts (14x if you install the rear brace)10x M3x8mm screws (one button- or other low profile head for the cable arm)Optional HardwareM4 heat-set inserts - You can drill out the printed threads and use M4 inserts (since ¼-20 hardware is quite expensive and hard to find)1x UNC ¼-20 tap to refine the printed threads Printing Required parts are:TopBaseSidepiece - frontSidepiece - rearOptional are:Cable - armCable - hookBrace - rearBase - grip adapterNATO - rail*Supports:The parts can be printed mostly without supports or skirts with exception of:rear shoe on “Top” requires local supportscutout for the cable arm on “Base”requires local supportssidepiece front/rear requires skirt/brim - possibly support for near holes“NATO - rail” (45° overhang) possibly requires supports I printed my parts in Prusament PC-blend because i wanted to test the filament (i had some warping issues). I think you will be fine with using PLA or PETG, just keep in mind that the ¼-20 threads are printed. You of course could drill the treads out and install heat-set inserts etc.. Assembly Remove support materialInsert heat-set threads in “Top”:5x M3 on the right side (for sidepieces)2x M3 on the rear left (for brace)Insert heat-set inserts in “Base”:4x M3 on the right side (for sidepieces)2x M3 on the rear left (for brace)1x M3 at cutout (for cable arm)1x UNC ¼-20 from the bottom (to mount e.g. quick release plate)(I used 2x M4 on the front for grip adapter as i didn't have the right ¼-20 screws)Assemble cable arm:Screw “Cable - hook” to “Cable - arm” using a M3 screw and washer.To secure the screw in the cable arm use e.g. super glueMount the cable arm in “Base” Assemble cage using 10x (14x when using brace) M3x8 screws consisting of:BaseTopSidepiece - frontSidepiece - rearKeep in Mind: Mount the camcorder before you add the rear brace, this way you can slide the camera-strap around the base.(brace) Et voilà! That's how your cage should look like: *Nato-rail:Here is the drawing i used to model the NATO-rail:Source:https://de.m.wikipedia.org/wiki/Datei:STANAG_4694_%E2%80%9CNATO_Accessory_Rail%E2%80%9D_1.jpg Originator: NATO Army Armaments Grouphttp://www.dtic.mil/ndia/2009infantrysmallarms/wednesdaysessionvArvidsson.pdf
With this file you will be able to print Panasonic HCV-777 Cage with your 3D printer. Click on the button and save the file on your computer to work, edit or customize your design. You can also find more 3D designs for printers on Panasonic HCV-777 Cage.