Overlord Pro - Dial Indicator mount
thingiverse
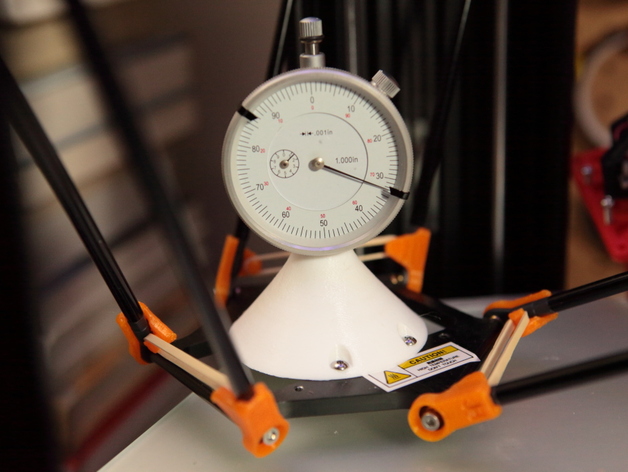
The paper test isn't really my thing, I'm a numbers person. Two models are showcased below. Take note that the Overlord Pro was initially sold with a resolution of 100 micron. Don't get too worked up if you can't achieve perfect repeat-ability. Dial indicators are super sensitive and will move quickly even at a low precision setting of 50 micron or .002in. It's worth mentioning that dial indicators themselves come with some tolerance issues, which can add to the overall problem. There are two mounts listed: 1) The V2 model is a cone-shaped design that fits perfectly on a standard 1" range dial indicator. It will securely clamp onto the shoulder of the indicator using a 9.4mm diameter clamp and has enough clearance to accommodate a 3/8 (9.525mm) if your filament can stretch. To secure it tightly, use a 3mmx20mm screw. A relief is built in for a standard 3mm nylock (5.5mm from one flat side to the other). Note that PLA printing works best with V1a, not V2. 2) The V1a model acts as a universal bracket and can hold almost any type of dial indicator with a mounting tab on its backside. It shares roughly the same dimensions as a standard Mitsumi analog dial indicator. For added room for error, the slot is designed to be 3.5mm in width. The provided slop enables you to fine-tune your adjustments until the dial indicator is perfectly centered through the hole of the mounting plate. To secure it tightly, use a 3mmx25mm screw. To put things into perspective, there's about 7mm gap between "towers" and the thickness varies, so they face forward for easier reading. The design wasn't perfect – one tower was thinner than I wanted it to be.
With this file you will be able to print Overlord Pro - Dial Indicator mount with your 3D printer. Click on the button and save the file on your computer to work, edit or customize your design. You can also find more 3D designs for printers on Overlord Pro - Dial Indicator mount.