Oven Hexaknob
prusaprinters
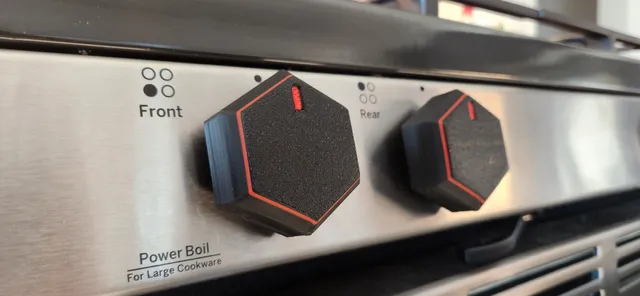
The injection molded knobs on my GE gas stove/oven failed within a year. The ridiculous price GE asked for a single knob (~$15 or more) compared to a set of generic alternatives (5 for $25) resulted in simply spending less for the same outcome - Loose and dangerous knobs! Well if I am going to have to replace these once a year I may as well print the f&*#ers myself for about $0.50 each! And f*#k GE and the copycat/generics for their designed to fail parts (I disassembled them, they made choices that had little to do with cost that resulted in a less reliable component). Knobs shoudn't be a consumable on a home kitchen stove, man! This will not stand, you know. This aggression will not stand, man. I have included a step file of my labeled model and a plain version to make remixing (or embossing with PrusaSlicer) easier for people. For example, you may need to align an ignition, high or low in a different orientation. Or maybe you want numbers, the sky is the limit! Some printing recommendations:Can easily be printed with a 0.4 or 0.6mm nozzle. Small details may become an issue with a larger nozzle. Pictured knobs were printed with a 0.6mm nozzle at 0.2mm layer height.At a minimum ensure there is enough walls/perimeters to have solid material around the D cavity/shaft that will be pushed on the potentiometer. This is obviously where most of the torque will be applied in use and any weakness in slicing choices to save a few grams may result in printing a whole new knob sooner.The first layer is the “face” of the knob so you want a perfect first layer. Watch your overhang speed/cooling, the major chamfer angle is 50 degrees which shouldn't be an issue for most modern machines. You're going to be looking at them a lot so slow down and make them nice. If you want to get fancy throw in a color change to highlight the top marker. A real Filament Bae will sprinkle on some first layer settings modifiers for a single perimeter to optimize the monotonic line evenness (c'mon Joe get it into PrusaSlicer, it has been in SuperSlicer forever!) I don't have a multimaterial printer so I have no advice for you folks, you do you boo.The pictured knobs were printed in Overture PLA Pro on a modified Ender 3. I have had surprisingly good results using this filament in printer cooling ducts so I will see how they last on my stove under general use. I will most likely remove them prior to any high temp cleaning cycles. YMMV with any PLA and your stove/oven. PETG, ABS are the obvious alternatives, but get as exotic as you want I guess. I'm not your supervisor!Additionally, you may find the knobs are easier to clean if you apply some kind of external smoothing coat (e.g. epoxy, resin, etc) I have not done this… yet. I don't know what would be most suitable… yet. Didn't design this for the competition but it was lucky timing :) Don't like this or vote for it though, it was stupid simple with some basic skills in Fusion 360, and took no time whatsoever :P
With this file you will be able to print Oven Hexaknob with your 3D printer. Click on the button and save the file on your computer to work, edit or customize your design. You can also find more 3D designs for printers on Oven Hexaknob.