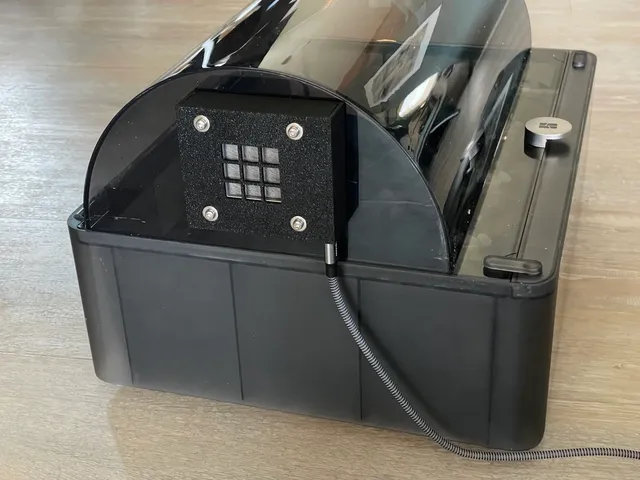
Outside Mounting Cover for Rosahl M-3M1R Electric Dehumidifier Membrane based Filament Drybox or Bambu Lab AMS
prusaprinters
This is an alternative mounting cover/frame to the original one for a Rosahl M-3M1R electric dehumidifer membrane with a very low mounting profile on the inside. This makes it suitable for mounting to a Bambu Lab AMS and hence turning the AMS into an electric dehumidifier without the need for any desiccant anymore. Along with a USB-C power supply module it's a convenient and low power consumption dry storage solution.Operation PrincipleRosahl dehumidifiers are based on a solid-state polymer membrane. When supplied with a 3V DC voltage, moisture on one side is being decomposed into Hydrogen ions and Oxygen, the Hydrogen ions pass the membrane and recombine with air Oxygen to moisture again on the other side and get discharged. The Rosahl dehumidifiers are compact, work fully mainenance-free and the power consumption is very low.The Rosahl M-3M1R membrane is suitable for storing multiple filament spools in a storage box of around 50-80l. With pre-dried filament spools (especially spools made of cardboard contain quite high moisture) a continous storage at approx. 15% rH and less is achievable. See diagram in pictures.Bambu Lab AMSI found that the Bambu Lab AMS is not as well sealed as the manufacturer states. Compared to a 50l storage box with gasket, where I achieved 5% of end humidity inside, the AMS can get down to like 16%, which is still considered a proper humidity level, see picture.The Bambu Lab AMS sitting on top of the P1P/P1S/X1C printer gets passively heated a bit during print operation and hence further reduces relative humidity inside the AMS and makes the M-3M1R even more efficient!PrintingThe mounting cover is made of three parts, see pictures. All can be printed without any supports needed. The inner fixture requires a bit of bridging, so please check in the slicer if it did chose the proper bridging direction.I printed with Overture PLA Professional on a Bambu Lab P1S. A .3mf file is available along with the STL models.Assembly/MountingThe inner fixture can be held upside-down to desired mounting position for marking the mounting holes. I found it works best to drill a first hole and then insert a screw into that hole to fix the position and then use the cover to drill the subsequent holes. I used a 3mm drill since the fixture has slightly larger holes and will hence comcompensate a bit of tolerance while drilling the holes.Next the larger hole for the membrane has to be marked and cut out with e.g., a Dremel with a cutting disk.When mounting to the Bambu Lab AMS it's preferable to drill a row of 3mm holes around the mebrane area and go with a small round file from hole to hole and finish with a flat file. See pictures of the M-1J1R outside cover for processing steps.The inner fixture has two compartments, one for the M-3M1R membrane and one for the USB-C power supply module. The cables from the power supply to the membrane are routed through a hidden tube within the part. Feed the cables through that tube and solder the USB-C power supply on one end and 90° flat-connectors to the other end. Those are more convenient to solder than soldering directly to the membrane terminals. See below part list.The USB-C power supply slides into a slot-like compartment, see pictures.Before inserting the M-3M1R membrane make sure to insert a rubber sealing ring below the membrane into the recess.When the membrane and the USB power supply module are inserted, the outer cover can be slid over the inner fixture. It holds the membrane in place.Now the full part can be mounted to the enclosure with the original M-3M1R gasket going in between the part and the wall.If the box wall is too soft and bends a bit away from the gasket you can add the back plate to the inside, which ensure proper sealing. This is not required for the Bambu Lab AMS, but it doesn't hurt adding it.Parts NeededThe Rosahl M-3M1R dehumidifier membrane is available here, same for the USB-C power supply module here.50l storage box: https://www.amazon.de/gp/product/B0CLDT4815/ (I prefer those over the often used Ikea Samla boxes because they come with a decent sealing/gasket.) or a Bambu Lab AMS!1x 4.8mm flat connector: https://www.amazon.de/gp/product/B07GRH2Y71/1x 6.3mm flat connector: https://www.amazon.de/gp/product/B07BDNR5CQ/Rubber sealing ring (49/45mm outer/inner diamer, 2mm thick): https://www.amazon.de/gp/product/B07FY9ZYYD/4x M3x30 screws plus nuts/washer (length would depend on the box wall thickness used). For the Bambu Lab AMS use 4x M3x35!optional hygrometer: https://www.amazon.de/gp/product/B0BXRDWYG2/ (I prefer these over the commonly used cheaper black ones since they measure down to 10%RH and use an easier to source CR2032 battery instead of those LR-something silver oxide cells)A kit with the M-3M1R membrane, USB-C module and above parts (except the storage box) is available here.CommentsYeah, the Rosahl membranes are not cheap but they are crazy efficient when it comes to power consumption with less than 2W continously. I leave them running 24/7 without the need for ever re-drying a spool in a conventional filament drying or oven which would require significantly more power.Updates27.08.2024: Updated the inner part (M-3M1R_inner_frame.stl) because on some membranes a rubber spacer does protrude the top metal cover slighty and conflicts with the connector cutout width. On the new STL the cutout is 2mm wider. The .3mf file has been updated as well.
With this file you will be able to print Outside Mounting Cover for Rosahl M-3M1R Electric Dehumidifier Membrane based Filament Drybox or Bambu Lab AMS with your 3D printer. Click on the button and save the file on your computer to work, edit or customize your design. You can also find more 3D designs for printers on Outside Mounting Cover for Rosahl M-3M1R Electric Dehumidifier Membrane based Filament Drybox or Bambu Lab AMS.
