Outdoor Wall Light - tardis style
prusaprinters
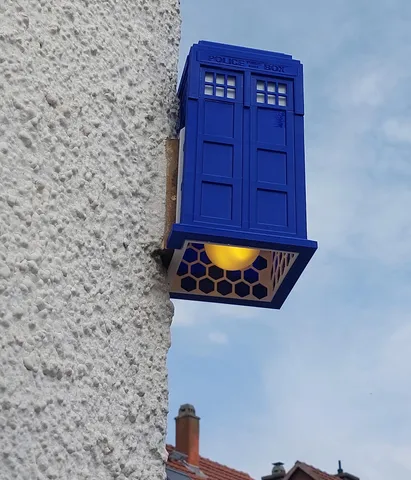
Update: a new version of the tardis-cover is nearly finished (minimum 4 perimeter, symetrical, prepared to be printed in parts. Estimated date: end of aprilA modular wall mounted light, with the possibility of adding individually styled covers.The light consists of 5 modules:1.) the Bulb-base - see shopping list2.) the Core: that is the hex-mesh that mounts to the wall, holds, the Bulb-base, the Shade and the Cover.3.) the Adapter, that defines the wall mounting for the core. Core and Adapter need to be merged to one printed module (blender, cad or slicer). Any custom made Adapter needs to have same dimensions as the original to allow the Cover to fit onto the Core.4.) the individual CoverThe Tardis.v1-Cover is designed for fixture at the corner of a house (see images)5.) a Shade, that allows for shading the light individuallyNeeded besides Printer-Parts:Bulb-base: https://amzn.to/3PLhC2f or others - check hole distances.Wire Connectors: https://amzn.to/4aFHTHz, https://amzn.to/3TWM10b or others2 M5-Screws for the Adapter-wall-connection (check with your individual wall ;-)2 M3-Screws and nuts for the fixture of the bulb-base to the coreKnown issues:Tardis-Cover top and bottom do not fit perfectly together. Working on v2 with:Thicker walls to shield more of the light through the blue filamentAdapted Dimensions to allow better printing in 2 parts and fitting them together.Shade is “work in progress” and highly dependent on the bulb size. Upload pending.The flat adapter - fixed plain on the wall requires to digitally cut the wall-side-base of the tardis. Keep that in mind using e.g. custom CoversDisclaimer:Ensure that you install the light according to your local codes regarding electricity and water resistance. If unsure consult your local electrician.Printing / Installation Help:The cage has dimensions: 115mm x 115mm x 150mm. The Adapter extends out of these dimensions. The cover has inner dimensions 118mm x 118mmSelect the Adapter or design your own and merge with the cageMount two 10cm wires and add wire connectorsMount a bulb-fitting into the cageScrew the Cage to your wall, connect the wires accordingly - be sure that the power is off (fuse or switches)Place the cover over the cage.Tardis:Cover (v1)Print both covers (top and bottom), glue them together and push the window module into it.
With this file you will be able to print Outdoor Wall Light - tardis style with your 3D printer. Click on the button and save the file on your computer to work, edit or customize your design. You can also find more 3D designs for printers on Outdoor Wall Light - tardis style.