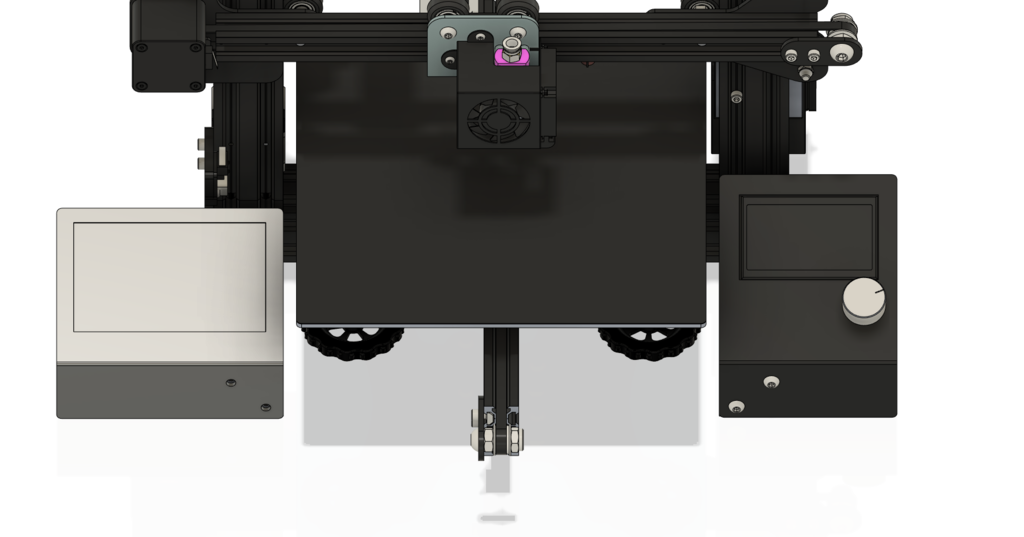
OSOYOO 5inch DSI Touch Screen Mount for Ender 3/Pro
thingiverse
My old Touch Screen design was not working very well with OctoDash since it performs best with a high refresh rate and at least a 5 inch screen, so I picked up this touch screen and built a mount for it. Since this LCD only needs one ribbon cable, I decided to build a mount just for the LCD. This way you can mount a Raspberry Pi 3/4 anywhere as long as you can feed this LCD the ribbon cable it needs. It also requires no drivers and this mount doesn't require rotating the display - it is 100% plug-and-play. Here's a link to my modified Pi3/4 case with a V slot mount I'm using: https://www.thingiverse.com/thing:4536100 You need at least a 150mm ribbon cable for this project. F3Z Files Included. Links: OctoDash - https://github.com/UnchartedBull/OctoDash OctoPi - https://octoprint.org/download/ Malolo's Pi 3 Cases - https://www.thingiverse.com/thing:3719217 Malolo's Pi 4 Cases - https://www.thingiverse.com/thing:3723561 BOM: The catch is that the Touch Screen comes with a 100mm ribbon cable, which won't get you much more than the raspberry pi sitting directly under the connector on the LCD. This touch screen needs a type A ribbon cable, and all the Raspberry Pi ribbon cables are type B. To solve this problem, you need to find a 15-pin type A FFC ribbon cable with same-side connectors. I could only find them on Mouser and Digi-Key. Even then, the selection is small, and I couldn't find any longer than 100mm on AliExpress. Here are some links to the selections they provide: 1x OSOYOO 5 Inch DSI Touch Screen - https://www.amazon.com/gp/product/B07KKB5YS9 5x M2x8mm Hex Socket Head Cap Screws 5x M2 Nuts (Possibly Optional) 1x FFC Jumper Cable with Same-Side Connectors at whatever length you require OSOYOO 5 Inch DSI Touch Screen - https://www.amazon.com/gp/product/B07KKB5YS9 VIGRUE M2-M3-M4-1080PCS Stainless Steel Screws and Nuts - https://www.amazon.com/gp/product/B07KKB5YS9 Mouser links: 152mm - Perfect for my linked case and the Pi sitting directly under the LCD - https://www.mouser.com/ProductDetail/710-686615152001 203mm - https://www.mouser.com/ProductDetail/538-15039-0847 254mm - https://www.mouser.com/ProductDetail/538-15039-0851 Don't remove the parts from the print bed until it has reached close to room temperature. This makes sure the parts come off perfectly flat, which is especially recommended on LCD Front part as it has a 0.4 mm thick layer that covers the LCD. LCD Front should have four walls instead of three. So that the diagonal piece sticking off the print bed has 100% infill to make it as strong as it needs to be and so that the print head moves straight across it when printing. This makes it look nicer as well, and something this thin will probably have infill marks on the outer walls. Install Notes: - Run a M2 screw through all the holes to break the bridging. - Press in the 5x M2 Nuts with a pair of needle-nose pliers (preferably angled). I made the screw holes on LCD Front small enough you might be able to get away without the nuts if you want. It seemed to be strong enough in testing without nuts. - Install the LCD into the LCD Front part. - Place the LCD Back part on. - Screw in the 5x M2x8mm screws till they are snug (not tight). - Install the ribbon cable by using a small screwdriver or Allen key to assist you. The exposed contacts should face down toward the PCB. It is easy once you have done it the first time. - Place the assembly on the Ender 3/Pro and start both screws but don't tighten yet. - Press down firmly on the area below the LCD but just above the mounting screws so that the cut away on the back is held against the aluminum extrusion. - Then tighten the top then bottom screw while holding it down. - The LCD mount should be just as solid as the stock metal one on the other side and not flex when you tap the LCD.
With this file you will be able to print OSOYOO 5inch DSI Touch Screen Mount for Ender 3/Pro with your 3D printer. Click on the button and save the file on your computer to work, edit or customize your design. You can also find more 3D designs for printers on OSOYOO 5inch DSI Touch Screen Mount for Ender 3/Pro.
