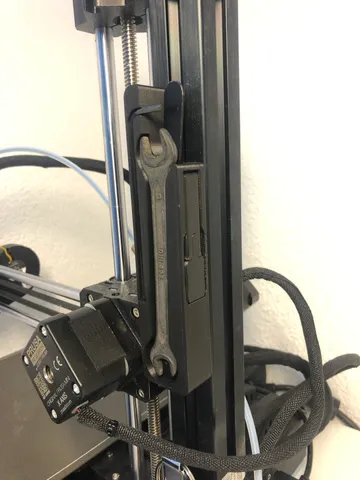
Original Prusa Mini Tool Holder
prusaprinters
Print this toolholder for the Original Prusa Mini to store the included tweezers, hexkey and wrench in the printer itself. As a bonus the toolholder has space for an additional 3D printed scalpel.The tools are hold in with magnets and are bolted to the Z-axis.Ready to print files for Original Prusa Mini /Mini+ in PLA and with 0.1mm layer height are provided. Additional materials needed4 x 5x2mm disc magnets2 x M3 insert or M3 nut (DESON Threaded Insert M3 Insert Nut Embedded Knurled Nut Brass Embedded Nuts Round Nuts for Plastic Parts 3D Printed Parts by Ultrasonic Warm Embedding (M3) Pack of 50 : Amazon.de: DIY & Tools)2 x M3 bolt (6 to 8mm long if inserts used and 10mm long if embedded nuts are used)2 x 9mm washer1 x 8x8x0.5mm magnetic plate (can be cut from a can lid or any other scrap sheet metal)1 x scalpel blade (the scalpel handle works with 3 different brands of blades that I tried) (Filzada ® 120 x Ultra Sharp Skallpel Blades - Replacement Blades for Scalpels, Hobby Knives, Craft Knives - Includes Storage Box : Amazon.de: Home & Kitchen) Printing tips Ready to print files for Original Prusa Mini /Mini+ in PLA and with 0.1mm layer height are provided.You only need to print one T-Slot Fastener. Choose whether you want to use threaded inserts or embedded nuts. Tool holderThe tool holder uses embedded magnets to secure the wrench and hexkey. Therefore, it is not advised to use global supports. Instead use support enforcers on the three openings (opening and overhang for the scalpel handle, opening for the tweezers, through hole for the top bolt) as shown in the picture below.To embed the magnets, use a material change on the layer height 14.2mm to insert the first two magnets and at 15.0mm to insert the last two magnets. The material change pauses the print while keeping the heated bead warm, which allows you to insert the magnets with no hurry. Use a material change instead of a pause, so that the printer primes the nozzle before it returns to the print. Make sure you remove the excess material with tweezers! To ensure the magnets don’t get pulled out by the hotend as it prints the next layer, glue the magnets into the designated recess with a glue stick or anything similar. T-Slot Fastener with embedded NutsTo embed the nuts, use a material change at layer height 5.1mm to insert the two nuts. Scalpel HandleUse a material change at layer height 3.3mm to insert the magnet. Assembly tips Tool HolderGlue the 8x8mm magnetic plate into the designated recess on the side of the toolholder. This allows the scalpel handle to be held in place by magnetic attraction. T-Slot Fastener with InsertsAfter a successful print, use a soldering iron to heat up the insert and push it into the designated hole of the T-Slot Fastener. Mounting to the printerUndo the two bolts securing the Z-axis motor assembly to the aluminium extrusion.Undo the two bolts securing the two guiding rods to the motor bracket.Lift the motor bracket off the guiding rods and rotate it out of the way, so the T-Slot Fasteners can be inserted into the aluminium profile. Be carefull to not stress the motor cables on the back of the Z-axis.Redo all the bolts and mount the Tool Holder to the T-Slot Fasteners.
With this file you will be able to print Original Prusa Mini Tool Holder with your 3D printer. Click on the button and save the file on your computer to work, edit or customize your design. You can also find more 3D designs for printers on Original Prusa Mini Tool Holder.
