Original Prusa i3 MK2/MK2S/MMU pinda probe cooler
prusaprinters
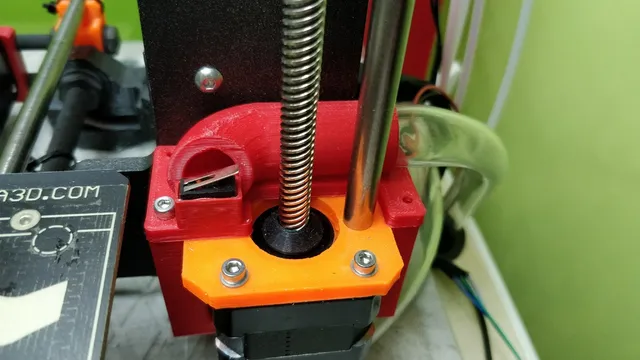
The PINDA probe on the original PRUSA i3 MK2/S has an achilles heel: when it heats up, it detects the bed too early. (This will be remedied by the soon to be released PINDA 2 which actively compensates for the temperature of the probe). This is particularly a problem when printing materials requiring a high bed temperature in an enclosure, especially if a print is aborted and restarted soon afterward. This cooler helps with this issue by blowing unheated air from outside the enclosure over the PINDA during the bed heating cycle. MATERIALS REQUIRED: 1x EK1713 Limit Switch 1x 50X15mm centrifugal fan This can be either 5v or 12v, depending on how you plan to power it. 2-3 feet of 9/16" OD Vinyl tubing Commonly sold by the foot at most hardware stores Wire Power supply for fan M3X10mm machine screws (x8) Post-Printing Wiring Because the cooler is triggered mechanically, there are many options for powering the fan. The simplest is to repurpose a suitable AC to DC wall transformer. Wire the limit switch as follows Positive lead of power supply -> Common terminal of limit switch (C) Normally open terminal of limit switch (NO) -> Fan positive terminal Fan negative terminal -> Negative lead of power supply. ADVANCED OPTION: It is also possible to power the cooler using the Mini-rambo's outputs. I will not describe this process in detail since you could damage your printer if you don't know what you are doing. On the V1.3 mini rambo, A 5V blower fan can be powered by pin 2 and pin 4 of the P3 expansion header A 12 volt blower can be powered from the mini rambo by multiplexing the part cooling fan output. Use the NC and C terminals of the limit switch to direct power to the part fan when the limit switch is open, and the NO and C terminals of the limit switch to divert power to the pinda cooler when the limit switch is closed. You would also need to alter the startup gcode to activate and shutdown the part fan for this setup to work. (M106 S255 ; turn on part fan M106 S0; turn off part fan.) Assembly Press the limit switch and wiring into the cooler nozzle. The free end of the limit switch arm must face away from the heatbed. Place the cooler nozzle on top of the right Z axis stepper motor. Slide the bottom bracket under the motor, taking care not to pinch the stepper motor's wiring. Secure the nozzle to the bottom bracket using 4* M3X10mm machine screws. Insert the blower motor into the fan holder body, taking care to route the fan wires through the smaller hole. Secure the fan cover to the fan body with 4* M3X10mm machine screws. 9/16" OD vinyl tubing serves as an air duct between the blower and nozzle. The blower must be mounted outside the enclosure. Slic3r startup gcode to activate cooler Startup gcode is used to activate the cooling fan by moving the tip of the pinda probe to the X and Z coordinates where it activates the limit switch. IMPORTANTSome calibration of the exact X and Z position may be necessary. You may need to change the values in bold below to ensure that everything activates properly. May not be compatible with all fan shroud designs ;EXAMPLE STARTUP GCODE M115 U3.0.12 ; tell printer latest fw version ; Start G-Code sequence START T[initial_tool]; M140 S[first_layer_bed_temperature]; G21 ; set units to millimeters G90 ; use absolute coordinates M83 ; use relative distances for extrusion ;START OF PINDA COOLER GCODE G28 X Y Z; Home X Y and Z axes G90; Switch to absolute coordinates G1Z5 F2000; Raise nozzle to 5mm above bed G1 X230 F8000; Rapid move to end of x carriage; G1X247.5 F600; Slowly move to limit switch M190 S[first_layer_bed_temperature]; M104 S[first_layer_temperature]; G4 P60000; dwell for 30 seconds (gives extruder time to heat) G1 X220 F600; back off to turn off fan ;END PINDA COOLING SEQUENCE G28 W ; Mesh bed levelling routine with a cool pinda G80 G92 E0.0 M203 E100 M92 E140 ;(change if setting a custom esteps/mm value) M109 S[first_layer_temperature]; If extruder not at temp yet, wait for it. G1 Z0.250 F7200.000 G1 X50.0 E80.0 F1000.0 G1 X160.0 E20.0 F1000.0 G1 Z0.200 F7200.000 G1 X220.0 E13 F1000.0 G1 X240.0 E0 F1000.0 G1 E-4 F1000.0 G92 E0.0 Category: 3D Printer Parts
With this file you will be able to print Original Prusa i3 MK2/MK2S/MMU pinda probe cooler with your 3D printer. Click on the button and save the file on your computer to work, edit or customize your design. You can also find more 3D designs for printers on Original Prusa i3 MK2/MK2S/MMU pinda probe cooler.
