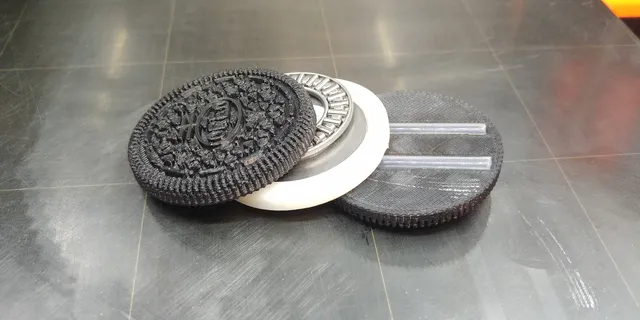
Oreo Cookie Sliderotor (Sliding and Rotating Fidget)
prusaprinters
This is a combination sliding and rotating haptic fidget toy that looks just like a real Oreo cookie. Here's a video showing how it should work, and a couple ways of playing with it.Bill of Materials (BOM)5x3mm round neodymium magnets - x146x3mm round neodymium magnets - x96x2mm round neodymium magnets - x9Thrust Needle Roller Bearing 20x35x4 - x1 (should come with two washers)4mm OD PTFE tube - at least 80mm length. ID does not matterBlack filament and white filament. ABS makes a nice, clean print for the cookie, but anything is fine.Printing can be tricky, because these are designed to trap the magnets in the print rather than gluing them in later. I found that glue will break loose over time, so now I do all my magnetic fidgets with embedded magnets. This requires that your hot end does not have any ferrous metals near the print, or that the magnets fit snugly. Also, because there are so many different kinds of magnets and installed at different times at different levels, it's VERY easy to install magnets with the wrong polarity. To top it off, the magnet at the center of the circular group needs to be opposite polarity from the 6 that surround it. As such, it's a good idea to plan out the magnet installations, and even mark them some how so that you can install them correctly even if they get turned around (like if you drop them!). I'll detail the orientation for them all below. You can use a polarity detector app on your smartphone to figure out which side is North (+) and which is South (-).If you want to risk glue breaking loose and would rather not print the magnets into the piece, then you can just grab the models and shave the bottom layers (and top layers of the filling piece) off to expose the magnet pockets before printing. Flue glue, blue cap Gorilla brand super glue is a good choice, as it remains flexible after curing, and should not allow the magnets to break free as easily as regular super glue.Having a THWACK mallet on hand to help stubborn magnets into their pockets is not a bad idea.Printing the cookie (black)Make sure your first layer is on point, because I use a 0.1mm first and second layer, to make sure there is a strong surface holding the magnets in without being too thick.Pause at the layer just before the bridging over the magnet pockets to install the magnets. In the 3mf and gcode provided, this is at 3.4mm.For the set of 7 magnets (5x3mm) in a circle in the center of the print, all but the one in the center should be North (+) pole pointing up. The center one should be South (-) pointing up.For the set of 9 magnets (6x3mm) in a grid pattern, all should be South (-) pole pointing up.Printing the filling (white)Make sure your first layer is on point, because I use a 0.1mm first and second layer, to make sure there is a strong surface holding the magnets in without being too thick.Pause at the layers just before the bridging over the magnet pockets to install the magnets. In the 3mf and gcode provided, this is at 2.6mm and again at 5.9mm.For the set of 9 magnets (6x2mm) in a grid pattern (first pause), all should be North (+) pole pointing up.For the set of 7 magnets (5x3mm) in a circle in the center of the print (second pause), all but the one in the center should be North (+) pole pointing up. The center one should be South (-) pointing up.If everything went according to plan, then all three parts should hold together by the magnets. If not, or if the filling layer needs to be up-side down, then you'll need to re-print it. A heat gun is an easy way to get the magnets out if you want to reclaim them. Or, if you want two fidgets, remember to do reverse polarity for the other two cookies. ;-)The rest of the assembly is easy. Put the washers into the pockets, and then the thrust bearing between those two halves. Cut some PTFE to pop into the channels on the other cookie, and you're good to go. Part of this was based on the Oreo Haptic Coin by mming1106 on Thingiversehttps://www.thingiverse.com/thing:4346263 Which was, itself, based on the Detailed Oreo STL by jdexterbhttps://www.thingiverse.com/thing:3391808
With this file you will be able to print Oreo Cookie Sliderotor (Sliding and Rotating Fidget) with your 3D printer. Click on the button and save the file on your computer to work, edit or customize your design. You can also find more 3D designs for printers on Oreo Cookie Sliderotor (Sliding and Rotating Fidget).
