Orbox
prusaprinters
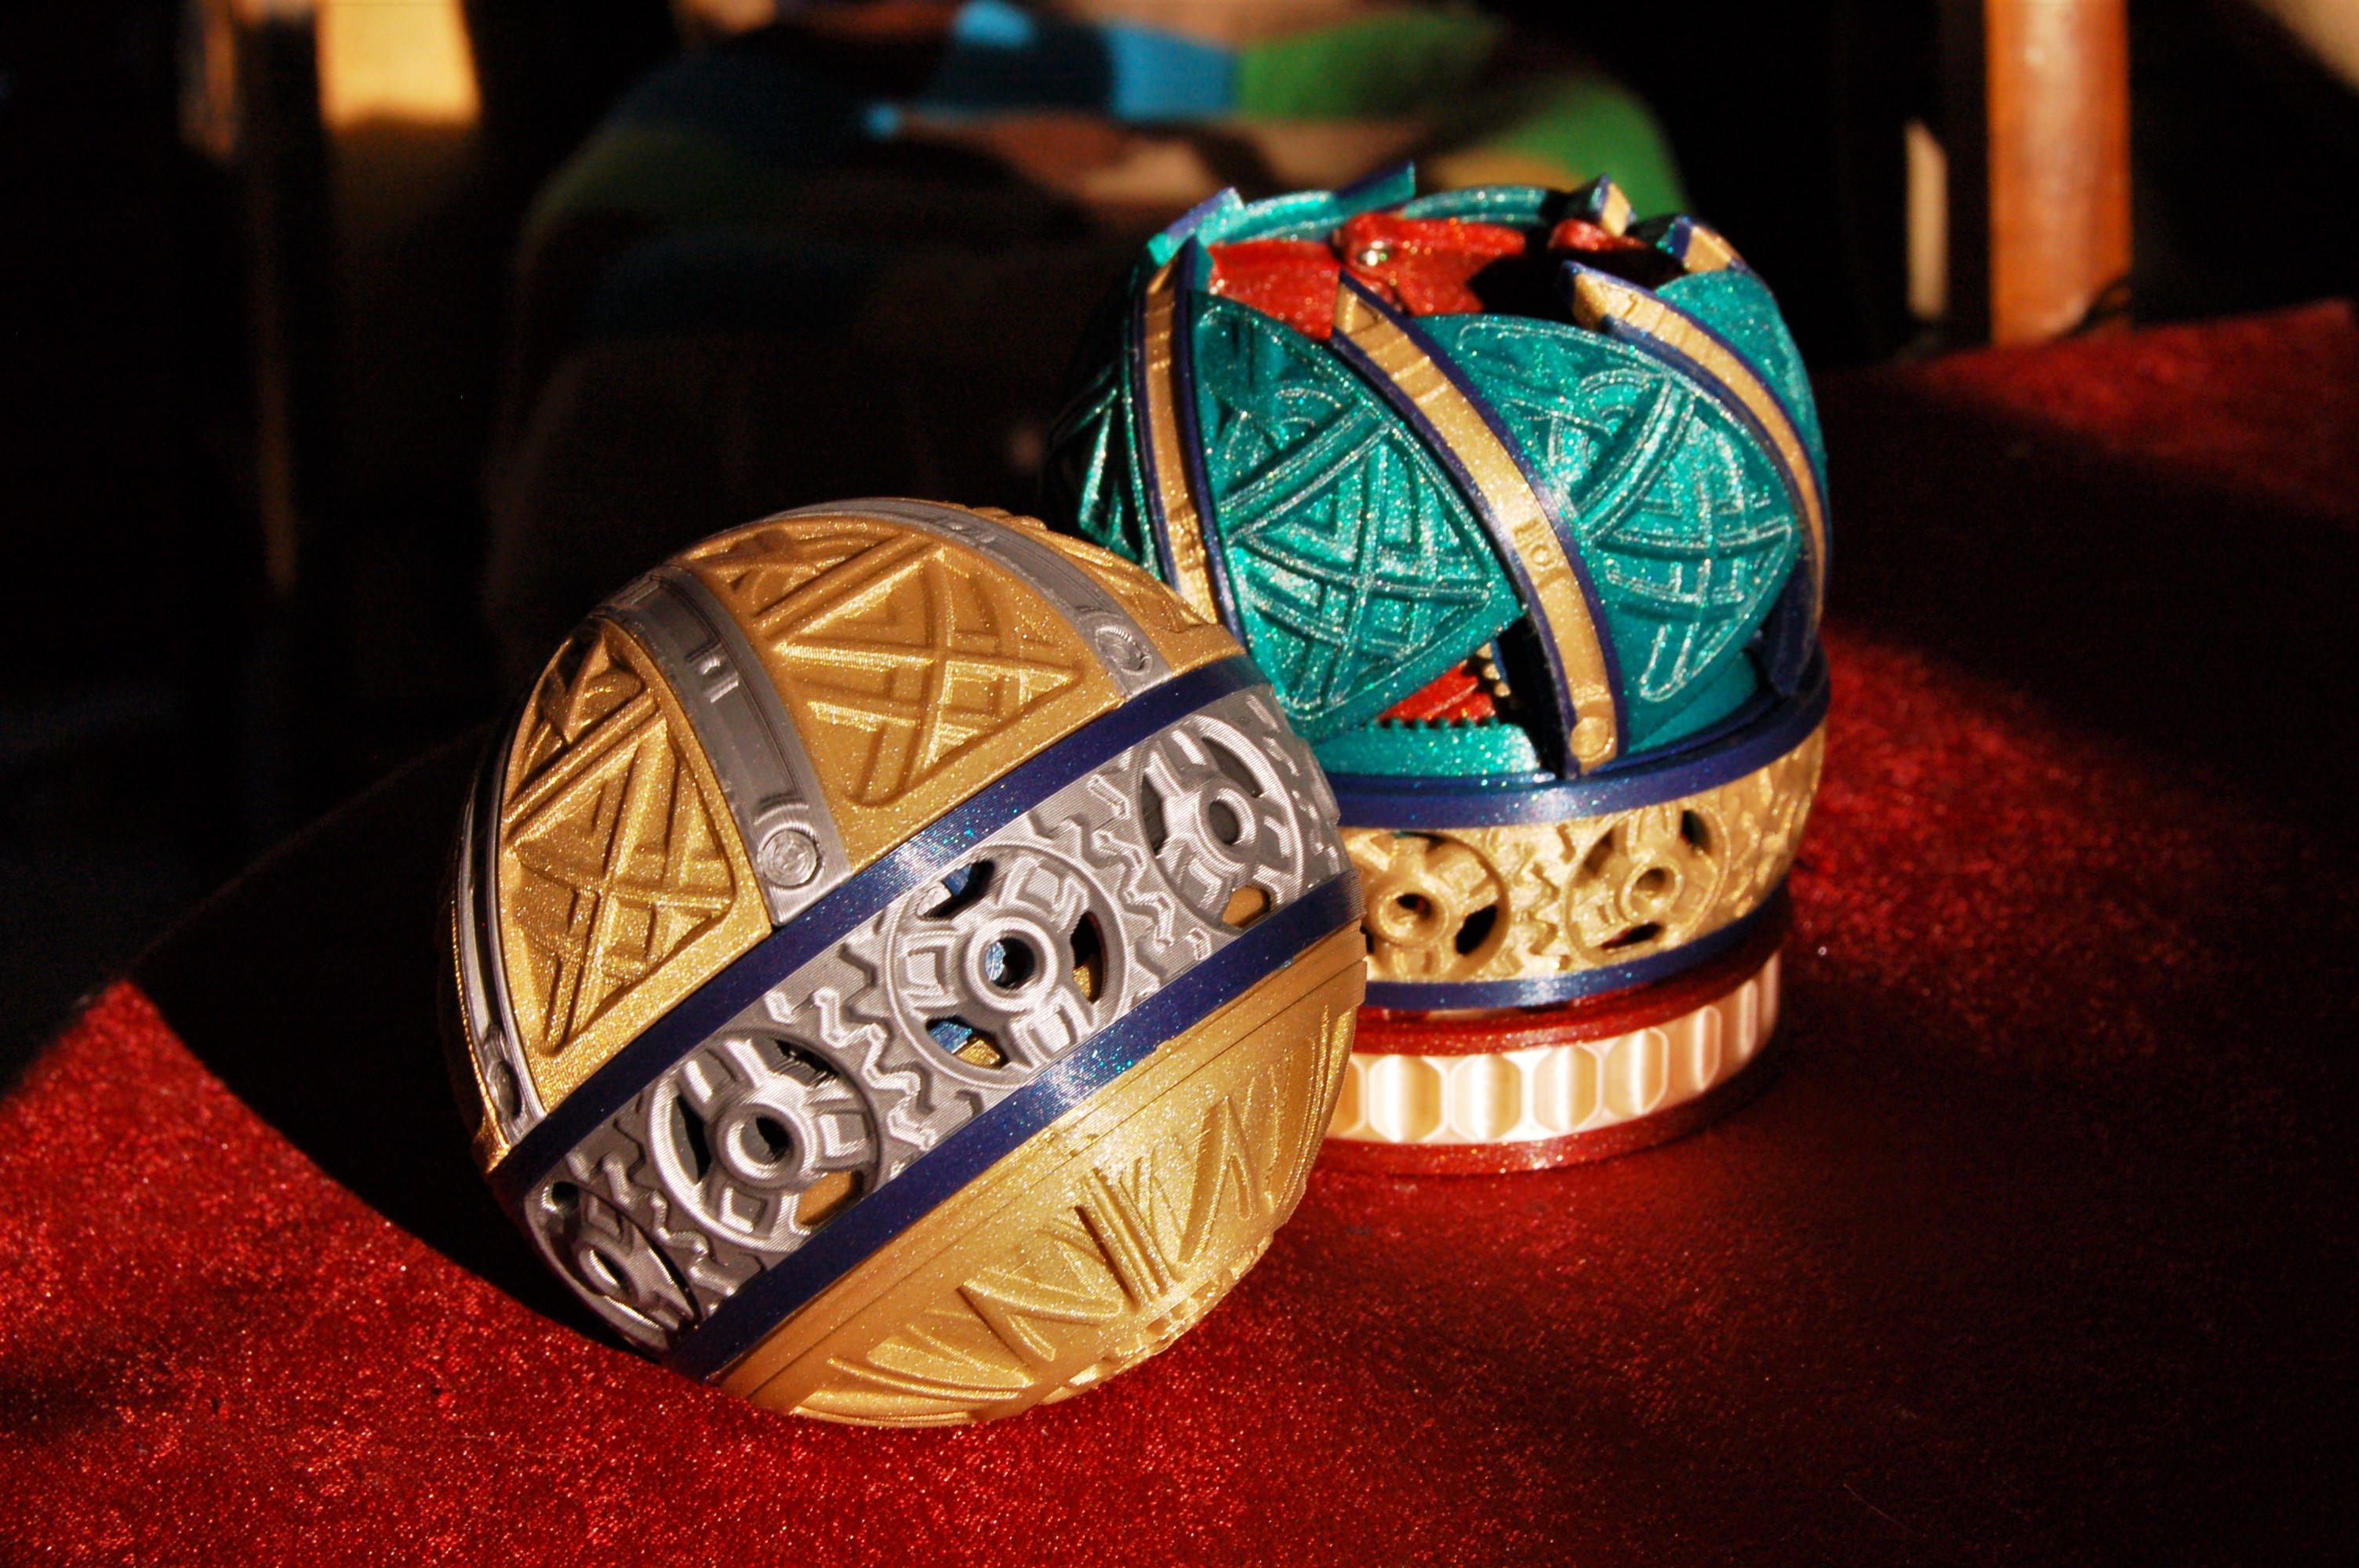
<p>This is an iris box design which is perfectly spherical when closed (81mm in diameter). No support material is required for this design, although on some parts a brim is recommended. The multicolour designs are achieved by simply doing material swaps on a standard single nozzle FDM printer.</p><p>The box is opened by turning the twist collar to unthread it and open the mechanism. It is further rotated, while holding the base stationary, which turns the gears and actuates the iris door. There is an optional stand which makes holding onto the base and using the box easier (and stops it rolling away when you put it down).</p><p>This was originally uploaded to MyMiniFactory in 2021, and I have now uploaded it here as well. I have 14 other iris boxes designs and I have an <a href="https://www.instructables.com/Decorative-Iris-Box-Guide/">instructable</a> describing them and how to print them.</p><h3>Box Styles</h3><p>There are a few decorative styles for the components: </p><ul><li>2 stands </li><li>2 bases </li><li>2 collars </li><li>2 gears </li><li>4 top door patterns</li></ul><p>Beware that the second top door style 'Top door 2' will only work with 'Bottom door 2' and vice versa. In addition there are blank versions for a smooth sphere surface (although the smooth base makes opening the box quite difficult).</p><h3>Parts Testing</h3><p>When printing the bottom and top doors, I highly recommend using a brim to help them stick to the build plate, which should be trimmed off afterwards. The design requires 24 <a href="https://www.amazon.com/s?k=M2x6+countersunk+screw&rh=n%3A17290023011&ref=nb_sb_noss">M2x6 countersunk screws</a> to assemble (same as all my other designs) or M3x8 screws at 150% scale etc. </p><p>To test the fit of the screws, print one 'Top door' and one Gear. The screws should be tight (but hopefully not splitting the print) in the blind holes, and loose in the through holes. You can use contour/hole compensation in your slicer to account for this if there are problems.</p><h3>Parts Printing</h3><figure class="image"><img src="https://media.printables.com/media/prints/316852/rich_content/a1993e9c-e017-4ca6-a425-185a8695fd16/dsc_0135.jpg#%7B%22uuid%22%3A%227688aed0-70ae-4ea8-bdda-4f39afcc0f30%22%2C%22w%22%3A3008%2C%22h%22%3A2000%7D"></figure><p>For the box you will need to print: </p><ul><li>1x ‘Body’ </li><li>1x ‘Base’ </li><li>1x ‘Internal collar’</li><li>1x ‘Twist collar’ </li><li>7x ‘Gear’ </li><li>7x ‘Bottom door’</li><li>7x 'Top door'. </li></ul><p>There are also optional 'Screw covers' for the doors and the 'Stand' to sit the box on.</p><h3>Assembly Instructions</h3><h4> </h4><h4>Step 1</h4><p>Trim away the brim on the door parts using a craft knife and remove the print-in-place supports from the 'Bottom door'.</p><h4> </h4><h4>Step 2</h4><figure class="image"><img src="https://media.printables.com/media/prints/316852/rich_content/3a69f779-5ec4-40c3-8b81-6f6d08d15a04/dsc_0138.jpg#%7B%22uuid%22%3A%22259e35ca-47d2-4d50-ac3c-f71ae94a7a75%22%2C%22w%22%3A1780%2C%22h%22%3A1222%7D"></figure><p>Screw the rounded end of the 'Bottom door', to the top point of the 'Top door'. Then screw the other end of the 'Bottom door', to the middle hole of a second 'Top door'. Repeat this process until you have a chain of four bottom/top doors.</p><figure class="image"><img src="https://media.printables.com/media/prints/316852/rich_content/40bbff32-e23f-49a6-8695-98a65e0d697d/dsc_0141.jpg#%7B%22uuid%22%3A%22d710e5d2-750a-45d2-8ff6-60866a4e4590%22%2C%22w%22%3A3008%2C%22h%22%3A2000%7D"></figure><h4> </h4><h4>Step 3</h4><figure class="image"><img src="https://media.printables.com/media/prints/316852/rich_content/f2a14cb8-03cc-4fb6-8413-ca5adcf3d5d3/dsc_0146.jpg#%7B%22uuid%22%3A%2269bfe2e9-b574-4b79-aebd-9da65c88b6c0%22%2C%22w%22%3A3008%2C%22h%22%3A2000%7D"></figure><p>Take the two 'Top doors' on the ends of the chain, and match up their edges to form a loop. Then take the loose 'Bottom door' on the end of the chain, and fit the cam into the slot of the matched up 'Top' door.</p><h4> </h4><h4>Step 4</h4><figure class="image"><img src="https://media.printables.com/media/prints/316852/rich_content/ac00e458-88cb-4514-8b73-13d8ae91a3ad/dsc_0147.jpg#%7B%22uuid%22%3A%22312dbc0e-1e68-4065-9e4d-3e70c7a0bce1%22%2C%22w%22%3A3008%2C%22h%22%3A2000%7D"></figure><p>Fill in the gaps in the loop with bottom and top doors to complete the iris mechanism. The screws should be tight enough to keep the mechanism moving accurately, but not too tight to make opening it wth your hands difficult (it will loosen a little over time).</p><figure class="image"><img src="https://media.printables.com/media/prints/316852/rich_content/8da593ff-2ebe-47af-8724-a01b7d56bd14/dsc_0149.jpg#%7B%22uuid%22%3A%224d2ed381-318b-4b4d-bde0-809a362f15b1%22%2C%22w%22%3A3008%2C%22h%22%3A2000%7D"></figure><figure class="image"><img src="https://media.printables.com/media/prints/316852/rich_content/a3cfaccf-a68e-40aa-8300-ea6948695305/dsc_0153.jpg#%7B%22uuid%22%3A%2293d08f5c-e504-4937-9535-772dddbdd7ac%22%2C%22w%22%3A3008%2C%22h%22%3A2000%7D"></figure><figure class="image"><img src="https://media.printables.com/media/prints/316852/rich_content/c5ef8fe4-6a2e-45dc-bb4e-1cfb28fbe1bc/dsc_0152.jpg#%7B%22uuid%22%3A%224f43cffc-b666-4a28-b537-2c72aef76726%22%2C%22w%22%3A3008%2C%22h%22%3A2000%7D"></figure><h4> </h4><h4>Step 5</h4><figure class="image"><img src="https://media.printables.com/media/prints/316852/rich_content/87b74bc7-64aa-4743-b8e0-9fb015c5808a/dsc_0154.jpg#%7B%22uuid%22%3A%223e13d360-61f2-4c7e-985c-e2f1db2ed5dd%22%2C%22w%22%3A3008%2C%22h%22%3A2000%7D"></figure><p>Next move on to assembling the body mechanism. Take the 'Internal Collar' and thread it, gear end first, into the narrow end of the 'Twist Collar' until it stops. This may be tight at first depending on your printer tolerances. </p><figure class="image"><img src="https://media.printables.com/media/prints/316852/rich_content/142bd7d2-4321-48da-bde1-17af618448d0/dsc_0155.jpg#%7B%22uuid%22%3A%224cfbfc78-3cf4-410f-b7c6-39042eea021a%22%2C%22w%22%3A3008%2C%22h%22%3A2000%7D"></figure><p> </p><h4>Step 6</h4><figure class="image"><img src="https://media.printables.com/media/prints/316852/rich_content/7f126c7a-a021-49b5-a837-36b1c7cef92a/dsc_0158.jpg#%7B%22uuid%22%3A%22a8ccbcdf-ce70-44fc-9ebc-1c9772447040%22%2C%22w%22%3A3008%2C%22h%22%3A2000%7D"></figure><p>Place this collar assembly, gear end first, onto the narrow side of the 'Body' component. Then place the 'Base' component onto the same end of the 'Body', making sure to line up the internal screw holes. Now you can screw the 'Base' and 'Body' together using three screws. This should also retain the collar assembly, but it should be free to rotate.</p><figure class="image"><img src="https://media.printables.com/media/prints/316852/rich_content/31041321-b922-47b0-acdf-fc3271c57f79/dsc_0161.jpg#%7B%22uuid%22%3A%224a175ad6-9169-4491-a6b2-5c9f12171a21%22%2C%22w%22%3A3008%2C%22h%22%3A2000%7D"></figure><figure class="image"><img src="https://media.printables.com/media/prints/316852/rich_content/fdbb9dfe-eac9-479e-94aa-42586272b2d2/dsc_0164.jpg#%7B%22uuid%22%3A%22516eedfa-c226-4d98-b0e2-c1a95a75a6aa%22%2C%22w%22%3A3008%2C%22h%22%3A2000%7D"></figure><p> </p><h4>Step 7</h4><figure class="image"><img src="https://media.printables.com/media/prints/316852/rich_content/b9478bda-e79d-4167-addb-d8f47336b530/dsc_0166.jpg#%7B%22uuid%22%3A%22d99abc68-7ac8-431b-870a-988f3109dc18%22%2C%22w%22%3A3008%2C%22h%22%3A2000%7D"></figure><p>Tighten the three body screws all the way, and then back them off 2-3 turns. The gap between the ring gear on the body, and the ring gear on the collar should be just large enough for one of the small gears to snap in place, to help prevent it falling out later. Adjust the screws until they just allow the small gears to fit.</p><figure class="image"><img src="https://media.printables.com/media/prints/316852/rich_content/19a83676-86c4-4208-b5a0-75fd30f91b09/dsc_0167.jpg#%7B%22uuid%22%3A%22ce8dde5e-3c5d-4f49-bacc-6d8498074882%22%2C%22w%22%3A3008%2C%22h%22%3A2000%7D"></figure><h4> </h4><h4>Step 8</h4><figure class="image"><img src="https://media.printables.com/media/prints/316852/rich_content/44fc2268-06dd-4f5b-9cac-07f9a9ef61ae/dsc_0168.jpg#%7B%22uuid%22%3A%2237115992-fa58-4815-8856-80450c1a9bc3%22%2C%22w%22%3A3008%2C%22h%22%3A2000%7D"></figure><p>Now for the fiddly bit. The internal collar has 7 small notches around the perimeter, these are to line up the small gears around the body; the gears need to be both evenly spaced and at matching angles for the mechanism to work properly. I find it easiest to take each gear, and line the raised hole up with the notch on the collar. Then lightly press the gear into place on the body, making sure it is straight. I then repeat this process around the body pressing in all the gears. </p><figure class="image"><img src="https://media.printables.com/media/prints/316852/rich_content/04291777-fbb4-426d-9b7d-5be5bbdba875/dsc_0170.jpg#%7B%22uuid%22%3A%22c0e8ee07-6a50-4c40-964c-81e6efad94e9%22%2C%22w%22%3A3008%2C%22h%22%3A2000%7D"></figure><p>To prevent other gears falling out during this process, it can help to use a rubber band to hold them all lightly together. It also helps to lightly hold the body and base together to hold the gears in place. Do a quick check to make sure the gears are evenly spaced and match around the body, adjust any that are out of alignment. Now you can tighten the body screws to firmly hold the small gears in place (but not too tight to lock up the mechanism).</p><figure class="image"><img src="https://media.printables.com/media/prints/316852/rich_content/dd7a3c3b-8fbd-432d-a1be-f292a675b15e/dsc_0178.jpg#%7B%22uuid%22%3A%22e2015234-bd5c-41c3-b29d-a390253618c0%22%2C%22w%22%3A3008%2C%22h%22%3A2000%7D"></figure><p> </p><h4>Step 9</h4><figure class="image"><img src="https://media.printables.com/media/prints/316852/rich_content/16c8b34c-478d-41a6-a72d-3e4026b276cc/dsc_0179.jpg#%7B%22uuid%22%3A%22948d3ed1-0995-46db-bf34-3ddde639280e%22%2C%22w%22%3A3008%2C%22h%22%3A2000%7D"></figure><p>The small gears should turn in a synchronised fashion as you turn the collar (the gears can only be turned by twisting in one direction). Turn it until the raised gear holes line up at the open side of the body. You should be able to thread the twist collar back in until it touches the raised lip on the small gears, forming the lower hemisphere.</p><figure class="image"><img src="https://media.printables.com/media/prints/316852/rich_content/2fb4d96b-4a88-497b-a328-4c6727bc8937/dsc_0182.jpg#%7B%22uuid%22%3A%227c408c57-68e3-4198-86c3-b611676b9f84%22%2C%22w%22%3A3008%2C%22h%22%3A2000%7D"></figure><p> </p><h4>Step 10</h4><figure class="image"><img src="https://media.printables.com/media/prints/316852/rich_content/e8e777d8-aa36-425b-8599-91d15c4bf6ea/dsc_0183.jpg#%7B%22uuid%22%3A%22b97b867c-9066-42b8-bd32-1ddee87e8d23%22%2C%22w%22%3A3008%2C%22h%22%3A2000%7D"></figure><p>Now take the assembled iris in the closed position, and place it onto the body. Line up the door holes with the holes in the small gears; this will require adjusting the thread position to line up the holes vertically. Then screw in all 7 doors onto the small gears. Make sure these are tight to make sure the mechanism moves properly, but not too tight to lock it up. </p><figure class="image"><img src="https://media.printables.com/media/prints/316852/rich_content/e56515e8-8b6a-4e23-bd20-b5fe9d1542d1/dsc_0188.jpg#%7B%22uuid%22%3A%22ca74ad2e-e18b-497f-954e-af652108080a%22%2C%22w%22%3A3008%2C%22h%22%3A2000%7D"></figure><p>The box should now move by twisting the collar and holding the base. The screws will likely need re-tightening, and 'helping' the iris section open and close by moving it manually with your hands at first until it operates smoothly. It may take a few tries to get the right tension on the outer screws.</p><figure class="image"><img src="https://media.printables.com/media/prints/316852/rich_content/d2b44796-0364-4698-90d4-ff6701bafd1a/dsc_0205.jpg#%7B%22uuid%22%3A%228fc4dce0-6c1d-4615-9041-1bf46d2f8a45%22%2C%22w%22%3A3008%2C%22h%22%3A2000%7D"></figure><p> </p><h4>Step 11</h4><h4><img src="https://media.printables.com/media/prints/316852/rich_content/447940fc-369a-464e-990b-4736a36b6af7/dsc_0190.jpg#%7B%22uuid%22%3A%2209eca4a1-f8f2-4ea7-8d6e-2384f3e399d6%22%2C%22w%22%3A3008%2C%22h%22%3A2000%7D"> </h4><p>Once you are happy with the box operation. Press the optional 'Screw Covers' in place (I don't recommend gluing them, otherwise you cannot dissassemble the box fully and you may glue the rotating screw joints) to hide the screws. You can also use the optional stands to display and open the box more easily.</p><figure class="image"><img src="https://media.printables.com/media/prints/316852/rich_content/72eebf0c-536f-4d2d-99d1-17aa87f9df22/dsc_0194.jpg#%7B%22uuid%22%3A%22ff83e74f-2d62-4a73-bf63-3dd2b69da03d%22%2C%22w%22%3A3008%2C%22h%22%3A2000%7D"></figure><p> </p><h4>Step 12</h4><figure class="image"><img src="https://media.printables.com/media/prints/316852/rich_content/ae32b757-695b-46d8-8def-dafeeac929e4/dsc_0197.jpg#%7B%22uuid%22%3A%228568b48b-0c7d-4f2f-b2fc-db4476bc723d%22%2C%22w%22%3A3008%2C%22h%22%3A2000%7D"></figure><p>Enjoy your 'Orbox', I hope you like it :). Let me know if you are have any questions or difficulties with the design.</p>
With this file you will be able to print Orbox with your 3D printer. Click on the button and save the file on your computer to work, edit or customize your design. You can also find more 3D designs for printers on Orbox.