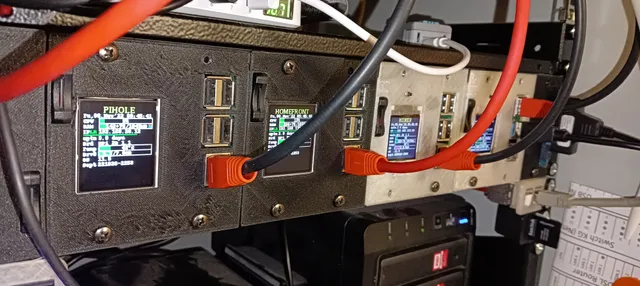
OpenSCAD - Frontpanel for mount Raspberry Pi and ODROID C4 (with display, fan and more) in 19" Rack
prusaprinters
Due to the successful use of this component, I have now completely reprogrammed it in OpenSCAD. I was able to incorporate all the points that I had missed in the past.One of the biggest features is that the component can be printed according to current needs using the customizer within OpenSCAD.Previous solution:The whole thing is based on my experiences on previous solutions. If you are interested, you can see the previous solutions here:Rack mounting: Thingiverse 258934 and Thingiverse 4879316Wall mounting: Thingiverse 4557789, Thingiverse 4233277 and Thingiverse 4144109 Many thanks also to Bruno Viegas and Julian Moors who inspired me with their models Thingiverse 3918744 and Thingiverse 4153717.The new Panel:With this panel you can mount up to 10 Raspberry Pi on a 2U in your 10" rack.If you use the slightly larger panels, only 5 Raspberrys fit, but these are then also equipped with screens.Depending on your needs, the panel can be configured with the following components:Raspberry Pi 1B, 2B(v1.2), 3B(+), 4B, none or a mix of them. e.g. compatible with Raspberry 1B and 4BWidth of the front panel (so that 5 or 10 fit next to each other, can also be mixed)Choice between the displays: WaveShare 1.44inch LCD HAT, 1.8" SPI Display or none. Support for a small 0.91" display is also in preparation.Holder for a Micro-SD card reader to be able to exchange the memory card via the cover. This can be set at a suitable point on the panel.Optional mount for a 40mm fanExtra box (small frame for your own small circuit boards. I use this for a fan control, for example.Requirements:generally:19" Rack Frame (Required to install up to 10 faceplates in it): DAP Empty 2U Rack PanelFrontpanel (open the .scad file with OpenScad, configure your need and export as a stl file)Raspberry Pi 1,2,3,42x M3 screws to mound Raspberry Pioptional:Display (to provide any optical feedback)WaveShare 1.44inch LCD HAT8x female-male jumper wires (length 10-12cm)code: https://github.com/Starwhooper/RPi-status-on-OLED 1.8" SPI Display8x female-female jumper wires (length 10-12cm)code: https://github.com/Starwhooper/RPi-status-via-lumaFan: 40x40x10mm (i recommend 5V)code: https://github.com/Starwhooper/RPi-fan-control alternative to the code: Their 5V fans can also be connected directly to +3V and GRD. This means that no extra code and one GPIO less is required. Because the fan is designed for 5V, but only receives 3.3V, it does not run at full (loud) strength.Micro-SD Card Reader Adapter 15cm is long enoughin case you have no clue, which display is the better for you:The Waveshare display costs more than twice as much as the simple 1.8" display. The display offers the advantage of having control elements later on. But I never had a use for it in this scenario.The simple 1.8" display is larger and has a slightly higher resolution and is significantly cheaper. At least my Python code for displaying the status is significantly less mature than for the WaveShare display.My personal opinion regarding the display:I have no need for the buttons on the display. My Raspberrys are also behind a glass door and access is always a bit cumbersome.The lower price and the larger area are more important to me. So in the future I'll be going more and more with the 1.8" displays. - And in some cases the 0.91 as soon as I've developed a suitable code. Further Featurs:Adjust RJ45 and USB ports better to Pi1 dun P4 (currently the opening is larger than necessary)Get code to use a 0.91" display
With this file you will be able to print OpenSCAD - Frontpanel for mount Raspberry Pi and ODROID C4 (with display, fan and more) in 19" Rack with your 3D printer. Click on the button and save the file on your computer to work, edit or customize your design. You can also find more 3D designs for printers on OpenSCAD - Frontpanel for mount Raspberry Pi and ODROID C4 (with display, fan and more) in 19" Rack.
