OpenFur: Canine Fursuit Head
prusaprinters
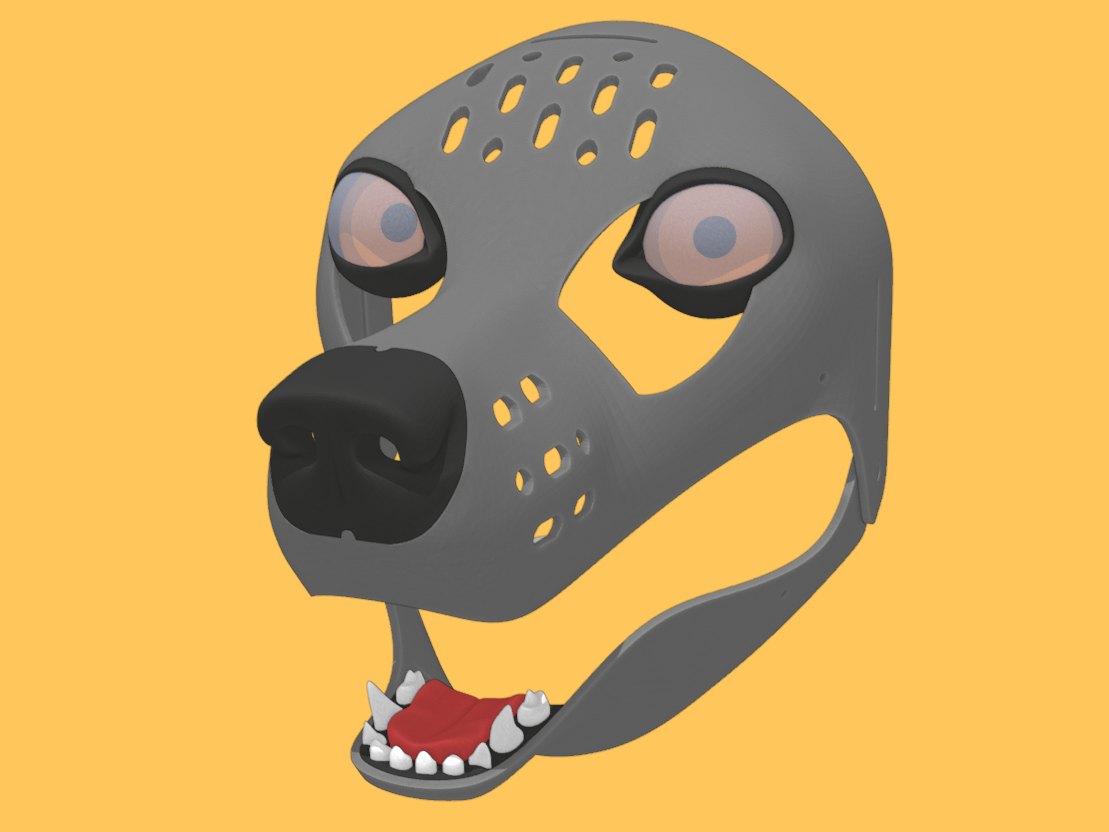
<h3>Preface</h3><p>This head was designed specifically for smaller printers, with a minimum build area of 18cm x 18cm x 18cm and to use comparatively little filament (a little over 200g), while still holding up against accidental abuse. If you don't own a 3D printer but have seen this blank somewhere else and want to use it, I recommend just asking in a furry group chat on a platform of your choice. Many furries are also tinkerers and may print this for little money.</p><p>The base (including teeth, gums, tongue and nose) should cost about 8€ (plus a bit more if you have someone else print it). This of course will also depend on the filament used. Additionally you will need the parts listed in the BOM below.</p><p> </p><h3>Changes</h3><p>Version 5.0 contains many tiny changes to the heads geometry making printing a little bit easier and optimizing the model for both .6mm and .4mm nozzles, allowing faster and sturdier prints. The snout (and nose) is wider than previously, to give the head a less fox-ish look. The nose now features proper nostrils to make breathing easier. I've removed the upper gums, as they tend to get in the way of drinking or eating snacks, plus they're almost never visible and take up extra time to print. The jaw now features a fully enclosed platform so said snacks can not just fall into the space underneath the gums, annoyingly lodging themselves into place. The images for the eyes are now higher resolution, include a 4cm measure line, as well as a light and dark sclera and will waste less ink.</p><p> </p><h3>Bill Of Materials (head only)</h3><p> </p><ul><li><strong>this base</strong> (I recommend PETG for printing)</li><li>a set of <strong>printed eyes</strong> (see eyes.zip)</li><li><strong>plastic glue</strong> (which bonds well with the filament and preferably has a needle applicator)</li><li><strong>clear glue</strong> (like e6000)</li><li><strong>2x 5mm bookbinding screws</strong> (5mm in diameter and length) </li><li><strong>2x 4cm lenses</strong> (glass or acrylic), make sure they are solid half spheres.</li><li><strong>4cm x 80cm elastic band</strong></li><li><strong>10cm round elastic band</strong> (2mm diameter)</li><li><strong>scissors</strong></li><li><strong>water or tea</strong> (yes, this isn't optional. Please stay hydrated)</li></ul><p>Optionally:</p><ul><li><strong>flush cutter </strong>and/or<strong> deburring knife</strong></li><li><strong>exacto knife</strong><i> or</i><strong> razorblades</strong></li><li><strong>your favourite music</strong></li><li><strong>1mm thick rubber foam sheets</strong></li></ul><p> </p><h5><strong>A little word of caution:</strong></h5><p>You may feel inclined to use a carbon fibre or similarly filled filament. <strong>DON'T! </strong>These types of filaments tend to shed their fillings over time. You will be wearing this directly on your face and you don't want glass or carbon fibres in your face. The fully assembled head will withstand accidental abuse just fine even without any speciality filament.</p><p> </p><h3><strong>Print Settings</strong></h3><p>If printed accordingly to the print settings down below you should be able to print your own fursuit head base (including eyelids, teeth, gums and the tongue) in roughly a day.</p><h5>General:</h5><ul><li>Set the number of wall perimeters to 4.</li><li>Set the top and bottom perimeters to at least 5 and 4, respectively.</li><li>If possible, set the fill angle to 0° instead of the default value of 45° (so that the top and bottom layer lines are horizontal/vertical instead of diagonal).</li><li>Switch off the supports. They should not be necessary when printing in PETG. However, less stiff materials may give different results.</li><li><i>Additionally: </i>Consider the colors you want to end up with. The head and jaw should be printed in the same colors as the gums. Both the eyelids and nose will still be visible after furring.</li></ul><h5>Head & Jaw:</h5><ul><li>Make sure that your printer is able to handle bridging and overhangs well.</li><li>Since the contact area with the print bed is very narrow, a brim of at least a few millimeters is recommended.</li><li>If possible, align the parts so that your part cooling fan blows into the inside of the head part and underneath the jaw.</li><li>If necessary, switch on the "Detect bridging perimeter" function. (To check, pay attention to the headband slots on the head).</li><li>Watch your first print carefully.</li><li>And don't forget to drink some water.</li></ul><h5>Nose, Teeth, Tongue, Gums & Eyelids</h5><ul><li>Print as fine as possible. A layer height of 0.15 mm or less is recommended.</li><li>Strong cooling may be required for the teeth.</li><li>If possible, do not add a brim.</li><li>Print the teeth last and <i>don't mix them up</i>! If possible keep them on the bed until assembly.</li></ul><h5><strong>Eyes</strong></h5><ul><li>Print out a set of eyes from the eyes.zip file so that the 4cm lines at the bottom are actually 4cm in lenght.</li><li>If you are unsure about the exact sizing simply put multiple sizes into the same print and check their fit using the lenses later.</li><li>If you want to create your own design please keep in mind, that the pupil may appear larger once the lens has been applied. Test it's sizing first.</li></ul><p> </p><p> </p><h3>Assembly</h3><p>The head is provided with built-in support structures and may be printed with a brim. Remove those before proceeding. Cut off the small bridges that connect the left side to the right side. Then cut the small pins that attach the supports to the head. I suggest a flush cutter, but a exacto knife or even bending them back and forth may also do the trick. Clean up the remaining supports by running the knife or flush cutters over them one more time.</p><figure class="image"><img src="https://media.printables.com/media/prints/89641/rich_content/634dae5e-86f2-464c-adca-e9e657671ca3/01_stabilizer.png#%7B%22uuid%22%3A%227777842f-cf12-4ff2-ab2f-38e51c179bec%22%2C%22w%22%3A1009%2C%22h%22%3A832%7D"></figure><p>Test the fit before proceeding! Connect the jaw and head parts using the bookbinding screws by inserting them into the hinge (as marked below). Then hold the head piece against your face.</p><figure class="image"><img src="https://media.printables.com/media/prints/89641/rich_content/8334cc86-b8fc-4d76-bc40-09485a6f5ba5/02_testfit.png#%7B%22uuid%22%3A%2235925d1e-2a83-4525-95a4-d73e4e1f1d9b%22%2C%22w%22%3A1009%2C%22h%22%3A832%7D"></figure><p>This head should be worn at an angle of about 25° to 30°. The head should rest against your forehead and chin and you should be able to see through the tear ducts. Your chin should rest against the jaw without applying much pressure.</p><p>If the head seems to fit, you can proceed by removing the bookbinding screws again and assembling the eyes.</p><p>Sadly not every lens sold as “half-sphere” is actually half a sphere. Most, if not all, of them will shave off a few millimeters. As such you'll have to test if they actually make contact with the eyelids if put on top of each other.</p><p><i><strong>If so, the next step is really easy:</strong></i></p><p>Just apply a big drop of your clear glue onto the pupils, filling them entirely and then a little more (be generous, you want some excess glue for this). Carefully place the lenses on top, pushing any bubbles and excess glue to the sides. Then, place the eyelids into the lenses, making sure they make contact with the glue you just pushed out from the lenses sides:</p><figure class="image"><img src="https://media.printables.com/media/prints/89641/rich_content/d9efd974-2a71-4d88-aed8-79e3f4928bbf/07_eyes.png#%7B%22uuid%22%3A%22648f7033-f1f9-42ea-a1ae-094fcd9cfb2b%22%2C%22w%22%3A1009%2C%22h%22%3A832%7D"></figure><p><i><strong>If the eyelids don't properly mate with the lenses:</strong></i></p><p>you'll have to push them up a bit. To do so apply a big drop of your clear glue onto the pupils, filling them entirely and carefully place the lenses on top, pushing any bubbles to the sides. Once the glue has set cut them out and glue the eyes to a piece of rubber foam. Once the glue has set cut them out again and check if the added height is enough, if not repeat until it is. If the height checks out and the lenses make proper contact apply a generous drop of glue to a piece of rubber foam. Place the Eyes on top, pushing excess glue to the sides. Then, place the eyelids onto the lenses, making sure they make contact with the excess glue you just pushed out from the eyes sides.</p><p> </p><p>Next are the teeth.</p><p>The teeth come prearranged for you, hence why it's best to leave them on the print bed until assembly. You'll find a double row of teeth and two large teeth left and right featuring a little indexing pin. Set the two teeth with the indexing pin aside for now.</p><p>Next, add a little bit of your plastics glue to the holes inside the gums and carefully push the teeth into them. Due to the slightly oval shape of their base they should automatically orient themselves.</p><figure class="image"><img src="https://media.printables.com/media/prints/89641/rich_content/3932ece7-6e49-4196-879a-4a00f856c77d/03_teeth.png#%7B%22uuid%22%3A%2233a649cd-6d35-4b4c-b666-ced12e609b99%22%2C%22w%22%3A1009%2C%22h%22%3A832%7D"></figure><p>Next up will be the jaw assembly.</p><p>Inside the jaw you will find a little platform. Cover it with a thin layer of plastics glue. Then insert the gums+teeth assembly from the previous step onto the platform, pushing it forward as far as it'll go without slipping out. Then insert the tongue from the top. Apply a little pressure until the glue hat at least partially set.</p><figure class="image"><img src="https://media.printables.com/media/prints/89641/rich_content/17610d7e-b584-4f04-b26a-958e6e44cf13/04_gumstongue.png#%7B%22uuid%22%3A%22df3a68b0-3f14-4b45-9975-6fdb64822e74%22%2C%22w%22%3A1009%2C%22h%22%3A832%7D"></figure><p>This completes the jaw and is the perfect time to drink your favorite tea or water.</p><p>The two remaining teeth can now be installed into the head piece. To do so locate the small indents inside the head piece, next to the vents by the nose hole and fill them with a generous amount of plastics glue. Also apply the glue to the flat side of their respective teeth (including the indexing pin) and push them into their place. They will line up automatically and will only go in one way.</p><figure class="image"><img src="https://media.printables.com/media/prints/89641/rich_content/0d9d7a0d-bd9c-4a1c-94dc-9b6105402a82/05_teeth_top.png#%7B%22uuid%22%3A%2203cf62c6-f7d4-4e6f-8f9e-8e728e5731c8%22%2C%22w%22%3A1009%2C%22h%22%3A832%7D"></figure><p>To install the nose just apply some plastics glue to the rim on the in the front of the head and push the nose in place. The new version features two indexing pins making the nose much easier to align.</p><figure class="image"><img src="https://media.printables.com/media/prints/89641/rich_content/caef59ca-4c26-42a2-96c8-f7d33e30e4b6/06_nose.png#%7B%22uuid%22%3A%224ed7e592-ca3f-4b40-9565-492f800d211a%22%2C%22w%22%3A1009%2C%22h%22%3A832%7D"></figure><p>Installing the eyes is little more tricky and it's best to do a ‘dry run’ first <i>without</i> any glue, just to test the fit. First, you'll need to locate the small ledges inside the eye holes. This ledge will help you to align the eyes to the rest of the head. </p><figure class="image"><img src="https://media.printables.com/media/prints/89641/rich_content/d399395e-fe48-4f58-8545-9477fb39e6ec/08_eyes_ledge.png#%7B%22uuid%22%3A%22ebb482de-9d94-4a5b-9133-6dc43b8a431e%22%2C%22w%22%3A1009%2C%22h%22%3A832%7D"></figure><p>You'll also need to sort the left from the right eye. The orientation on the print bed is already the correct one. Insert the eye into it's proper position by rotating it from the inside of the head into it's proper orientation.</p><figure class="image"><img src="https://media.printables.com/media/prints/89641/rich_content/fb93ba69-afa9-4505-bbf2-eda6497aaef8/11_eyeinset.png#%7B%22uuid%22%3A%2255cf4fda-debd-4d10-a217-60d36de35885%22%2C%22w%22%3A1009%2C%22h%22%3A832%7D"></figure><p>The eyelid should sit perfectly flush with the ledge. If not, turn it until there is no gap or the gap is minimized. If the eye just doesn't seem to fit you may have mixed them up and may want to try the other one.</p><p>Once you've found the correct positioning you can install them by applying plastic glue to the inside edge of the eye holes as well as the ledge and installing them just as previously described.</p><p> </p><p>For added strength, it is best to add additional glue around the edge where the pieces touch. Be careful not to get any glue onto the printed paper, as some glues can discolor the ink. </p><p>Once this is done you can re-insert the book binding screws, attaching the jaw to the head piece again. You can also install the round rubber bands into their proper holes. Pretension them a little more than you think is necessary, as the fur will put additional stress and friction on the jaw mechanism.</p><figure class="image"><img src="https://media.printables.com/media/prints/89641/rich_content/3e16bced-7b77-4e64-9c04-b68a07fc6397/10_jaw.png#%7B%22uuid%22%3A%221b2a14c5-b3a7-4bee-a0d7-6e6f3a284c04%22%2C%22w%22%3A1009%2C%22h%22%3A832%7D"></figure><p>This completes the head.</p><figure class="image"><img src="https://media.printables.com/media/prints/89641/rich_content/56ee39cb-f216-4b4d-91c0-f4fafad3b5ff/12_finished.png#%7B%22uuid%22%3A%22dba9466d-bc27-4d92-a76d-7ace4d8d3d94%22%2C%22w%22%3A1009%2C%22h%22%3A832%7D"></figure><p>You can now insert the 4cm wide rubber band into the respective slots.</p><p>Next up is the creation of the ears as well as a duct tape dummy, tracing, marking, cutting and furring. Sadly this is a highly individual process, as this completely depends on species, breed and style. For this reason I won't include it in this guide.</p><p>I plan on adding this in the (distant) future tho'.</p><p>As for now, you can just search for these steps online. There are a lot of great people who have documented their process.</p><p> </p><p><strong>What I can give you right now are a few tips and a word of caution:</strong></p><p>You may want to add some flair with <strong>LEDs or other electronic gimmicks</strong>. That's fine. But do not mount the battery (especially LiPo types) inside the head. In the rare event that they do catch on fire, you should be able to remove them from your person as quickly as possible. If they are mounted inside the head, this won't be possible. <strong>DO NOT</strong> mount them there.</p><p> </p><p>Not as important but still relevant:</p><p><strong>Faux Fur</strong> may be expensive and materials like fleece may seem like a good, cheaper alternative. It is not. Fur adds considerable volume to your creation, make the suit look nice and fluffy and will hide a lot of mishaps from the furring and gluing process. Fleece and similar materials will mimic the look of a hairless cat and won't hide any rough gaps or stitches. If that's your thing, I won't stop you. But keep that in mind if you want to go for a more fluffy appearance.</p><p>A lot of makers use hot glue to secure the fur to the head, so you may find that this solution works for you just fine. In my personal experience, I always find myself applying too much hot glue and/or pressure to the fur, forcing the glue through the it's fabric backing into the fur itself. This creates problems during the trimming process as the shaver gets stuck in the glue, resulting in a jagged look. To solve this I don't use hot glue anymore. I brush on a thin layer of glue instead.</p><p>When marking the duct tape dummy do not forget to add arrows for the furs direction, flowing from the nose down to the body and up the ears. If in doubt: use reference images of actual canines. Failing to do so <i>will</i> make finding the proper orientation of the fur difficult and may show up in the resulting head.</p><p>And last but not least: <strong>Take your time. </strong>Creating a fursuit head may not be too difficult but it <i>will</i> take some time.</p><p>Stay hydrated.</p>
With this file you will be able to print OpenFur: Canine Fursuit Head with your 3D printer. Click on the button and save the file on your computer to work, edit or customize your design. You can also find more 3D designs for printers on OpenFur: Canine Fursuit Head.