OpenForge 2.0 Medieval Scaffolding Construction Kit 1
thingiverse
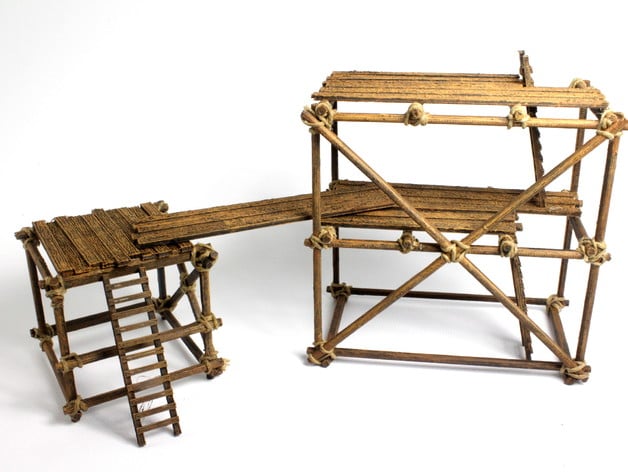
Human: Building a fantasy cityscape with scaffolding is a timeless classic in video games, and now you can create it on your tabletop for thrilling chase scenes and urban battles. Scaffolding is perfect for structures in caverns, wilderness, dungeons, and warehouses. The parts included here can even be used to build a guard tower if desired. This model consists of numerous pieces, requiring some modeling skills to assemble the desired structure. I'm particularly excited to see the creations made with this set, as it offers a wide range of creative possibilities. For beginners, we have a series of tutorials available on how to get started with OpenForge. Want to sell OpenForge prints or use OpenForge designs in your product? Check out our license FAQ for more information. OpenForge is now a patron-supported project, and I use the resources provided by my patrons to create more sophisticated tiles with increased detail. Please support me, and I'll deliver an ongoing stream of fantastic gaming terrain. You can find more about OpenForge and Masterwork Tools at: Online catalog and backer site Website Forums (primarily using Facebook now) Twitter Facebook Instructions for assembly are as follows: This model is composed of a variety of small parts, allowing you to create various types of scaffolding. The basic idea is to take 2 identical-sized scaffolding squares, 4 scaffolding crossbeams, and some planks. Planks should be the same length as the scaffolding square used. The scaffolding crossbeams should be printed with supports, which have a rectangular backing that properly spaces the squares apart. Glue the crossbeams to the squares, with the rectangular portion facing inward. For the planks to fit correctly, you must glue the crossbeams inside the outer poles on the right and left side of the square. I prefer to paint the planks separately from the scaffolding, then wrap them (see below) before gluing them in place. You can add various features to enhance the appearance of the scaffolding, such as gluing the cross supports down at the corners where the squares meet. You can also use the crossbeams as guardrails by gluing them on the outside with the rectangle facing inward. The different heights (1h, 2h, 3h) allow you to build more rigid structures of various heights. Wrapping: After painting but before gluing on the planks, you can make these look substantially better by wrapping all the joints with twine. I used a waxed twine because they tend to hold their shape better, making it easier to attach and glue them in place compared to using pure thread-based twine. Painting: After gluing the beams but before wrapping or gluing the planks, I spray paint all the parts with a black primer. Currently, I use Rust-Oleum Painter's Touch 2x Flat Black, which bonds well with plastic. However, I have also had great experiences with Krylon Fusion Camouflage Flat Black, although it is twice as expensive. From there, I paint using Americana paint: Burnt Umber - Covering nearly everything except the deepest crevices Chocolate - Side brushed to get all of the raised surfaces Honey Brown - Dry brushed to get the very tops of raised surfaces Other available sets include: Scaffolding Set 1 Scaffolding Set 2 Ladder Customizer Changelog: 2/7/2017 - Fixed 1x2 planks
With this file you will be able to print OpenForge 2.0 Medieval Scaffolding Construction Kit 1 with your 3D printer. Click on the button and save the file on your computer to work, edit or customize your design. You can also find more 3D designs for printers on OpenForge 2.0 Medieval Scaffolding Construction Kit 1.