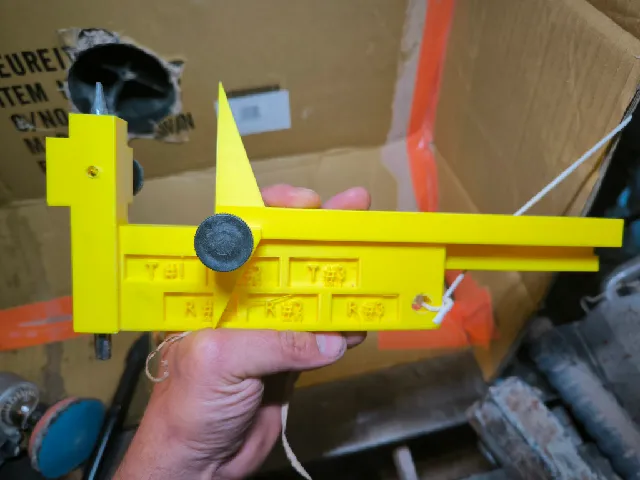
Oneway Stronghold marking jig for all jaws from #1 to #3
prusaprinters
It's a simple jig for marking the right size to cut, so that a tenon or recess works well with any of the Oneway Stronghold jaws (except for #4, which never made much sense to me as they overlap with #3 too much). It works for both dovetail and straight jaws, as fortunately they are nearly identical in range. However note that it kinda seems like every shop measures the range differently and the minimum here is really the “minimum” and maximum is really the “maximum”, so keep some distance ;)AssemblyPrint both partsImprove the two 6mm threaded holes using a threading drill (tap), just to make it work well, from my Bambu Lab it usually sucks (I print on 0.6mm)Put one into the other, pencil into the big hole, use a knob in each hole to lock the pen and slider in place.UsageSet the slider to whatever size you want, spin the piece and use the pen to mark a circle that would match the arrow on the slider (don't touch that one, that part of the rotating object goes up, so … you know, bang bang bang :) ).Upper row “T” means tenon. When making tenons for dry stuff, make it just a little above the minimum for best grip. When turning green stuff expecting re-turning when it dries, make it a bit bigger, since the tenon will change shape and you will have to make it smaller, so you need some headroom. A centimere is enough probably.Bottom row “R” means recess. There you always want just a little bit above the minimum for the best grip. Returning will only make it bigger so you are safe.Enjoy ;)Neshikawww.neshika.cz
With this file you will be able to print Oneway Stronghold marking jig for all jaws from #1 to #3 with your 3D printer. Click on the button and save the file on your computer to work, edit or customize your design. You can also find more 3D designs for printers on Oneway Stronghold marking jig for all jaws from #1 to #3.
