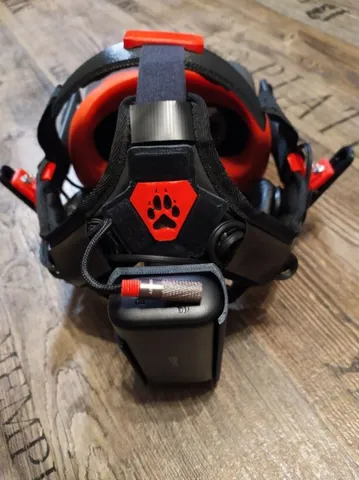
Oculus Quest "Lunar Genesis Mod"
prusaprinters
PDATE15.12-2021People seemt to have problems with breaking headphone arm slider mount on the springloaded part!! Make sure to print the part that slides in the rail to be orientated laying on the side when printing!! Check updated Picures!This is my complete and final Mod over my oculus Quest.I wasnt able to get a deluxe audio strap as it is sold out everywhere, on ebay and other platforms prices are ridiculously high! So I wanted the same sort of experience like with the audio strap and even more.............and it DOES! I have the deluxe Audio strap for my vive and can say that after all this mods, my Quest outperforms the original vive deluxe audio strap in comfort and sound by quite a bit!It includes several overworked parts already available here on Thingiverse ( https://www.thingiverse.com/thing:3666505 , https://www.thingiverse.com/thing:4070533 ) I just refined and added upon.A custom headphone spring loaded System that applies equal pressure no matter how big or what form your head features. Easy to store headphones for transport by flipping them up and folding them inside.I am using Sony MDR-ZX310W for this Mod as they sound good enough and the price is ok.I included two articulated Speaker mounts, one for the same type of headphones I used for this Mod and a smaller base as well for other types of headphones with a straight surface on the back side.You need two springs with a diameter of 6mm and a length of 15mm ( moderate Tension) I got mine out of those typical mixed spring boxes you can get from the hardware store. 2x 25mm M3 screws, 4x m3 washers and 2 nuts. Some superglue to fix the springs in their moun and glue the wolfpaw logo triangle on the Battery holder.Get the headband from here:https://www.thingiverse.com/thing:3664951Glue the clip over the middle head strap so the pressure of it is applied equally on your upper head. ( the strap has to go OVER the Plate( not under) otherwise its for nothing, I ve seen enough head plates here on thingiverse with the strap going below, which makes no sense at all and practically cancels out the whole sense of the headband.You will need some additional Velcro tapes/ ties to mount the battery holder to the Quest.I got a cheap backhead cushion sorta thing from Amazon, but there is better quality one available from VR cover. Both do the same Job. Its also super easy to hide all the remaining cables below the vecrostraps of the backhead cushion.https://www.amazon.de/gp/product/B082Y6CPZR/ref=ppx_yo_dt_b_asin_title_o09_s00?ie=UTF8&psc=1I also got one of those silicone covers for the original Quest face gasket:https://www.amazon.de/gp/product/B07X4CVSZL/ref=ppx_yo_dt_b_asin_title_o09_s00?ie=UTF8&psc=1but soon gonna switch it with the VRcover replacement padding, as for me I prefer them always over the stock ones.IMPORTANT!! When you clip on the articulated Speaker Plate into the adjustable Headphone speaker arm, WARM the clip up with a heat gun as well, otherwise IT WILL SNAP OFF one or two flaps!!The Battery holder is also adapted so you can see the charging indicator on the side and also have access to the test button of your Anker Power Core 10000 PD.https://www.amazon.de/gp/product/B07TCS3RPM/ref=ppx_yo_dt_b_asin_title_o05_s00?ie=UTF8&psc=1
With this file you will be able to print Oculus Quest "Lunar Genesis Mod" with your 3D printer. Click on the button and save the file on your computer to work, edit or customize your design. You can also find more 3D designs for printers on Oculus Quest "Lunar Genesis Mod".
