Octo-Iris Box
myminifactory
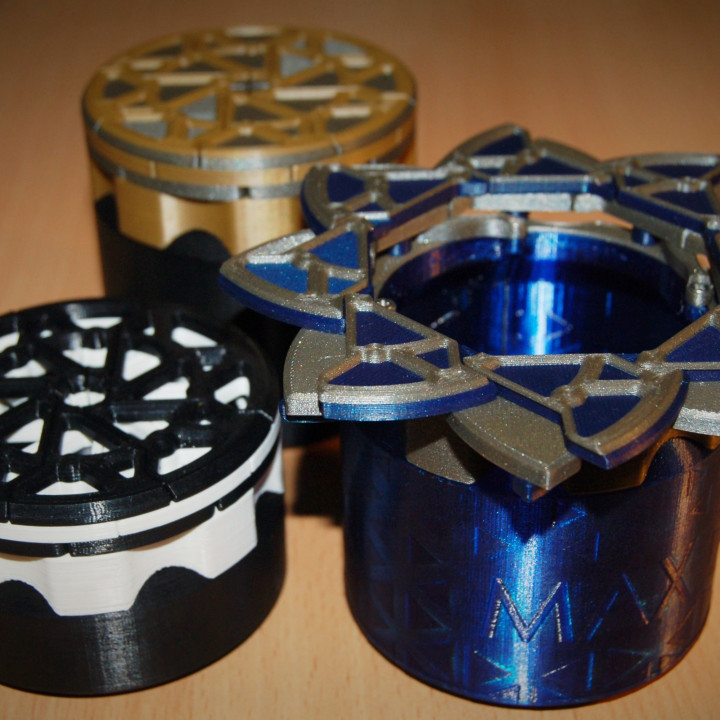
This is an upgraded version of my 'Octobox V2' iris container which features a new simple twist release mechanism. This has eliminated the need for handles on top of the container allowing for more decorative elements to be added. The box measures 80mm tall, 80mm in diameter and opens by twisting the mechanism clockwise. No support material is required for this design. There are many other iris containers available on my profile page. In addition to the printed parts, this requires M2x6 countersunk/flathead screws to assemble such as these (the same screws used in my other designs); 48 screws are needed for one box. Larger or smaller screws can be used if you scale the model accordingly e.g. M3x8 screws at 150% part scale. Note: it's cheaper per screw if you buy in bulk from a specialist supplier. There are two versions of the container available, the standard sized container and the shortened container which brings the overall height down to 48mm. The pattern on the green and blue containers was created using the velocity painting technique on the standard container and there are many excellent guides online on how to do this. The floral pattern was designed by GarryKillian - www.freepik.com The triangular pattern was remixed from a design by rawpixel.com / Freepik. There are three door designs included for the box: The plain 'door' is completely flat and used on the grey/gold and blue/orange/green examples. The decorative door 'top door mechanism' has an embossed embellishment on top of the doors. There is also a multimaterial version of this door, denoted with 'mm' in the file name, which is shown on the gold/silver/black example. These can be made with a single nozzle printer using the multi-pass printing technique, an excellent tutorial on how to do this was created by Devin Montes. And lastly there are the 'hole' parts which have the same pattern as the 'mech' parts, but the panels are cut all the way through the doors creating the framework type appearance as shown on the black/white and blue/gold examples. Part testing Before printing off all the parts you should ensure the screw joints work correctly with your print settings. Print one 'door top' and one 'door base' parts. Check that your screws fit tightly in the holes in 'door top' but are free to rotate in the 'door base' holes and the head is flush with the bottom surface. You may need to use hole XY compensation (Ideamaker is a free slicer which does this) to get a good fit. Assembly Instructions (also see pictures) To make one box you will need to print: 1x 'container' or 'short container', 1x 'collar', 8x 'link 1', 4x 'link 2', 8x 'door base' of any type, 8x 'door top' of any type. No support material is required for these parts. You will also need 48-M2x6 countersunk/flathead screws. Firstly screw the non-pointed end of the longer links (link 1) to the collar. It's essential to get these the right way around otherwise the mechanism won't work. Next take all the 'door' parts and begin assembling them into the iris with the screws. It's easier to assemble them neatly in the closed position rather than open shown in the pictures. Also try to keep the screws straight to make the assembled top neat. Don't overtighten the screws otherwise it will be difficult to open the box. I generally tighten them all the way and then untighten them half a turn. This iris mechanism should now open and close fully. Now flip the door assembly upside down and screw the larger end of the small links (link 2) to the inner holes on the 'base' doors. Make sure the four links are distributed evenly around the mechanism, one every other base door. Then take the collar assembly and place it on top of the door assembly. Take the other end of the longer links and screw them to the outer holes on the door base parts. Finally take this entire door assembly and place it onto the container. With the iris fully opened screw the other end of the small links to the holes in the container. The box is now fully assembled! The box should close by twisting the collar anti-clockwise (it may be a bit stiff at first). If you have any problems with this design, let me know and I'll try to help out ASAP.
With this file you will be able to print Octo-Iris Box with your 3D printer. Click on the button and save the file on your computer to work, edit or customize your design. You can also find more 3D designs for printers on Octo-Iris Box.