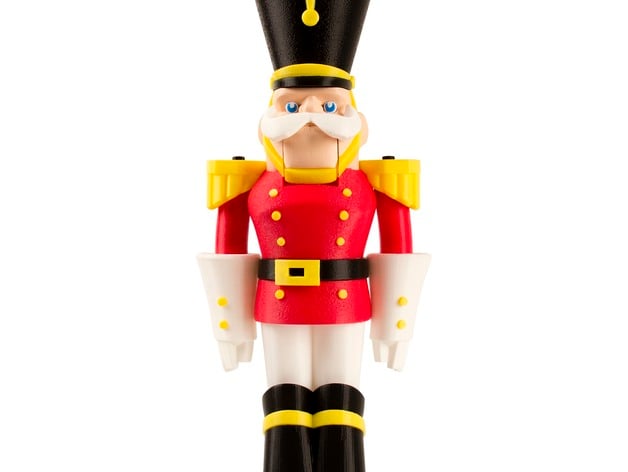
Nutcracker
thingiverse
It's no wonder the nutcracker is a cherished holiday treasure sought after by people everywhere, from the young to the old. Legends claim that families were given these precious figurines as gifts to bestow them with good fortune and safeguard their homes. The MakerBot Nutcracker takes this timeless tradition in stride but gives it a fresh twist – now you can make one yourself! This elegantly designed multi-part print is perfect for any of the MakerBot printers. Its components snap together seamlessly, allowing your imagination to soar as you experiment with color combinations. However, we advise caution – assembly might be tricky for beginners. Instructions INSTRUCTIONS To start, print these parts in the recommended colors or use your preferred palette. We suggest keeping pieces grouped by color for a smoother assembly experience on your first try. Remember to note that any piece labeled '30infill' should be printed at 30% infill to ensure maximum strength. True Red: Arms, Back Lever (30infill), Body Bottom, Body Top True White: Gloves, Hair, Mustache, Eyes, Legs True Blue: Iris Clips Rod True Black: Belt, Boots Bottom (30infill), Boots Top, Hat, Shoulder Buttons True Yellow: Belt Buckle, Boot Band, Buttons, Hat Straps, Shoulder Pads, Hat Decorations Peach: Ears, Head (30infill), Jaw (30infill) Assembly Having tweezers and a mallet nearby will make the assembly process significantly easier. Most components snap together effortlessly without glue. • Start with Boots Bottom facing you, then attach Boot Band to the top of it with the recessed piece facing up. Next, place Boots Top over Boot Band. • Securely fasten Boots Top to Legs by attaching them at the correct angles and ensuring the knees are slightly bent forward. Attach Body Bottom (with the recessed side down) to Legs and insert two buttons into Body Bottom. • Attach Belt to Body Bottom with the nub pointing in the forward-right direction. Connect Belt Buckle to the nub. Securely attach Body Top to Belt, then insert six buttons into it. Place Hat onto Head by aligning them correctly and securing with clips. • Place R Arm on R Shoulder Pad and L Arm on L Shoulder Pad. Make sure shoulder buttons are firmly in place at the top of the Shoulder Pads before attaching the corresponding gloves (R Glove to R Arm and L Glove to L Arm). Securely insert eight buttons into both R Glove and L Glove, then attach each one to the corresponding arm. Ensure that the shoulder pads on both sides fit correctly. • Insert Jaw into Back Lever (serrated groove facing up), making sure the handle points downward. Attach Jaw firmly to Head through a smooth mechanism involving the rod. • Securely insert Ears onto Head from both sides, then add Mustache, Hair and final details of Eyes before adding any more finishing touches. • Attach Hat Decorations and safely place them inside the hat. Place Belt Back securely into Back Lever as you finalize all pieces that connect to Jaw and Head – a series of satisfying snaps and twists brings your assembly to life! • Securely clip Head onto Body, making sure they are aligned perfectly together for that smooth fit and appearance. Congratulations!
With this file you will be able to print Nutcracker with your 3D printer. Click on the button and save the file on your computer to work, edit or customize your design. You can also find more 3D designs for printers on Nutcracker.
