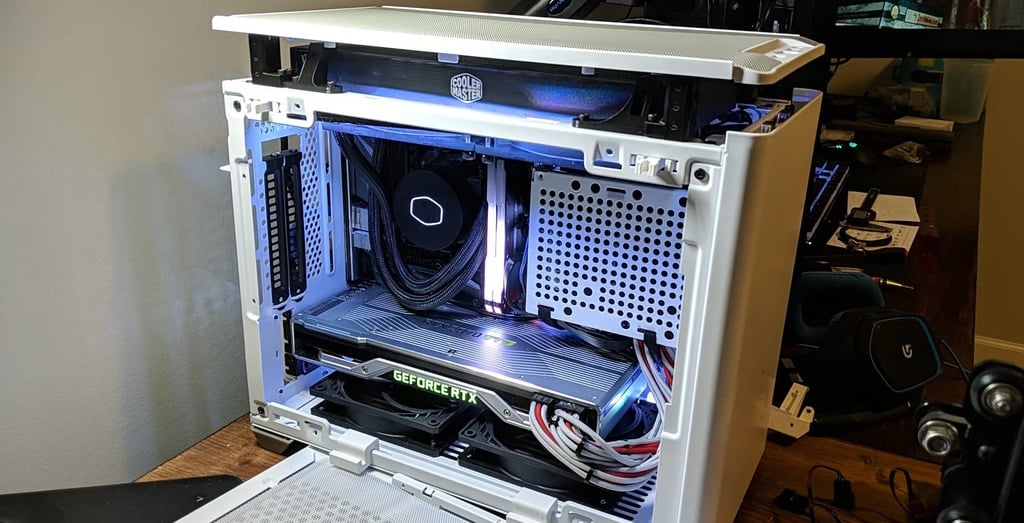
NR200 "T240R" Top-Hat mounting assembly (OUTDATED-)
thingiverse
### THIS MODEL IS OUTDATED: PLEASE GO TO https://www.thingiverse.com/thing:4712534 FOR THE MOST UP TO DATE VERSION ### Summary of the T240R- *Top 240 mm Radiator* mount for the Coolermaster NR200 ITX case. This is a mounting assembly/system mod for the Coolermaster NR200 to mount a full size 240mm radiator with 2 120mm fans to the top of the NR200. This mod uses the existing top bezel to cover the top for a fully enclosed look. This assembly is non-destructive -- no permanent changes to the original case are made; this means, NO DRILLING MILLING OR CUTTING REQUIRED. The assembly is space optimized to minimize additional case height added due to this mod, leaving around 1-2cm clearance from the top of my RAM and PSU extension cable. This mod also includes two brackets to move the front IO (power button, usb3.0, and audio) up to the new height. ### Materials needed: * M3 6mm long socket head QUANTITY - 8 * M3 8-10mm long socket head QUANTITY - 8 * 6mm long radiator mounting screws (for mine i used #6-32 thread screws) QUANTITY - 8 * 35mm long radiator mounting screws (for mine i used #6-32 thread screws) QUANTITY - 8 * A 3D printer (I used a Creality CR10mini) and filament * Hex and Phillips screwdrivers * i'll add more here if i'm missing anything but i think that's it ### Methods: * print the parts with orientation in mind, minimizing supports and making sure that the bezel adapter parts are printed SIDEWAYS, with the inner cylinder SIDEWAYS, not straight up from the build plate. This part will break at the snap-fit mounting point where the top bezel attaches if you print it vertically, so don't do that. I'll write up a guide later with proper print orientation later. * you'll need to know how the current case snap fit joints work-- they snap fit right into the metal corner brackets. The top of a stock NR200 doesn't have the black snapfit joints, and the metal tabs that are in the four corners are what i used to snap in mounting points for this mod. The mounting points are the "T240R bracket-to-case mount.stl", which you'll need 4 of- two of which need to be mirrored. See the SolidWorks assembly picture for more details. * once you snap in those mounting points from below (bracket-to-case), prep your radiator and fans first screw in your fans below in your preferred direction, and then wire it up and wait. Then, take the "front/back right/left rad bracket" parts and mount them to the corners of your radiator with screws (in my case it was 6-32 screws). Then, place the radiator on the top frame of the NR200, and you can mount each corner with 2 M3 screws each, INTO the holes from the "T240R bracket-to-case mount.stl" parts that you previously snap fit into the top of the case. * Then, if you want the top bezel, attach the corresponding "front/back right/left rad bracket" parts on each corner with 2 more M3 screws each. the top bezel should then just snap fit right on to those four points. * you'll need some smaller 6-32 screws (should have spare ones in your original NR200 kit, or buy more) to mount the brackets to adapt the front IO to the new height using the STLs provided. ### more details to come soon as i write this out. Just want to get the parts out there first for people to play with. Please be noted: This file is distributed under the CreativeCommons Attribution-NonCommercial-ShareAlike 4.0 International (CC BY-NC-SA 4.0). You are free to: Share — copy and redistribute the material in any medium or format Adapt — remix, transform, and build upon the material Under the following terms: Attribution — You must give appropriate credit, provide a link to the license, and indicate if changes were made. You may do so in any reasonable manner, but not in any way that suggests the licensor endorses you or your use. NonCommercial — You may not use the material for commercial purposes. ShareAlike — If you remix, transform, or build upon the material, you must distribute your contributions under the same license as the original
With this file you will be able to print NR200 "T240R" Top-Hat mounting assembly (OUTDATED-) with your 3D printer. Click on the button and save the file on your computer to work, edit or customize your design. You can also find more 3D designs for printers on NR200 "T240R" Top-Hat mounting assembly (OUTDATED-).
