Nozzle Zip Tag
prusaprinters
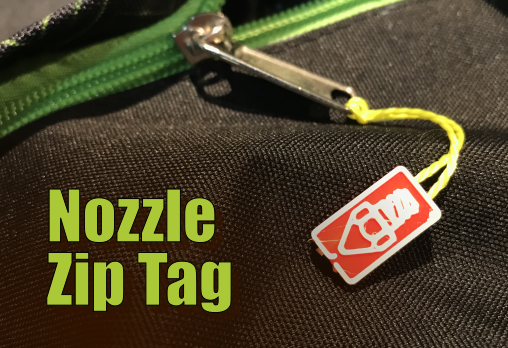
<p>The new school year fast approaches and this signals the start of the annual frenzy of covering books and labelling anything that can't be nailed down. Slightly off topic for the button challenge, but an opportunity to tag clothing, bags and pencil cases with a custom zip pull.</p><h3><strong>Design</strong></h3><p>A cheap polyester thread from the local hardware store was chosen in order to minimize the risk that the thread would make a terrible mess (higher melting temperature than PLA). Initial experiments however suggested that the thread was inclined to fray and was reluctant to hold a tight knot. A knotted design was therefore out, so in order to minimize the thickness of the tag and to keep print times down I elected to try a captured design. This design features a pair of channels with deeper section at each end that feature slight overhang to try and retain the thread as the hotend passes over. The bends in the thread also offer some resistance to the thread pulling through. The design is sensitive to the diameter of the thread and will need to be adjusted for different threads. Having said that it only took a couple of attempts to tune the provided deign for the thread I was using. Thereafter its printed reliably. The ideal seems to be to have the thread seated as close as possible to the bridge layer without being so proud that it interferes with the print.</p><figure class="media"><oembed url="https://youtu.be/qNlpxeog-B0"></oembed></figure><p>The printing process can be seen in the render and time lapse video. The OpenSCAD source has been provided (as well as the final design files and gcode).<br>The design parameters are hopefully self-explanatory:</p><ul><li>Logo scale (ls)</li><li>Thread diameter (td)</li></ul><p>The logo design itself was also created using OpenSCAD, the exported projection was then exported into Inkscape and then tweaked until it met the needs of this design. </p><h3>Tips</h3><ol><li>When slicing the design try to orient the print horizontally and perhaps slightly towards the front of the print-bed to avoid needing to work around the hotend when inserting the thread.</li><li>If working with a printer whose profile supports a wipe-tower, consider adding that </li><li>When slicing insert a pause on the layer bridging over the top of the two thread recess channels.</li><li>The design is intended to be printed with a 0.2mm layer height, the last two layers holding the outline for the nozzle logo. So a filament color-change should be inserted with 0.4mm to go (if not using the provided gcode). </li><li>If printing the provided design, at the pause, when inserting the thread take the time to push the thread down into the deeper parts of the thread channels and pull any proud sections taught and clear of the hotend.</li><li>Blue painters tape can be used to secure the thread in place and minimize the risk that the hotend will catch on any wayward thread.</li><li>The print-time is short (5 minutes for the provided design in PLA) so its advisable to watch this print through just in case the thread does get caught on the hotend.</li><li>I used the blue print stick to help this adhere, I find that this releases more easily than the standard variety which is useful when dealing with small parts.</li></ol><p> </p>
With this file you will be able to print Nozzle Zip Tag with your 3D printer. Click on the button and save the file on your computer to work, edit or customize your design. You can also find more 3D designs for printers on Nozzle Zip Tag.