Nozzle Holder
prusaprinters
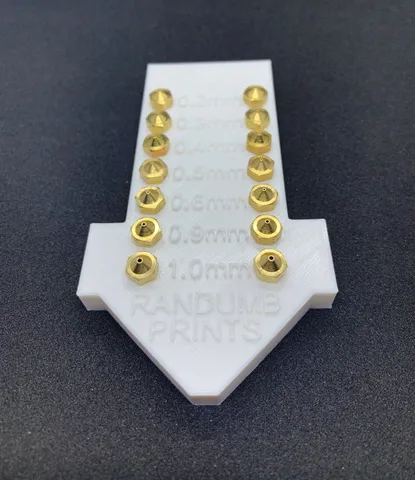
An exaggerated nozzle for your nozzles! Edit: I've added a lid! - The lid is only for the OpenSCAD version of this file as its slightly bigger than the pre .stl'd ones :) Print instructionsThis was a fun one, a very simple project that evolved into so much more! I have included a few files, several ready to slice and go and two that can be opened in OpenSCAD and played with, because thats the fun of 3D printing right? The tinkering! The comments in the .scad files should make it pretty clear and i've included them below but I have also have them and a readme.txt on my Git for anyone thats interested https://github.com/RandumbPrints/OpenSCAD_Nozzle_Holder Let me know what you think! Massive thanks to Karlos for the help and advice with the OpenSCAD files. Wouldn't have been possible with out him! Why not check out his prints too? (https://www.prusaprinters.org/social/46341-karlos/prints) Prerequisites What should I do first? Well first and foremost - Install OpenSCAD you can install OpenSCAD here: https://www.openscad.org/ Next you need to download and install The Belfry OpenSCAD Library or BOSL for short, this can be done by going to this GitHub repository: https://github.com/revarbat/BOSL The install instructions for the BOSL are included in their Readme file, but for ease, I've copied them here. However if you want to understand OpenSCAD and how powerful it can be I really recommend reading the README.md file on the above repository. Quote from README.md (https://github.com/revarbat/BOSL/blob/master/README.md) Download the .zip or .tar.gz release file for this library. Unpack it. It should create a BOSL-v1.0 directory with the library files within it. Rename the directory to BOSL. Move the BOSL directory into the appropriate OpenSCAD library directory for your platform: - Windows: My Documents\OpenSCAD\libraries\ - Linux: $HOME/.local/share/OpenSCAD/libraries/ - Mac OS X: $HOME/Documents/OpenSCAD/libraries/ 5.Restart OpenSCAD. Once you've done the above, you're ready to rock and roll! Open the .scad file and it should just work, kind of like magic, but more like the conclusion of the steps we took above ;) Instructions So what can I do with your file I hear you say? Well its a fair question and you're this far in and you've not edited anything, well below is a list of things that you can easily change: Remove the "branding" Edit the diameter text Select how many holes you need Choose a 1 or 2 Column designed Threads (depending on which file you've downloaded) All of these options have been designed in a way that its easy and accessible with very little knowledge of OpenSCAD, even for the first time user this should be easy. There are also comments in the file which makes it easy to follow incase you get this far and decide not to bother reading. If its not easy or you think these instructions need updating, let me know! Remove the branding On line 15 you'll find "logo = true;" to remove the branding simply set true to false e.g. logo = false; hit F5 and its gone! Edit the diameter text On lines 19-25 you'll find - [hole_spacing 0,"0.2mm"], [hole_spacing 1,"0.3mm"], [hole_spacing 2,"0.4mm"], [hole_spacing 3,"0.5mm"], [hole_spacing 4,"0.6mm"], [hole_spacing 5,"0.9mm"], [hole_spacing * 6,"1.0mm"], To edit the text on the file simply change it between the "" Hit F5 and boom, its changed! Select how many holes you need On lines 11 you'll find "hole_count =7;" Just change the number people, see I told you it was easy. (Please note 7 is the max) Hit F5 and its changed! Choose a 1 or 2 Column designed On line 15 you'll find "second_col = true;" for a 1 column design, set this to false eg. second_col = false; Hit F5 and well you get it by now! Threads Okay so threads, after Initially being totally happy with the design, my friend and I thought, you know what this needs threads so that the nozzles can screw in gently and not fall out. I'm happy to report the theory worked, however the practicality of my printer not being as accurate as it could be, the threads are hit and miss. I'm including this because I really feel with a better printer it will be better, so here we go. Firstly, go to https://dkprojects.net/openscad-threads/ and save the file into C:\Users(user)\Documents\OpenSCAD\libraries Then open up the Nozzle Holder - Variable - Threads file - This is process heavy apparently so you can't pre-render with an F5 you have to fully render with F6 and then wait Total honesty moment, the render took 15 mins on my laptop. Hopefully others will find it faster. Export to .stl for slicing To export to your favourite slicer, hit F6 to render the file. Once you've finished that, the preview will show the whole print in a single colour. All you have to do now is press the STL button on the menu and save the file where ever you want. That's it folks! Probably one of the longest text files I've ever written. I've tried to explain this as clear as I could but if you feel its too much or too little, let me know! Thanks for reading everyone! I like to think I'm pretty cool, so feel free to edit, play with, remix, print and have fun. Please don't sell it though. It's designed to be free for everyone :)
With this file you will be able to print Nozzle Holder with your 3D printer. Click on the button and save the file on your computer to work, edit or customize your design. You can also find more 3D designs for printers on Nozzle Holder.