No Screws Bracket for Honeycomb Wall
prusaprinters
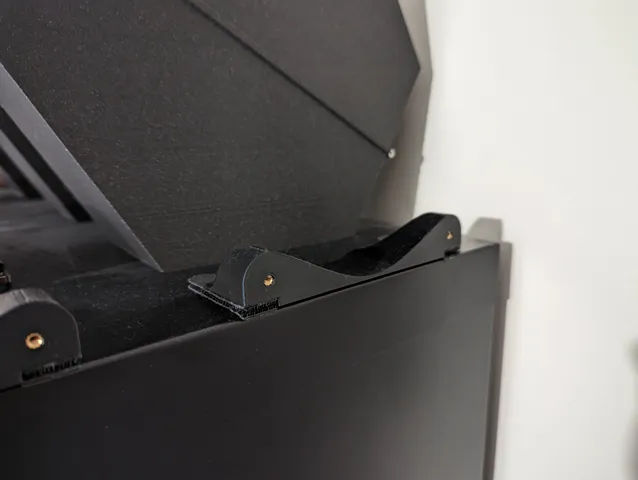
This model is designed to allow you to use command strips to secure a honeycomb storage wall to the top of a cabinet, without using screws and without damaging the cabinet. I designed this model as I wanted a way to attach the honeycomb wall to a metal cabinet, where I couldn't use screws or nails. The design of the bracket is deliberately sleek, playful and unlike anything you are likely to find “off the shelf”.For each bracket, you will need the following:2x M3 threaded inserts (https://www.prusa3d.com/product/threaded-inserts-set-standard-200-pcs/)2x 14 mm M3 screws2x M3 washers4x small command strips (e.g. https://command.3m.co.uk/3M/en_GB/command-gb/products/~/Command-Small-White-Picture-Hanging-Strips-17202-4UKN-4-Pair-Pack-27-Pack-Case/?N=5002385+8709316+8709366+8710658+8710846+8711749+8723963+3288690972&rt=rud)The following pieces from the original honeycomb wall design:1x honeycomb wall (fits the original, as well as the mk3s version)2x “hexagon-countersung-and-hole.stl”To assemble, first add the threaded inserts using a soldering iron, following the instructions on the packet.Next, attach the command strips to the slots in the base of the bracket and attach the bracket to where you want it to be.Insert the “hexagon-countersung-and-hole.stl” models into two hexagons at the top of the honeycomb wall, in such a way that the countersunk portion sticks out of the top (see pictures), in line with the bracket. Make sure the model is oriented as it is in the picture (i.e. with the “flat” sides to the sides, and the sides with the projecting hexagons to the top and bottom. This can look a bit messy, so I have included a model for a single hexagon, which you can clip onto each of the projecting parts to cover them up.Attach the M3 screws, via the washers and the countersunk holes in the “hexagon-countersung-and-hole.stl” models.Voila, your honeycomb wall is attached. You can add additional brackets (as I have done) to add more honeycomb walls sideways, or add more vertically by sticking them directly to the cabinet (command strips don't adhere strongly to the wall attachments, so it may fall off, if you don't use the bracket at the top!).
With this file you will be able to print No Screws Bracket for Honeycomb Wall with your 3D printer. Click on the button and save the file on your computer to work, edit or customize your design. You can also find more 3D designs for printers on No Screws Bracket for Honeycomb Wall.