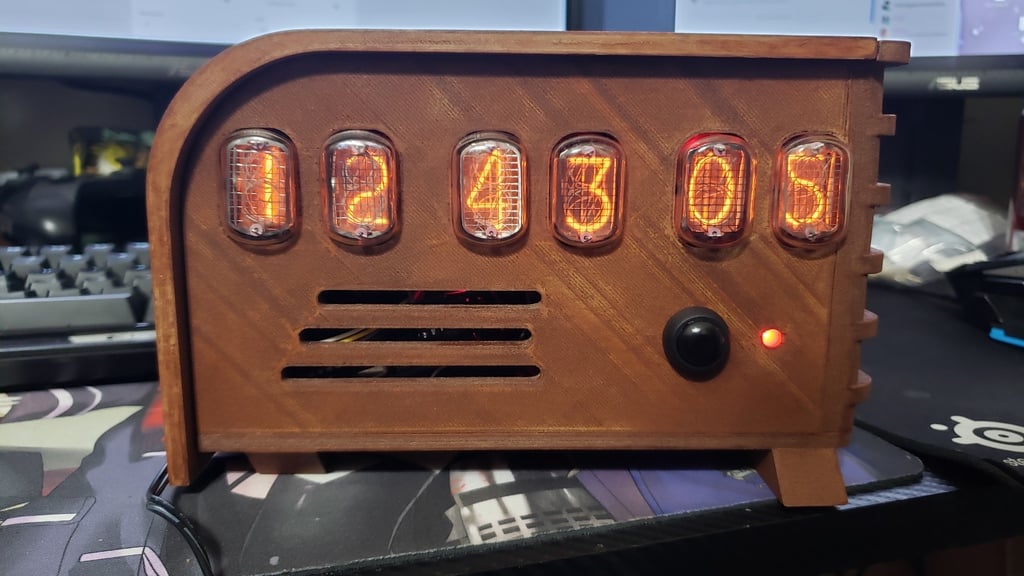
Nixie Clock Case (50s era)
thingiverse
When assembling my nixie clock kit, I discovered a shortage of suitable options that matched the age and style of the nixie tube. To bridge this gap, I designed a case inspired by a stylish 4-tube layout found on Google. The design was entirely built from scratch based on a single image. Each side of the case is a separate piece and should be printed independently using a printer with a minimum print size of 200mm x 200mm. Smaller printers can still be used, but you will need to adjust your printing angles accordingly. The design includes holes for a mini toggle switch on the back and a 12mm push-button switch on the front, as well as a 5mm LED. The dimensions for the toggle switch hole are 6.4mm, while those for the 12mm push button are 13.6mm. The tube holes perfectly match the NH-12A nixie tube, requiring minimal sanding to achieve a snug fit. This design choice allows for easy disassembly without the need for glue. The clock's compact depth restricts it to supporting boards that are approximately 60mm wide. While the length is generally sufficient up to about 6 inches, space becomes increasingly limited once the tubes are installed, making it essential to select a board with care. I recommend using the one linked below, as it is currently used in my clock. Parts Used: I employed a three-position switch due to its availability, but this configuration will work for your project. Here's where you can find the switch: https://www.ebay.com/itm/10Pcs-2-Pin-SPST-ON-OFF-2-Position-250VAC-Mini-Toggle-Switches-MTS-101-US-Stock/401585759456?hash=item5d806064e0:g:B48AAOSwp6lbgL9s:rk:3:pf:1&frcectupt=true 12mm Push Button: https://www.ebay.com/itm/10pcs-12mm-Waterproof-momentary-ON-OFF-Push-button-Mini-Round-Switch-Black-M122/222605766562?epid=2173810532&hash=item33d4566fa2:rk:1:pf:0 Clock Kit: This kit includes the circuit board and all necessary components except for the nixie tubes themselves. Here's where you can find it: https://www.ebay.com/itm/6-Digit-Nixie-Clock-Kit-Easy-Build-No-Tubes-Open-Source-Arduino/131740553919?ssPageName=STRK%3AMEBIDX%3AIT&var=431652218025&_trksid=p2057872.m2749.l2649 Assembly Instructions: Once printed, sand all edges with 220-grit sandpaper and superglue the pieces together. Leave the top unglued for easier access to internal components. If you print with wood, consider staining it as I did.
With this file you will be able to print Nixie Clock Case (50s era) with your 3D printer. Click on the button and save the file on your computer to work, edit or customize your design. You can also find more 3D designs for printers on Nixie Clock Case (50s era).
