MX105
thingiverse
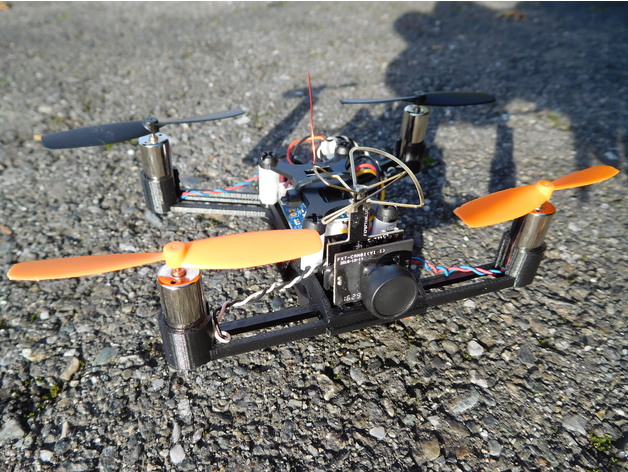
Also works great as a replacement frame for a QX95 if you happen to break yours. Let me know if you'd like anything modified. I have a TBS Discovery but I'm really not that good of a pilot yet. I get nervous flying my $1000 Discovery in fear of crashing or losing it. I decided to build a micro quad instead. I printed a few other frames from here on Thingiverse, but in the end, I didn't really like them. They were either too heavy, or I just didn't like the looks. I found the QX kit online and really liked the frame, but I had already bought all the components for building my own, so I modeled this frame based on the QX frame. My frame has a slightly larger wing span because I'm using the FX797T AIO camera, which has a shorter antenna than the one on the QX. I needed the props to clear, and everything is "sandwiched" with (4) M3 x 25mm nylon screws and nuts. The flight controller is an F3 EVO brushed and is held down in place by standoffs. There's a tilted platform on the front of the frame (about 20 degrees) for the AIO camera to sit on. The camera in the picture is the FX797T with the plastic case removed. There are holes in the frame for a rubber band to pass through and around the camera, making this mounting way easier with the case removed from the AIO camera. The top deck is designed for a micro Futaba receiver to be zip-tied and has a small retaining hole for the antenna to pass through and remain somewhat supported. The 8.5mm motors fit nice and snug in the motor cups. BOM: 1. Frame: Print the frame preferably in ABS, as the motor cups may get a little warm. 2. F3 EVO Brushed Flight Controller: This is the flight controller I used, but you can choose any other one that fits your needs. 3. FX797T AIO Camera: I used this camera, but you can use any other AIO camera with a similar footprint when you remove the case. 4. Spintech Motors: These are the motors I used, but there are many sources for 8.5mm motors available on the market. 5. Micro Futaba Receiver: This is the receiver I used, but you can choose any other standalone RX that fits your needs. 6. Nylon Bolts and Nuts: You'll need these to secure the frame together. 7. Standoffs: You can buy standoffs or print them yourself. The 25mm ones I used are able to pass through the entire frame assembly and secured using a nylon M3 nut on the very bottom. 8. Velcro Battery Strap: This is something you can find or steal from an extension cord or phone charger. Keep in mind that there are other options for some of these components, and these are just what I used. I think multiple different types of AIO cameras can fit on the frame as most of them have the same footprint when you remove the case. The Spintech motors are what I used but there are many sources for 8.5mm motors available on the market. Print Settings: Printer Brand: Ultimaker Printer: Ultimaker 2 Rafts: No Supports: Yes Resolution: .2 or smaller Infill: 100% Notes: Very easy and quick to print. Use support on the small battery strap holders.
With this file you will be able to print MX105 with your 3D printer. Click on the button and save the file on your computer to work, edit or customize your design. You can also find more 3D designs for printers on MX105.
