Multi Colour Dice Customisable (foldable)
prusaprinters
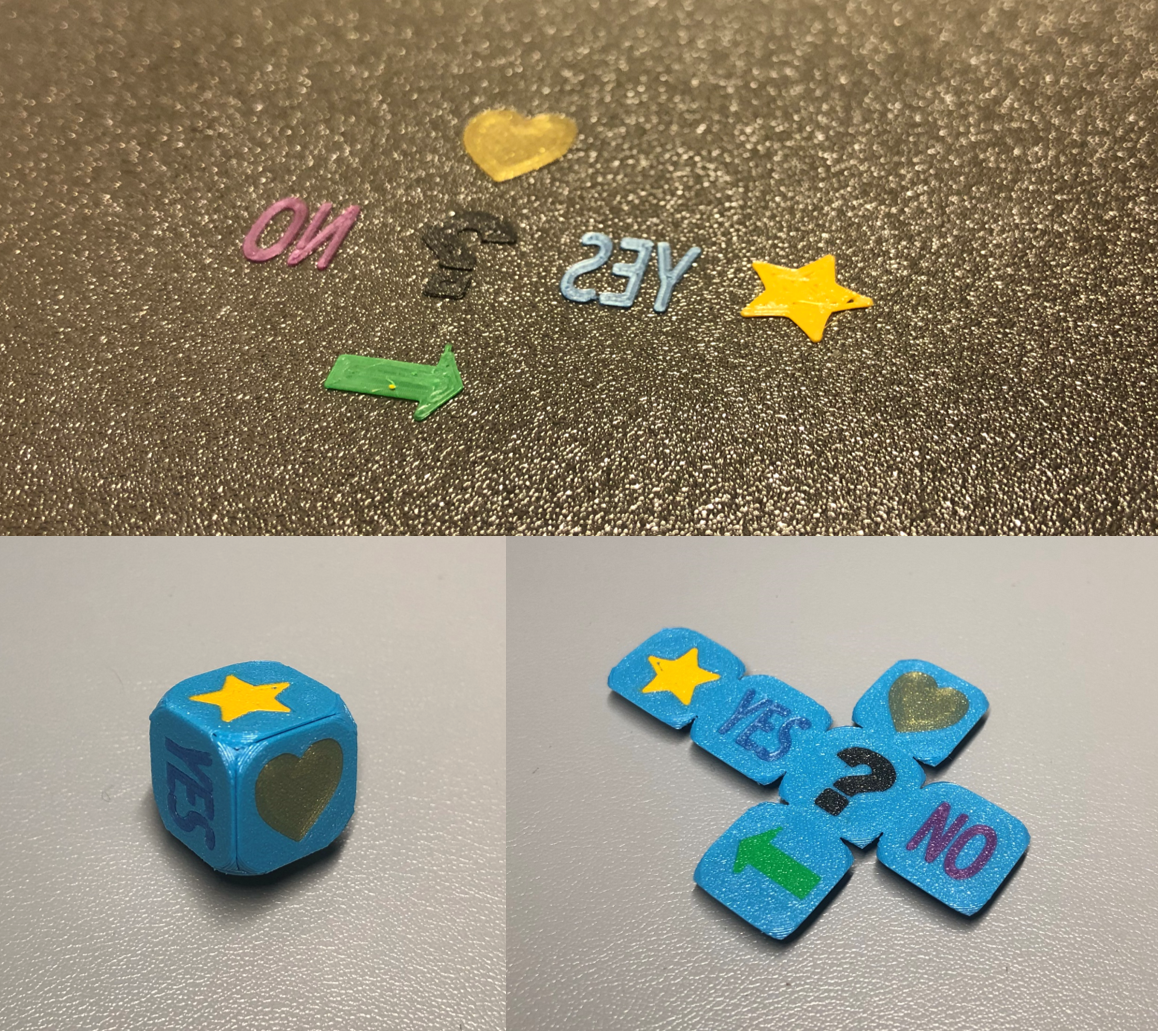
<p>This model includes dice-blanks and pips-blanks of few already published dual colour foldable and fair dice for creating dice with custom symbols. A step-by-step instruction is included to create the required files with Tinkercad for free.</p><p> </p><p>The blanks of the following dice are available:</p><ul><li>Dual Colour Dice (foldable) is a 6-sided dice with 14.6mm edge length and a 5mm corner radius. <a href="https://www.printables.com/model/209926-dual-colour-dice-foldable">Dual Colour Dice (foldable) by Dario Cairoli | Download free STL model | Printables.com</a></li><li>Dual Colour Dice rounded (foldable) is a 6-sided dice with 14.6mm edge length and a 7mm corner radius. <a href="https://www.printables.com/model/210184-dual-colour-dice-rounded-foldable">Dual Colour Dice rounded (foldable) by Dario Cairoli | Download free STL model | Printables.com</a></li><li>Dual Colour Dice sharp (foldable) is a 6-sided dice with 14.6mm edge length and a 2mm corner radius. <a href="https://www.printables.com/model/210191-dual-colour-dice-sharp-foldable">Dual Colour Dice sharp (foldable) by Dario Cairoli | Download free STL model | Printables.com</a></li></ul><p> </p><h4>Last Meters Competition</h4><p>This dice uses multiple materials. Each symbol can be printed in its own colour. To print the symbols approximately 2cm of 1.75mm filament are needed. the dice body itself uses 80cm of 1.75mm filament.</p><p> </p><h4>Tips and Tricks</h4><p>To Slice the pips in Prusa Slicer, you need to cut the part at 0.2mm and only keep the top part. This allows to print all numbers oriented correctly as one part. While slicing, make sure, that you do not move the loaded part. That ensures the correct orientation.</p><p>For the pips to print well, you need a good first layer calibration. I tend to print those by lowering the nozzle by 0.15mm compared to normal first layer z-height.</p><p>Make sure to remove the skirt after the pips are printed. If you have some stringing, try to clean up the most prominent whisps for a clean main print.</p><p>Make sure, that the print bed does not cool down between printing the pips and the dice body.</p><p>After printing, the satisfying folding of the dice is next. I found the best order to fold the dice is to start with folding the 6 and 1 onto the 4, then continue with 2 and 5 and finally close it all up by folding the 3.</p><p>If you get stretchmarks on the seams, you can use a lighter to restore the original colour. Let the flame touch the discoloured edge for a few split seconds until the white stretchmarks disappear.</p><p> </p><h4>Instruction for dice customisation with Tinkercad</h4><p><strong>1.</strong> Load the Dice-Blank into Tinkercad. Make sure you don’t move the model around (this is important later, but can be fixed).</p><p><img src="https://media.printables.com/media/prints/210275/rich_content/dada6c3b-c2ba-49b2-9b6b-97db1d6e1a3b/image.png#%7B%22uuid%22%3A%22ca3b111d-9c57-4eea-81ef-669965acddf3%22%2C%22w%22%3A1388%2C%22h%22%3A919%7D"></p><p><strong>2.</strong> Drag and drop any symbol of your choice from the Tinkercad library or any symbol you have as stl-file in the project.</p><p><strong>3.</strong> Resize and rescale the symbol as follows: The x and y dimensions should be scaled to about 8 to 10mm. The z dimension needs to be resized to 0.3mm. Additionally mark the symbol as “hole”.</p><p><img src="https://media.printables.com/media/prints/210275/rich_content/b2c8483c-9ef9-4884-9523-3aaf1664b707/image.png#%7B%22uuid%22%3A%22c55e287f-d4ea-4abe-898c-a2194b8ef400%22%2C%22w%22%3A1384%2C%22h%22%3A917%7D"></p><p><strong>4.</strong> Change to bottom view. Place the symbols on the dice side of your liking. Make sure that the symbol has sufficient distance to the edge of the dice side (at least 1mm).</p><p><strong>5.</strong> Now select all symbols and group them with the dice body. This will cut the symbols into the dice-blank. Export the new dice body. </p><p> </p><p><img src="https://media.printables.com/media/prints/210275/rich_content/97ed9780-2295-4f36-84e6-794419fc55ea/image.png#%7B%22uuid%22%3A%221cccaef9-cd8e-45e5-aa1c-4d8915812aa2%22%2C%22w%22%3A1387%2C%22h%22%3A917%7D"><img src="https://media.printables.com/media/prints/210275/rich_content/a5a029da-c1d3-4504-abc6-07722ec716df/image.png#%7B%22uuid%22%3A%22672a7577-3550-4740-a0a0-4bcdca38dfa2%22%2C%22w%22%3A1384%2C%22h%22%3A914%7D"></p><p><strong>6.</strong> Import the pips-blank.</p><p><img src="https://media.printables.com/media/prints/210275/rich_content/6f9bf37d-a468-4235-8fc7-c8dab5f9d143/image.png#%7B%22uuid%22%3A%22d450ae10-d624-48cc-9952-8ae3d57d9814%22%2C%22w%22%3A1387%2C%22h%22%3A917%7D"></p><p><strong>7.</strong> Move the dice body 0.2mm in positive z-direction. If you moved the dice-blank, you can just delete it and import your new dice body. It will centre it to the pips-blank again.</p><p><img src="https://media.printables.com/media/prints/210275/rich_content/7768f4b0-3df4-4130-aab5-95b6f37792d4/image.png#%7B%22uuid%22%3A%22d5987765-8378-4524-ad80-52e0fc791367%22%2C%22w%22%3A1384%2C%22h%22%3A917%7D"></p><p><strong>8.</strong> Make sure you exported the dice body already, since it will be used to cut the symbols into the pips-blank. Mark the dice body as “hole” and group the dice body and pips-blank.</p><p><img src="https://media.printables.com/media/prints/210275/rich_content/38bc9b53-226f-4826-bb58-a1f0959f132b/image.png#%7B%22uuid%22%3A%22714d81e3-541a-47fa-8879-43b18611c97e%22%2C%22w%22%3A1385%2C%22h%22%3A913%7D"></p><p><img src="https://media.printables.com/media/prints/210275/rich_content/ee3d0810-2d01-4dfe-a95b-098f5b81c1f9/image.png#%7B%22uuid%22%3A%222f89d401-6b5c-48a8-9b85-585f5c6b1044%22%2C%22w%22%3A1386%2C%22h%22%3A917%7D"></p><p><strong>9.</strong> Export the new symbol body.</p><p><strong>10.</strong> If symbols need to be printed in different colours, you need to repeat step 5) for each symbol with unique colour. With the undo command you can return to the beginning of step 5). Make sure you export one version with all symbols cut out. This will be your file for printing the dice body. The dice bodies with only the selected symbols cut out will be used to proceed with step 6) to 9) to create the individual symbol bodies. <br> </p>
With this file you will be able to print Multi Colour Dice Customisable (foldable) with your 3D printer. Click on the button and save the file on your computer to work, edit or customize your design. You can also find more 3D designs for printers on Multi Colour Dice Customisable (foldable).
