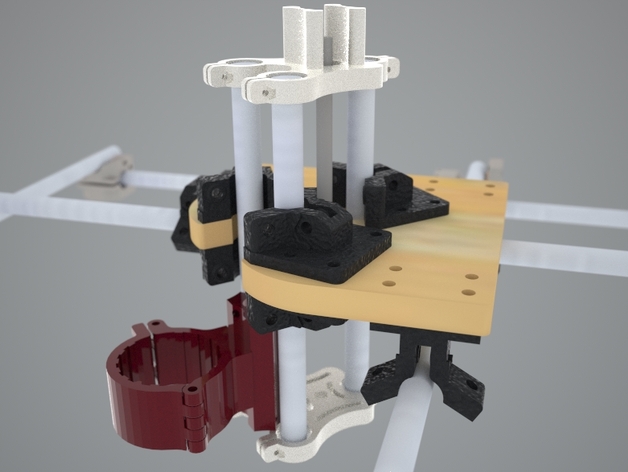
MPCNC WD_Platform_Mod Version 2
thingiverse
Flower Relief Vid https://youtu.be/iH5e_Hmh3Yo Update: Added skp file. https://youtu.be/sV9Fkbcss_U https://www.youtube.com/watch?v=wVbgnNDuzdI&feature=youtu.be Step 1: Open the dwg platform in your preferred CAM software and carve out. I have also included the gcode I used as an alternative to generating my own code. Watch how fast it goes! Step 2: Print the test part and check for tolerances; it should be snug, not loose. If the print comes out too loose, try using a thin shim like aluminum from a soda can or modify the included skp file. Step 3: If you're satisfied with the test fit, then print the following. WD_RemixPlatformV2_ZAxisTopMount - 1x WD_RemixPlatformV2_ZAxisBottomMount - 1x Step 4: Print these parts from the first remix. (Exactly the same) WD_RemixPlatform_ZBearing - 5x (3 for top, 2 for bottom) WD_RemixPlatform_XRod - 2x WD_RemixPlatform_YRod - 1x Step 5: Install bearings on all parts. (Note: I had to loosen or remove a bolt sometimes to fit in another bolt. You can take out a bearing and screw it back in no problem, and you can also add or remove parts from the rod if you take out a bearing.) Step 6: Assemble everything loosely without rushing to secure the brass nut. Make sure everything lines up and attach four small screws to the brass nut. Test the range of motion of the z-axis using your host program. Afterward, add an anti-backlash effect by placing another brass nut upside down on the bottom with a spring. Hand-position the brass nut about 2 mm away from the platform with tension on the spring and attach two small screws. The brass nut should be able to move slightly along the two screws. Step 7: Update firmware z steps/mm. I found that 800 works for this specific lead screw. http://www.aliexpress.com/item/3pcs-T8-8-mm-screw-300-mm-8mm-lead-trapezoidal-spindle-screw-with-3pcs-brass-copper/32472265214.html GCode Instructions: I used a 1/8" bit for Step1 and Step2. I then switched to a round router bit for Step3 and Step4 (optional). Step1 - Position the bit on the work piece in the center and run. It should drill out holes. Step2 - Place screws in at least three holes to secure the work piece, then run step2. Step3 - Change the bit and run step 3. Step4 - Remove excess material and secure the piece. After securing it, remove all screws and run Step4. Don't run with screws in the holes; it won't be pretty.
With this file you will be able to print MPCNC WD_Platform_Mod Version 2 with your 3D printer. Click on the button and save the file on your computer to work, edit or customize your design. You can also find more 3D designs for printers on MPCNC WD_Platform_Mod Version 2.
