MPCNC Sharpie Attachment
thingiverse
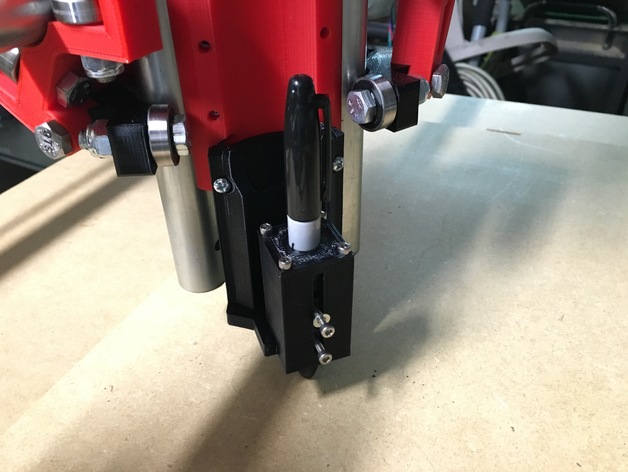
Here is a little attachment for the updated Multi-Purpose CNC machine tool holder https://www.thingiverse.com/thing:724999. You can use a Sharpie Marker or pen or pencil to create your drawing. To assemble, you will need one or two 3x6 mm screws and washers plus a spring from the spring kit found at Home Depot. http://www.homedepot.com/p/Everbilt-Miscellaneous-Spring-Assortment-SP-9901/100142075?cm_mmc=Shopping%7cTHD%7cG%7c0%7cG-BASE-PLA-D25H-Hardware%7c&gclid=Cj0KEQjwhN-6BRCJsePgxru9iIwBEiQAI8rq80TpgVQ5vZSh9YOtsZPn6ybWt-3CetZ28zel043RhRoaAgyf8P8HAQ&gclsrc=aw.ds. The spring may require massaging to fit over the Sharpie properly. All of the springs in the kit were slightly too small, but you can bend one with some effort. It is a good idea to sand down the ridges in the insert for smoother movement inside the base. I also applied lithium grease for lubrication. Place the spring over the Sharpie and insert the Sharpie into the insert, tightening the 3mm screws just enough to hold it in place. Tighten too much, and the insert will not move freely within the base. You can either glue on top or use 2mm screws to secure it. Attach to the new tool mount and enjoy drawing with your MPCNC. The Sharpie should touch the surface with sufficient depth to apply spring tension.
With this file you will be able to print MPCNC Sharpie Attachment with your 3D printer. Click on the button and save the file on your computer to work, edit or customize your design. You can also find more 3D designs for printers on MPCNC Sharpie Attachment.