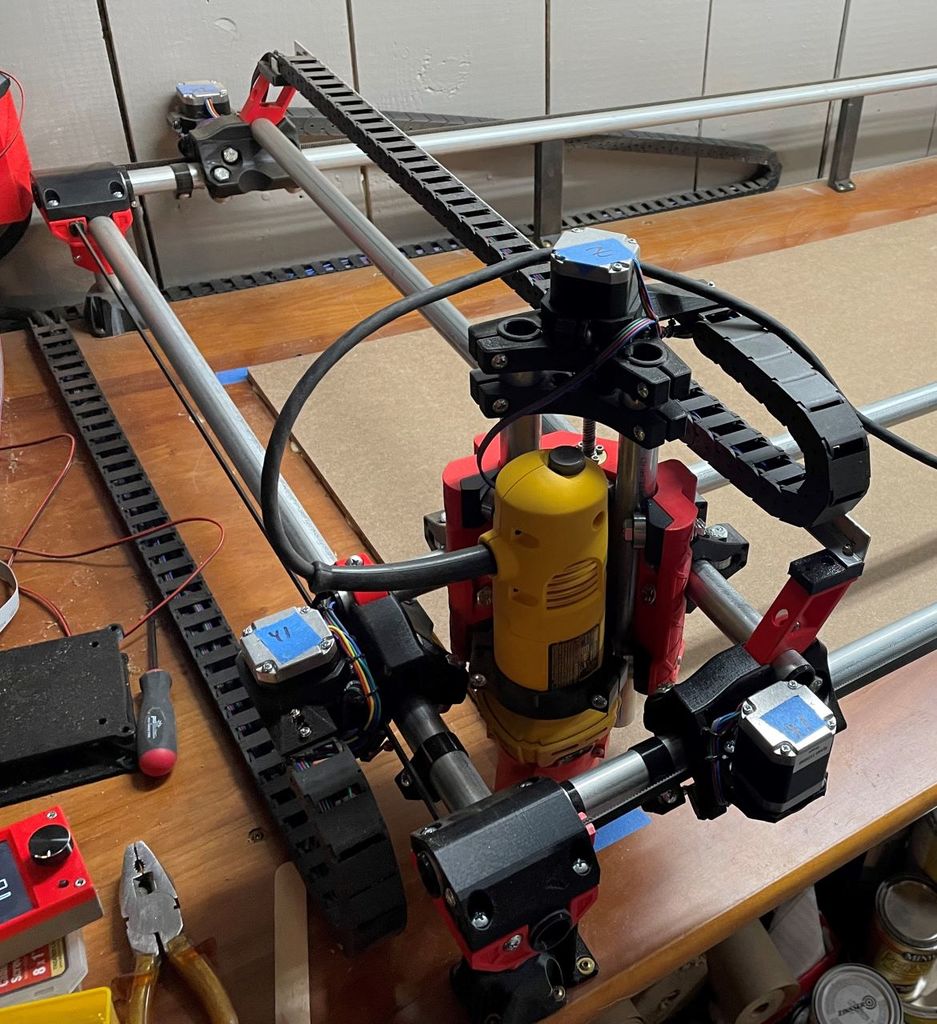
MPCNC Primo Nema17 drag chain mounts
prusaprinters
<p>Drag chain mount for MPCNC Primo, remixed from thing <a href="https://www.thingiverse.com/thing:4613811">https://www.thingiverse.com/thing:4613811</a>. I chose to attach the drag chains directly to the Nema17 steppers with a design that straps around the motor and kept in tension with a screw.</p><p>The drag chains i used are Sunhokey 15x20mm, purchased from https://www.amazon.com/gp/product/B07MJPBV4Y. I needed four of them since i have a larger machine (3x5' footprint).</p><p>For the drag chain from the gantry, I used a simple aluminum angle to give the drag chain some support to rest on (it's ok if it's only on one side). This was inspired by <a href="https://www.thingiverse.com/thing:4635424">https://www.thingiverse.com/thing:4635424</a> but created from scratch for my application.</p><p>Update April 16, 2021: added J and F size clamps.</p><h3> </h3><h3>Print Settings</h3><p><strong>Printer Brand: </strong>Prusa</p><p><strong>Printer: </strong>I3 MK3S</p><p><strong>Rafts: </strong>No</p><p><strong>Supports: </strong>No</p><p><strong>Resolution: </strong>0.2mm layer height</p><p><strong>Infill: </strong>20%</p><p><strong>Filament: </strong>Prusament PETG Black</p><p> </p><h3>Post-Printing</h3><p>In my setup, i have three drag chains.</p><p>The first drag chain is on the left, attached to the motor using part nema17-mount-yleft.stl, and leading to the rear left of the machine. This drag chain has all motor and endstop cables for the y-travel direction. The cables from the right-hand-size motor are routed inside the pipe to the motor truck on the left.</p><p>The second drag chain is connected to the gantry motor using nema17-mount-gantry.stl, and is angled and elongated in order to meet up with the drag chain support underneath. This drag chain contains the z-axis wires, endstop, and could also have your router/laser/probe wires if you want to.</p><p>This drag chain rests on a narrow aluminum extrusion (15x10mm) which is mounted to truck_clamp_c_primo_raised.stl and truck_clamp_c_primo_plate-small.stl on the front the machine, and parts truck_clamp_c_primo_raised.stl and truck_clamp_c_primo_plate-large to the rear of the machine. The drag chain is screwed to truck_clamp_c_primo_plate-large using an m3 bolt and nut.</p><p>The third drag chain is in the rear, attached to the read x motor using part nema17-mount-xrear.stl. This is a mirror of the nema17-mount-yleft part. This drag chain has the x-motor wiring and endstops, as well as the wires from the gantry, and leads to the rear left of the machine.</p><p> </p><p> </p><p> </p>
With this file you will be able to print MPCNC Primo Nema17 drag chain mounts with your 3D printer. Click on the button and save the file on your computer to work, edit or customize your design. You can also find more 3D designs for printers on MPCNC Primo Nema17 drag chain mounts.
