Mount for the Runleader Digital Tach for the Honda Navi
prusaprinters
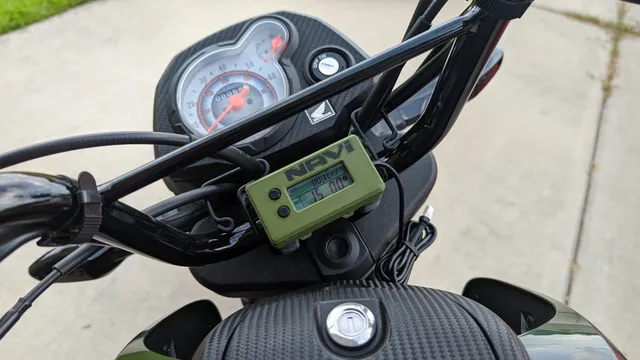
This is the work in progress mount I have designed for the Runleader digital Tach, and is designed to fit on the Honda Navi. The Runleader can be purchased on Amazon for around $25 here. To complete this build as pictured, you will need:(8) M3x10 screws(1) M3 Drill/Tap PRINT (2) ButtonPRINT (1) Case_Bottom (either version)PRINT (1) Case_Top (either version)PRINT (2) Hinge_Bottom_HalfPRINT (2) Hinge_Top_Half OPTIONAL: Cricut Maker Machine with Permanent VinylCase VersionsI have included a version of the Case_Top that has the Navi Logo ‘engraved’ as well as a blank top. I have also included 2 versions of the bottom; one with a push hole, and one without. The Runleader sits very snuggly in the lower half of the case, and without a push hole, it can take a few minutes to wiggle out. The push hole version makes it easy to pop out, but you lose the ‘enclosed’ look, or if you are worried about dirt getting up in there or anything. Optional Vinyl LogoI have included the PNG image I used to cut out the vinyl logo sticker for the top of the case. If you opt to print this with cricut, upload the image and scale it to: 1.85" x 0.29" and it should fit perfectly on the engraved case version, or on the non-engraved version for that matter. PrintingAll pieces were printed on my Ender 3 Pro with a stock 0.4mm nozzle, and printed at 0.2 layer height. I used Gyroid infil at 35% for the top case, and 50% for the hinges. ConstructionWith all of the pieces printed, start by tapping all of the holes where a screw will end up. I bought a simple drill/tap screw set on amazon, similar to this (2) in the center of Case_Bottom(4) in the corners of Case_Top(1) in each of the Hinge_LowerNow use 2 screws to screw the Hinge_Top into the Case_BottomNow Insert the Buttons into the Case_Top, followed by the Runleader. With the Case_Top facing down, place the Case_Bottom onto the runleader, and screw in the 4 corner screws. InstallationThis is a tad tricky, so I recommend keeping the Navi level on the center stand. Start by placing both Hinge_Lower pieces on the handlebar as seen below. With 2 fingers holding the hinge_lower's in place, slide the case unto the hingesNow rotate the entire assembly towards the front with your two fingers supporting the lower brackets. Once it is level, you can drop your last M3 screws in and screw them in with a long allen wrench. Final ThoughtsI say this is a ‘work in progress’ because it is still Version 1, and I have only just installed it. The screwless hinge design is not my favorite solution due to the size of the hinges, and it has not been thoroughly road tested against vibration and heat yet. If it does end up breaking, I will make improvements and update this page. Update: Well she's been on the bike for 2 months and 250 miles now with no problems at all. Still secured tightly and no signs of wear or stress. Holding up very well to the heat and humidity of Louisiana.
With this file you will be able to print Mount for the Runleader Digital Tach for the Honda Navi with your 3D printer. Click on the button and save the file on your computer to work, edit or customize your design. You can also find more 3D designs for printers on Mount for the Runleader Digital Tach for the Honda Navi.