Mould for Silicone Robot Tyres
prusaprinters
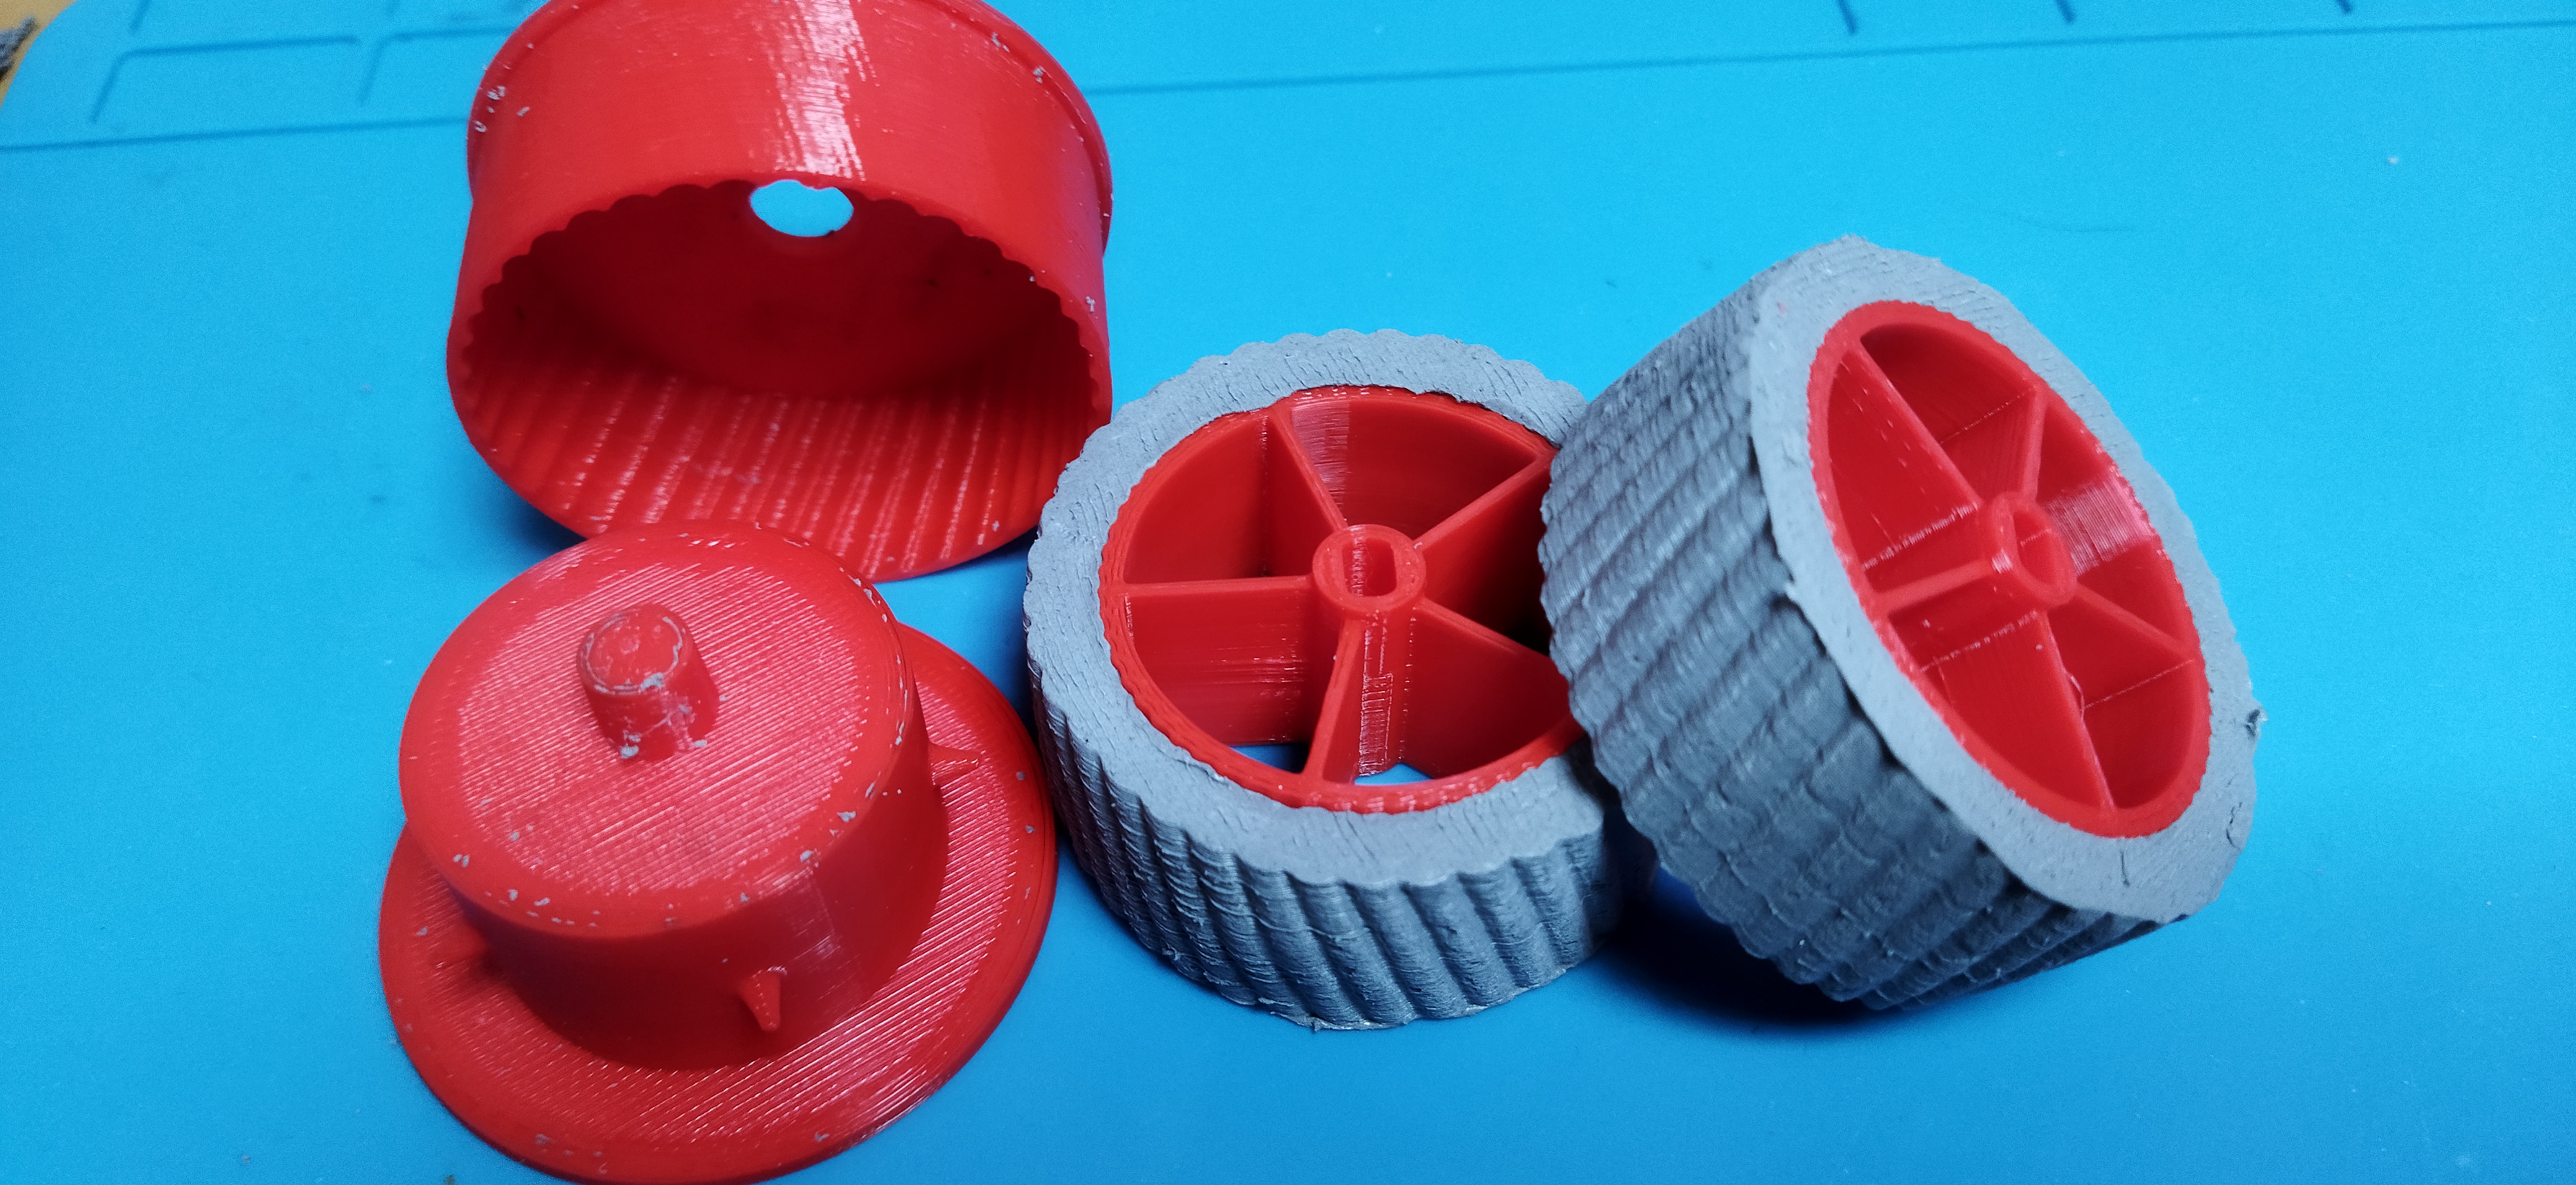
<h3>Introduction</h3><p>The first version of Scotbot had simple 3D-printed wheels, intended to fit onto cheap TT-motors and use a rubber band as a tyre. But… the rubber bands I had were too narrow and thin, and there wasn't enough traction for the torque put out by the cheap TT-motors… lots of wheelspins and erratic behaviour unless I slowed it right down. These moulded silicone tyres, made with ordinary bathroom silicone sealant, a couple of drops of glycerin and a dab of acrylic paint for colour, are cheap and have plenty of traction. I have included the parametric OpenSCAD files so that you can adjust the wheel diameter, width, tyre thickness and so on to suit your application. </p><h3>Features</h3><ul><li>Simple tread pattern provides good traction on most indoor surfaces</li><li>Hub designed for easy, friction-fit installation onto a TT motor's nylon shaft</li><li>‘Spikes’ in the wheel, with corresponding ‘sockets’ moulded into the tyre, ensure the tyres won't slip against the wheel (losing traction) or slide off while turning</li><li>Mould parts have rims allowing for quick and easy release even without any mould release agent</li><li>Mould parts have a locating pin for precision finish</li><li>Tyre stretches to fit on the wheel rim for snug, high-traction finish</li></ul><h3>You Will Need</h3><ul><li>Silicone sealant: I used the ordinary white bathroom sealant. But it does need to be real silicone, the stuff that reeks of vinegar - cheaper alternatives may not work.</li><li>Glycerine: a couple of drops considerably accelerates the cure time. Should be available from your local pharmacy/drug store, or from online retailers. A small bottle will last you for years.</li><li>Acrylic paint: a small squeeze to colour the wheels.</li><li>Disposable gloves: get yourself a pack of nitrile gloves in your size.</li><li>Lollipop sticks - flat wooden sticks as used for ice lollies, or perhaps wooden tongue depressors, for mixing and applying the silicone.</li><li>A non-porous mixing surface - I use a disposable plastic take-away tub, but even glossy paper should work well.</li><li>3D printed parts (see below)</li><li>Clamps to hold the mould closed - I use 2 inch spring clamps, which do a great job.</li><li>Paper towel</li></ul><h3>3D Printing</h3><p>All parts should be quite easy to print in generic PLA.</p><h4>Tyre Mould</h4><p>The tyre mould comes in two parts: </p><ul><li>tyre_mould_base.stl - the ‘outer’ mould. No supports needed.</li><li>tyre_mould_top.stl - the ‘inner’ mould. Depending on your printer, you may need supports for the ‘spikes’ projecting from the wheel - I did.</li></ul><p>I prefer to mould two wheels at a time (for perfect colour matching), and so I recommend printing at least two of each part. The moulds are reusable, and each set should be good for producing many wheels if you clean them carefully after each use.</p><h4>Wheel</h4><p>The model wheel_v2.stl is the wheel rim; each tyre is stretched over one of these. In other words, if you are producing two wheels, you will need to print two copies of wheel_v2.stl. This model is very similar to tyre_mould_top.stl, and again, I need supports for the ‘spikes’ as well as the inner shaft face on my printer.</p><h3>Moulding</h3><p>Hints before starting:</p><ul><li>Wear disposable gloves. Seriously, silicone is really messy and not fun to clean off when it cures on your skin - disposable nitrile gloves are a great investment and will make the whole process much more pleasant. Also, you can snip a finger off when you're done and use it to seal your silicone tube.</li><li>Invest in cheap wooden lollipop sticks - they are ideal for stirring the silicone and applying it to the mould parts.</li><li>Use the right silicone - ordinary bathroom silicone, the kind that smells strongly of vinegar while it is curing, is ideal. I used ‘Everbuild General Purpose Silicone’ (white), which was the cheapest silicone I could find, and it worked very well. It comes in a 280ml tube that you use with a skeleton gun. I suppose you could use a squeeze-tube, but the skeleton gun tubes seem to be much better value.</li><li>While the acrylic paint is not strictly necessary, it provides a useful indicator as to when the silicone has been properly mixed. Also, white wheels get grubby easily. I bought the cheapest black acrylic I could find on Amazon, and use approximately half a teaspoon per pair of wheels.</li><li>You might manage without the glycerin, but your model will need to cure for ages (24 hours or more) before demoulding. With the glycerin, the curing is much faster and more uniform, and you can safely demould the wheels after an hour.</li><li>It only takes a couple of drops of glycerin - seems to be a catalytic effect. A wee bottle from Amazon or you local pharmacy will probably be a lifetime supply.</li><li>Having clean paper towel on hand is always a good idea when working with silicone and acrylic paint.</li><li>This silicone gives off a strong vinegar odour as it cures - it will last for several hours before disappearing completely. You may wish to consider where you do this.</li><li>It may be a good idea to cover your work surface with newspaper, and wear old clothes. Once cured, silicone is a nightmare to clean off porous surfaces.</li></ul><p>Directions:</p><ul><li>Ensure both mould parts are clean.</li><li>Squeeze out some silicone onto a clean, non-porous surface. I use a disposable plastic tub, but I believe that glossy paper (eg advertising leaflet or take-away menu) works well, too. Three trigger squeezes from my skeleton gun is plenty for a couple of wheels.</li><li>Add two or three drops of glycerine.</li><li>Add a squeeze of acrylic paint (perhaps half a teaspoon per pair of wheels)</li><li>Thoroughly mix with a flat wooden lollipop stick until the colour is even.</li><li>Use the lollipop stick to smear a layer of the mixed silicone onto the round face of the tyre_mould_top. It should be thick enough to cover all of the spikes with an even layer all round. Try to avoid getting silicone on the flat ‘face’ of the mould; it should scrape off easily with the lollipop stick.</li><li>Now smear a layer of the mixed silicone onto the inside of the tyre_mould_bottom, making sure to press the silicone into the tread pattern. A layer about 2mm thick all around would be ideal.</li><li>Press the two parts of the mould together. The ‘pin’ on tyre_mould_top should locate neatly in the tyre_mould_bottom. Squeeze together with a small twisting motion until there is no gap between them. Ideally you should have a little squeeze-out, which you can easily scrape off with the lollipop stick or wipe off with paper towel.</li><li>Clamp the mould together - I use 3 two-inch spring clamps for each mould. Other clamps, or even elastic bands, would work too.</li><li>Leave for 60 minutes.</li><li>Separate the mould parts using the small rims. You can also place the projecting locator pin point-down on a table and press downward on the lower rim.</li><li>Once separated, peel the tyres out of the mould.</li></ul><p>At this point, I usually snip the pinky finger off one of the gloves I've been using, and seal it over the nozzle of the silicone tube with a rubber band, squeezing a small amount of silicone out into the finger. This keeps the silicone fresh for longer.</p><h3>Finishing</h3><p>Trim any flash off the tyres with a sharp pair of scissors. Clean the mould parts thoroughly - I find the silicone comes off easily and cleanly just by rubbing with a thumb. Stretch the tyre over its wheel rim, making sure the spikes locate in their receiving holes - it's easiest to start by locating one spike, then stretch the tyre around from there.</p><p>The wheel hub should friction-fit over the TT motor's nylon shaft. If required, an M3x8mm self-tapping screw can be used to fix the wheel - screw it through the small hole in the centre of the hub and into the TT motor shaft.</p><h3>Customising</h3><p>The included OpenSCAD files make it easy to customise wheel diameter, wheel width, tyre thickness, number of wheel spokes and many other parameters so that you can produce wheels and tyres well-fitted to your application.</p>
With this file you will be able to print Mould for Silicone Robot Tyres with your 3D printer. Click on the button and save the file on your computer to work, edit or customize your design. You can also find more 3D designs for printers on Mould for Silicone Robot Tyres.