Motorized blinds extremely cheap (IKEA Fridans esphome HA Home Assistant , MQTT homekit/homebridge + more or standalone)
thingiverse
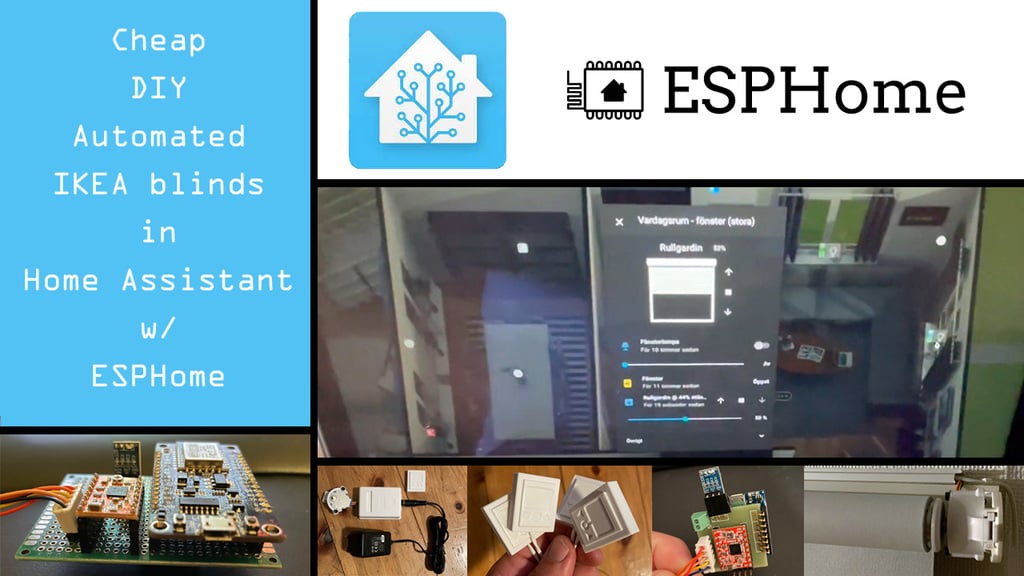
Here is my take on motorizing blinds to use in HA using ESPHome (they work stand alone as well). It has enough torque for 200cm in width (max that I've tested), uses the original fittings for for the roller blind for strength and there is few parts to print. No need for gears or ball bearings that complicates things. Speed is around 30 seconds to roll up/down 1 meter, this is for a blind with 200 cm in width (smaller blinds can be set to go faster but I wanted all mine to have the same speed, so it's set at 600 steps/s, to achive that "synced" look from the outside). I went with actual buttons for manual control, microswithces, to get that tactile feel. In the esphome integration I've also added support for magnet sensors (reed switches) to tell if the actual window is open or not, this is optional or if you'd like you could add light sensors, pir sensors or similar, there will be plenty of GPIO pins for whatever you need to add. I just found adding the reed switch a good alternative due to the proximity to the window. As a motor it uses the dirt cheap 28byj-48 (5V version) stepper motors together with A4988 motor controller. I've had no issues with motorizing 200cm wide rollers. Stepper driver A4988 runs the stepper in biploar mode instead of unipolar as the ULN2003 driver does, This adds about double the torque/speed. If there is interest I've got a design that works with ULN2003 for an even cheaper design... (personally I would not bother though) ###My Reason: Fyrtur only goes to 140cm in width and I needed some 200/180/160cm ones. Also another reason is the price (motorizing 15 windows is not cheap even with IKEA Fyrtur) Final reason is me controlling the software/ESPHome for excellent HA integration. I wanted a simple design not having to print parts that might break, using neither ball bearings nor gears and using the actual mount for the blind helped with that. ###The Cost: Compared to an IKEA Fyrtur roller blind (which is already a cheap alternative) it's about ~1/3 - 1/4 of the price. The more you make the cheaper they get.. ###Parts: > The 3D printed parts in this "thing" (I printed all mine using the original Ender 3) Please see attached image showing print-orientation, only "Fridans motor" needs support. > I orderd some PCB from an online PCB-Maker, to keep it tidy, but works just as well with "protoboard". > 2 x 20mm long m3 screws and nuts (preferably one 25/30mm m3 screw to fixate the nuts, see included photos) > 1 x 28byj-48 5v stepper motor > 1 x A4988 stepper motor controller > 1 x Wemos D1 Mini (I've tested NodeMCU V2 and V3 aswell) > 1 x ams1117-3.3 (to get 3.3V for you esp) > 1 x IKEA Fridans blackout roller blind of desired width > 1 x IKEA FIXA Screwdriver, lithium-ion 3.6 V, Sourced the battery eliminator and barrel jack for the same from this (Wierldy this was the cheapest way, and got a free lithium ion battery and a decent DC motor for future endeavors) the DC adapter is labeled 6V but measured value is 7.7V. (this can be swapped if you find a cheaper or you don't need the free parts ;-) ) > 1x micro tactile swicth if you want a hard button. > Reasonable length of wire > Some female and male pin headers. > Soldering iron and some base skills using it. > 1 or 2 reed switches with accompanying magnets (optional for sensing if window is open) > 1 x box of some type (I used what in sweden is called a kulo box, see pictures) (optional) Before mounting them I removed the springloaded side (left side) on the blind and re-attached it again, to "unravel" it to an "unsprung" position. If by some means (not even my 200cm wide ones needed this) the cover drags against something in the window (lamp/flowers etc.) and you feel it needs more torque, I would roll the cover down one revolution and flip the hanging part of the blind up and over itself again, so it is returned to the up position but the spring becomes tensioned, hopefully this makes sense, will add pictures if needed. the same might fix if you have very tall windows and the unrolled part is to heavy for the stepper, this will add more torison to the spring and will help the stepper. (had this while I was designing this and a long blind attached to a door opening, and this fixed it unraveling) I lastly mounted the blind to a piece of wood and then mounted that to the wall, was easier to find the studs in the wall, also wanted them mounted a bit above the actual window and a rolled out 10cm in the open position (for looks i'd guess). I've currently made 17 blinds for myself, all work perfectly, most blinds I've made are 140cm in width, but I have two 200cm and one 180cm that work equally good. Please look at the images included for instructions, wrote this in kind of a hurry to get it out there, so ask in the comments if anything is unclear and needs clarification. ESPHome .yaml script source is on Github: https://github.com/R34LiAM/HA-Roller Video showcase: https://www.youtube.com/watch?v=uZAkdkNRx30 Everything should be easy to find using the above list, but I'll add links to everything I bought eventually... will also add PCB layout for thoose interested. Finally if you build one, I'd love to here your thoughts, and posting a make would be awesome.
With this file you will be able to print Motorized blinds extremely cheap (IKEA Fridans esphome HA Home Assistant , MQTT homekit/homebridge + more or standalone) with your 3D printer. Click on the button and save the file on your computer to work, edit or customize your design. You can also find more 3D designs for printers on Motorized blinds extremely cheap (IKEA Fridans esphome HA Home Assistant , MQTT homekit/homebridge + more or standalone).