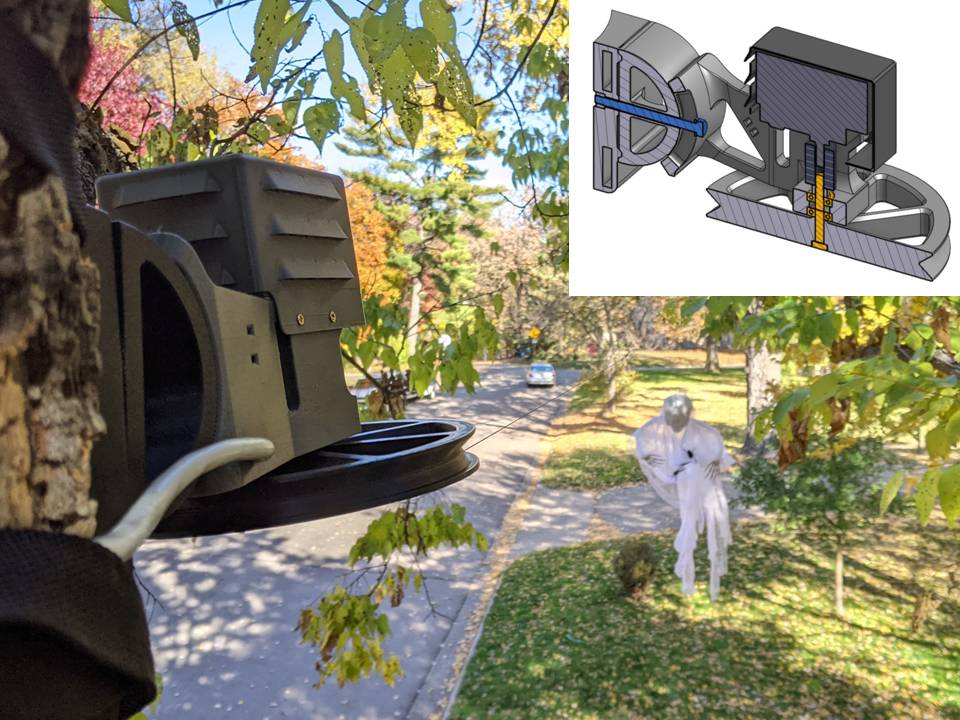
Motorized Axworthy/Flying Ghost Pulley System
prusaprinters
<p>This is a motorized pulley system to make your own Axworthy Ghost for Halloween. An Axworthy ghost is a spooky ghost that is made to look like a flying apparition through the use of fishing line, swivels, pulleys and some kind of motor. There are many examples online of people making them from bicycle wheels, electric drills, and other items found around the home. But, I did not find any 3D printable versions so I thought I's make my own. I will be the first to admit that this version may be a bit over-engineered, but with 3D printing why not?</p><p>Fishing line is strung between the pulleys and the ghost/s are attached using fishing swivels.<br/>As the pulleys rotate, driven by a motor, the fishing line is pulled around following a path between them carrying the ghost/s with it.</p><p>This is just the pulley system, no ghost provided. I purchased a cheap light version from amazon but you could definitely 3d print something. Just keep it light weight.</p><p>There are three assemblies provided: Drive Pulley, Tension Idler, & Idler. They are designed to mount to tree trunks/branches using ratchet straps or screws (I recommend straps). A single hex bolt allows you to adjust the pitch and roll of each pulley to account for branch angle. You will need to print at least a Drive & Tension assembly for a simple back and forth path.</p><h5><strong>Drive Pulley Assembly:</strong></h5><ul><li>Houses a 50 RPM shaded pole AC induction motor to power the system.</li><li>With an effective pulley radius of 3.5in (88mm) this creates a ghost speed of ~1.5ft/sec (0.5m/sec). I was going for a dementor like eerie floating feel.</li><li>Motor is connected to drive bolt via flexible coupling customized from <a href="/marcoalici">marcoalici</a></li></ul><h5><strong>Tensioner Idler Assembly:</strong></h5><ul><li>Helps add tension to the fishing line that runs between the pulleys to carry the ghost.</li><li>Can leave ratchet straps loose until fishing line loop is attached and then tighten straps to compress spring until desired tension is reached. You can also leave straps tight and use the fishing line notch on the top of the pulley to hook the fishing line and pull it around the pulley to tension the line(this requires optimizing/iterating the length of the fishing line loop).</li></ul><h5><strong>Idler Assembly:</strong></h5><ul><li>Provides additional pivot points on the path. Great if you want to make a more complex path, i.e. triangle or square.</li></ul><p><strong>Future Plans:</strong><br/>I would like to add a speed controlled DC motor as an option so the travel speed can be tuned.</p><h3>Print Settings</h3><p>Print in orientations from 3MF files.</p><h5><strong>Supports:</strong></h5><p>No</p><h5><strong>Resolution:</strong></h5><p>0.35mm Layers, 0.6mm Nozzle</p><h5><strong>Infill:</strong></h5><p>Yes</p><h5><strong>Notes: </strong></h5><p>Pulleys are designed to fit on a 200mm x 200mm bed.</p><p>Some parts include single layer thick section to turn what would have been geometry requiring supports to a single layer of bridging that can easily be cut away with a knife. If you are printing at layer heights less than 0.35mm be warned that these singled layer bridges may print as more than one layer.</p><p> </p><h3><strong>Use at your Own Risk</strong></h3><p>Word of <strong>Caution</strong>: Do not run this across public streets or anywhere the fishing line could get caught on a moving vehicle if it came off of the pulleys. Be aware of power lines whenever you are working in trees. Use at your own risk.</p><h3>Videos</h3><p>Drive Pulley Side - </p><figure class="media"><oembed url="https://youtu.be/s83zvFXB0Mo"></oembed></figure><p>Full Path - </p><figure class="media"><oembed url="https://youtu.be/aNLo8Lp_hrM"></oembed></figure><h3> </h3><h3>Parts List</h3><h5><strong>Common Parts</strong></h5><ul><li>Fishing Line, I used SpiderWire Stealth Braid Fishing Line 80lb test</li><li>Ghost, I would try to find something lighter than this or print/DIY your own.</li><li>Fishing Swivels</li></ul><h5><strong>Drive Pulley Assembly</strong></h5><p>QTY1, TREE_MOUNT stl</p><ul><li>QTY1, SWIVEL stl</li><li>QTY1, M8x90mm Hex Bolt</li><li>QTY1, M8x60mm Hex Bolt</li><li>QTY2, M8 Nylon Lock Nut</li><li>QTY1, M8 Washer</li><li>QTY2, 608-ZZ Bearings</li><li>QTY2, 1" Ratchet Straps</li><li>QTY1, DRIVE_ASSY_PIVOT_ARM stl</li><li>QTY1, ASSY_DRIVE_PULLEY.stl</li><li>QTY1, DRIVE_ASSY_MOTOR_COVER stl (print top down without supports)</li><li>QTY1, Flexible_Coupling_8mmx8mmx35mmTall stl</li><li>QTY1, DAYTON AC Gearmotor, 4.2 in-lb Max. Torque, 50 RPM Nameplate RPM, 115V AC Voltage, 1 Phase, <a href="https://www.grainger.com/product/DAYTON-AC-Gearmotor-50-RPM-Nameplate-52JE28">Grainger.com</a>, <a href="https://www.zoro.com/dayton-ac-gearmotor-42-in-lb-max-torque-50-rpm-nameplate-rpm-115v-ac-voltage-1-phase-52je28/i/G6618057/?utm_source=ExactTarget&utm_medium=Email&utm_content=&utm_campaign=202005_OrderConfirm_Transactional_None_All_None_1&smtrctid=169155818">Zoro.com</a></li><li>QTY1, Grounded electrical cable plug with pigtail ends to connect to motor terminals along with spade connectors for end.</li><li>QTY4, #10-32x0.75in Socket Head Cap Screw (mount motor)</li><li>QTY4, M3x8mm Self Tapping Screws or similar wood screw to attached motor cover</li></ul><h5><strong>Tension Pulley Assembly</strong></h5><ul><li>QTY1, TREE_MOUNT stl</li><li>QTY1, SWIVEL stl</li><li>QTY1, M8x90mm Hex Bolt</li><li>QTY1, M8x60mm Hex Bolt</li><li>QTY3, M8 Nylon Lock Nut</li><li>QTY1, M8 Washer</li><li>QTY2, 608-ZZ Bearings</li><li>QTY2, 1" Ratchet Straps</li><li>QTY1, IDLER_BEARING_SPACER stl</li><li>QTY1, IDLER_PULLEY stl</li><li>QTY1, IDLER_TENSION_ASSY_PIVOT_ARM stl</li><li>QTY1, IDLER_TENSION_ASSY_BEARING_SLIDER stl</li><li>QTY1, Compression Spring, I used a <a href="https://www.menards.com/main/hardware/fasteners-connectors/specialty-fasteners/springs/midwest-fastener-reg-23-32-x-2-3-8-zinc-compression-spring-1-count/88227/p-1444440203924.htm">Midwest Fastener 88227</a></li><li>QTY1, M8x80mm Hex Bolt (for spring)</li><li>QTY1, M8 Fender Washer (for spring)</li></ul><h5><strong>Idler Pulley Assembly</strong></h5><ul><li>QTY1, TREE_MOUNT stl</li><li>QTY1, SWIVEL stl</li><li>QTY1, M8x90mm Hex Bolt</li><li>QTY1, M8x60mm Hex Bolt</li><li>QTY2, M8 Nylon Lock Nut</li><li>QTY1, M8 Washer</li><li>QTY2, 608-ZZ Bearings</li><li>QTY2, 1" Ratchet Straps</li><li>QTY1, IDLER_BEARING_SPACER stl</li><li>QTY1, IDLER_PULLEY stl</li><li>QTY1, IDLER_ASSY_PIVOT_ARM.stl</li></ul><h3>Encouragement</h3><p>If you like what I'm doing or use this in your game consider buying me a coffee or sending me a tip:</p><p><img alt="Buy me a coffee" src="https://cdn.buymeacoffee.com/buttons/bmc-new-btn-logo.svg"/><a href="https://www.buymeacoffee.com/sj5pEfMZq">Buy me a coffee</a></p>
With this file you will be able to print Motorized Axworthy/Flying Ghost Pulley System with your 3D printer. Click on the button and save the file on your computer to work, edit or customize your design. You can also find more 3D designs for printers on Motorized Axworthy/Flying Ghost Pulley System.
