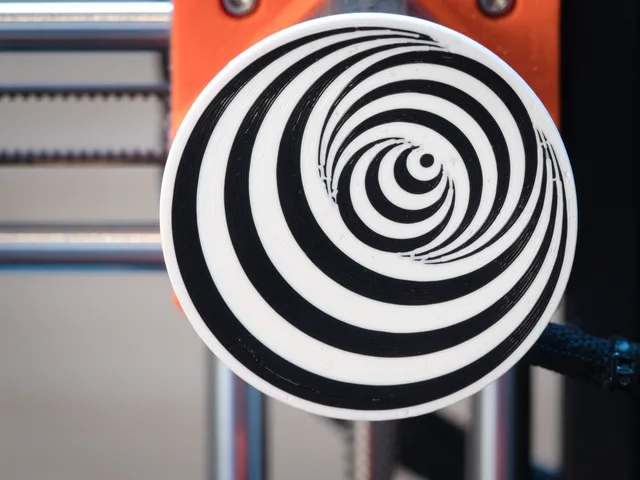
Motor Visualizer with 3D Optical Illusion
prusaprinters
Below is a video of the x-axis motor visualizer in action when the MINI is printing the motor visualizer itself:You can see that it creates a stunning 3D optical illusion when it is moving. The disc is attached by gluing a 8 x 3 mm neodymium magnet to its back in the foreseen slot. Using this magnet the motor visualizer can then easily be attached/detached to the axis of the x-axis motor. Note that I used two magnets to avoid any friction between the motor and the motor visualizer.Printing InstructionsThe design is intended to be printed in PLA using 0.2 mm layer height. You can use the provided g-code if you can print the design on a Prusa MINI. Otherwise, you can look at the .3mf file to see the options that I have used. Below I describe the main settings in more detail, as some are not obvious.Single Extruder Multi Material settingsThe design uses two colors: black and white. These can easily be printed on a regular 3D printer (e.g., Prusa MINI) by setting up two extruders in the General section of the Printer Settings tab of PrusaSlicer (in Expert mode) and ticking the Single Extruder Multi Material box.Add the following code to the Tool change G-code box of the Custom G-code section such that the slicer inserts the necessary filament swaps when needed:; eliminate first (unnecessary) tool change {if previous_extruder != -1} ; Change Temperature to the next required one M104 S[temperature[next_extruder]] ;next filament_colour= [filament_colour[next_extruder]] Extruder #[next_extruder] M117 change to [next_extruder] {(filament_colour[next_extruder]=="#FF0000"?"red" :(filament_colour[next_extruder]=="#00FF00"?"green" :(filament_colour[next_extruder]=="#0000FF"?"blue" :(filament_colour[next_extruder]=="#FFFF00"?"yellow" :(filament_colour[next_extruder]=="#000000"?"black" :(filament_colour[next_extruder]=="#FFFFFF"?"white" :(filament_colour[next_extruder]=="#00FFFF"?"cyan" :(filament_colour[next_extruder]=="#FF00FF"?"magenta" :(filament_colour[next_extruder]=="#C0C0C0"?"silver" :filament_colour[next_extruder] )))))))))} M600 ; eliminate first (unnecessary) tool change {endif}Set the Preview Extruder Color to white for Extruder 1 and to black for Extruder 2.Load the two .stl files (WhitePart .stl and BlackPart.stl ) at the same time by selecting both before clicking on the Open button. PrusaSlicer will then ask if it is supposed to keep the two files together as part of a multi color print. Confirm with yes. Now you can assign each part to the right extruder: WhitePart.stl to Extruder 1 and BlackPart.stl to Extruder 2.The print requires only two filament swaps. Start with white filament. After a few minutes, it will pause the print unload the white filament and ask to insert the next filament (black). A few minutes later it will again ask to insert the next filament (white) and then continues to print the remainder of the design.Print SettingsThe disc should be positioned with the front side on the plater0.20mm QUALITY profilePLAPerimeters: 10 (to avoid any infill in the black/white rings)Detect thin walls (to print the ends of the rings as narrow as possible)Printing the DesignThe print requires only two filament swaps. Start with white filament. After a few minutes, it will pause the print unload the white filament and ask to insert the next filament (black). A few minutes later it will again ask to insert the next filament (white) and then continues to print the remainder of the design.Assembly InstructionsGlue a neodymium magnet (8 mm diameter and 3 mm thick) in the foreseen slot at the back of the disc using super glue. Optionally add a second magnet to increase the distance. Now you can easily attach the motor visualizer on the axis of the stepper motor using the magnets.
With this file you will be able to print Motor Visualizer with 3D Optical Illusion with your 3D printer. Click on the button and save the file on your computer to work, edit or customize your design. You can also find more 3D designs for printers on Motor Visualizer with 3D Optical Illusion.
