Moon Shot
prusaprinters
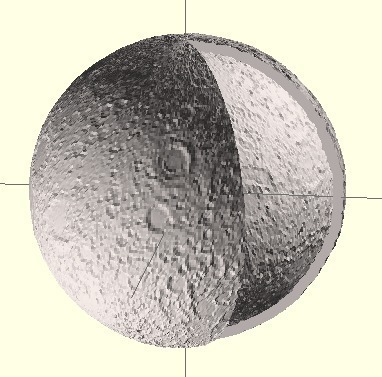
<p>Inspired by Bre's Moon crater, I thought, why not the whole moon?</p> <p>This thing is a bump mapped sphere that uses the planetary map data/images from here:<br/> <a href="http://www.johnstonsarchive.net/spaceart/cylmaps.html">http://www.johnstonsarchive.net/spaceart/cylmaps.html</a></p> <p>Specifically, I used this one:<br/> <a href="http://www.johnstonsarchive.net/spaceart/moonbumpmap2.jpg">http://www.johnstonsarchive.net/spaceart/moonbumpmap2.jpg</a></p> <p>I essentially used the same bump mapping technique I used on this bowl: <a href="https://www.thingiverse.com/thing:13991">http://www.thingiverse.com/thing:13991</a></p> <p>That is, use the picture as a height map. Use that height map to displace the vertices around the sphere. At the same time, use the image to colorize the thing as well, if you want extra reality.</p> <p>Now came the special part. Since I had the moon in my hands, I wanted to split it open and see what it was made of, answering that age old question once and for all.</p> <p>So, I cracked it open, and found that it was in fact hollow! No green men, no Amazonian women, no cheese, nothing, just a void. Unlike answering the Easter Bunny question, this was quite a let down.</p> <p>And lastly, since I was exploring the surface using MeshLab, I finally found the man in the moon. You can see him highlighted in red smiling back at us.</p> <p>This has got to be great for science exploration!</p> <p>A bit about the .stl files. I used Banate CAD to generate the models directly. The full moon has roughly 500,000 vertices, and double that in terms of faces. The partial moon has double the number of vertices because it has to generate the 'inside' as well as the outside. Each one took about 40-50 seconds to generate on my standard issue 3 year old Phenom II based machine. The generation time has more to do with the number of vertices than any other complexities. The routines create the normals for each face, whether they're needed or not, so this time could probably be cut in half in cases where you don't really need the normals, but it would not look nice when you render.</p> <p>To generate any spherical thing, you would just change one line of code in the .fab file:</p> <p>local heightsampler = ImageSampler.new({ Filename='moonbumpmap2_720_360.png', Size = size, Resolution = res, MaxHeight=16, }) Change "Filename = '...'",<br/> to be whatever file you so happen to want to bump map.</p> <p>This is the quick and dirty form of Bump/Height mapping. There are two things that should be done to improve the quality of such things. First, I'm doing a straight translation from the height map to a height value. What I should really be doing is taking an average, so you don't see such artifacting. The other thing is, for a sphere, there are better ways to apply a texture than to simply wrap the rectangle. By wrapping the rectangular image to the sphere, you lose something at the poles. I need better images which account for the spherical nature.</p> <p>But hay, for changing just a single line of code, this is not a bad technique.</p> <h3> Instructions</h3> <p>1) Download huge model<br/> 2) Print<br/> 3) Rejoice!</p> <h3> Custom Section</h3> <p><strong>Repaired .stl file</strong></p> <div><p>After all these years, I finally repaired the .stl file using Windows 3D Builder</p></div> Category: Other
With this file you will be able to print Moon Shot with your 3D printer. Click on the button and save the file on your computer to work, edit or customize your design. You can also find more 3D designs for printers on Moon Shot.