Modular Shelving Set - Shelves, Lamp, and Planter
prusaprinters
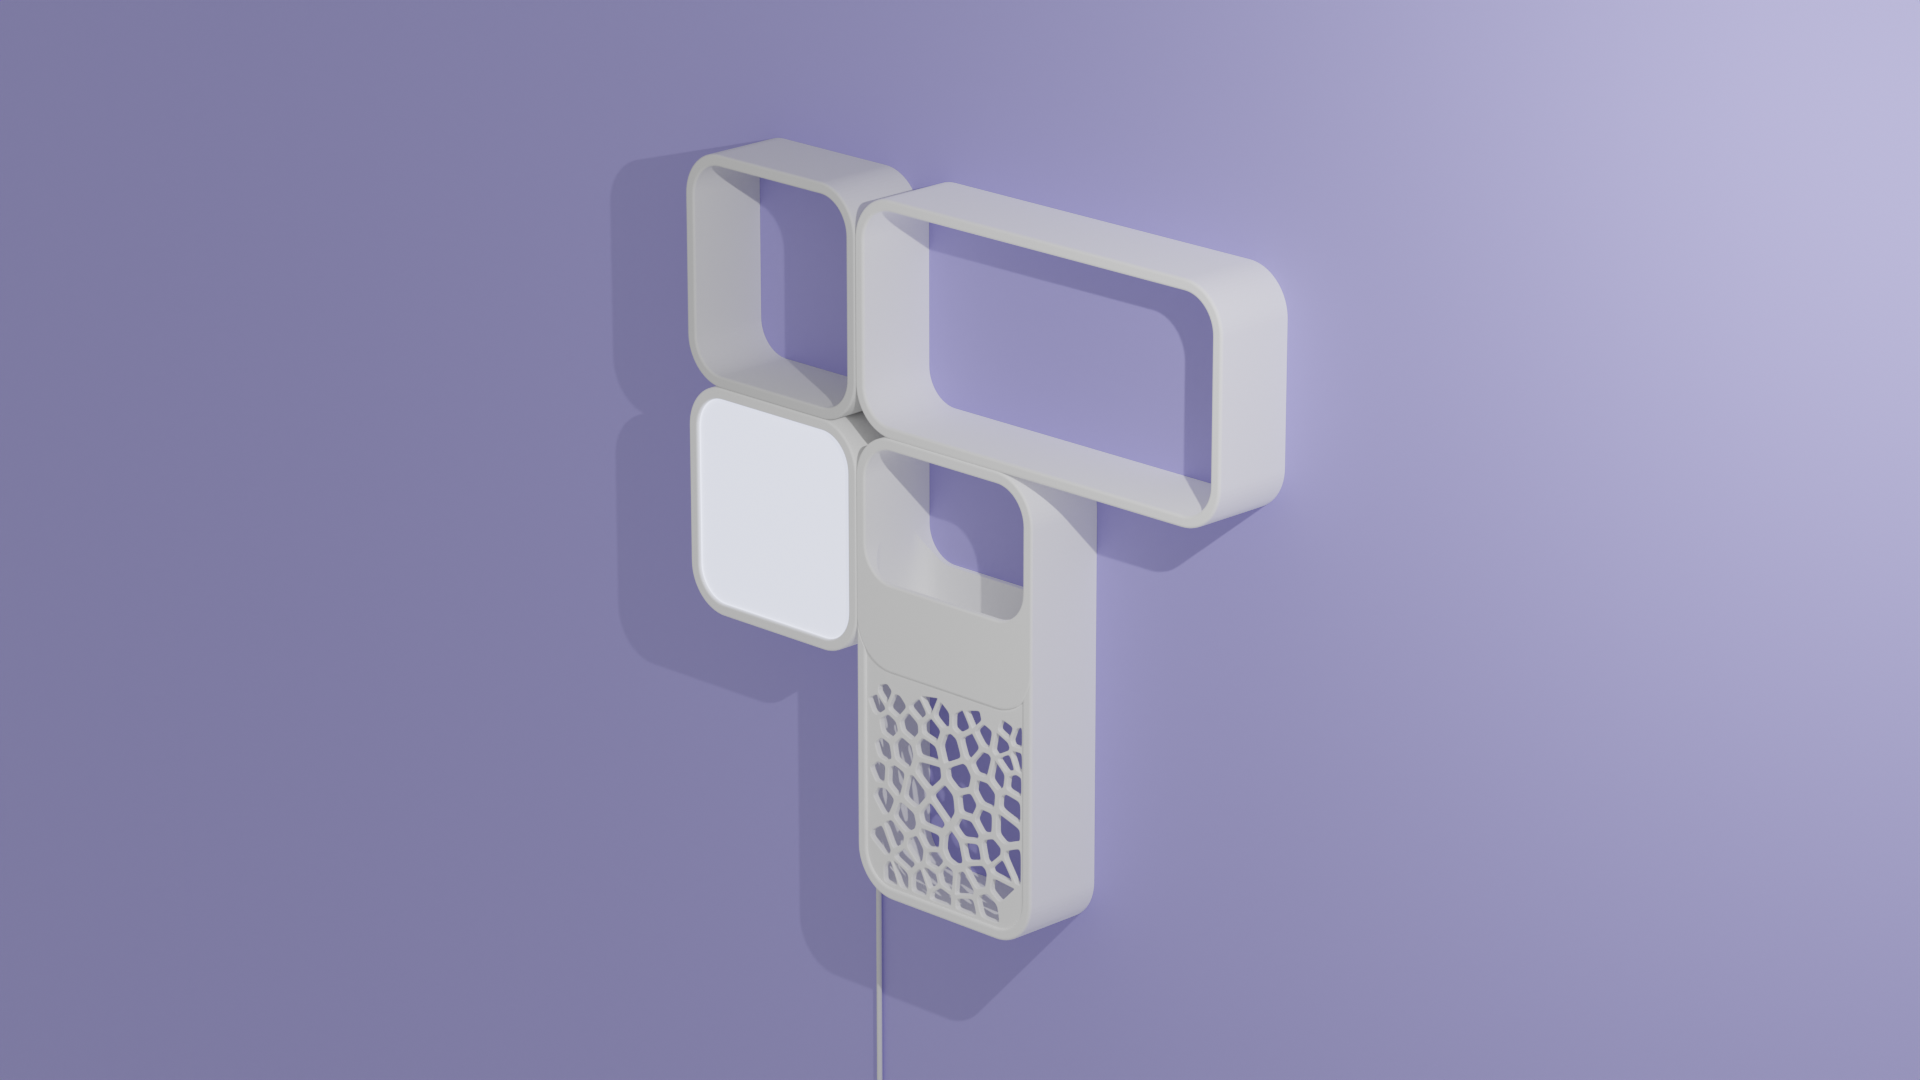
<h4>Introduction</h4><p>Hey everyone! I've been wanting to make some shelving for my room for a little while now, so when the “Print Tables” contest started I knew I had the perfect chance to just get something made. </p><p>When designing this project I wanted to make something that was easily customizable, rearrangeable, and (most importantly) printable. What resulted, was a - in my incredibly biased opinion - modern and sleek set of different shelves and furniture items and can be moved/adjusted to fit almost any need.</p><p>So, what's included in this set? Lets take a look.</p><p> </p><h4>1. The Basic Shelves (Single and Double)</h4><p>Firstly, I wanted a straightforward basic shelf. Nothing fancy, just a ledge to put things on. What resulted was the single and double shelves. I decided to use a closed-loop design, since I wanted a high wall mounting point for more stability. </p><p>To print, put the flat wall-facing side (with the nail keyholes) facing towards the build plate, hit slice, and print away!</p><p>Dimensions:</p><ul><li>Single<ul><li>Inner: 180mm x 180mm x 75mm</li><li>Outer: 200mm x 200mm x 75mm</li></ul></li><li>Double<ul><li>Inner 360mm x 180mm x 75mm</li><li>Outer: 400mm x 200mm x 75mm</li></ul></li></ul><p> </p><h4>2. The LED Light</h4><p>After the basic shelves were designed, I thought it would be really interesting to have a similarly themed wall-mounted LED light.</p><p>Starting from the basic single shelf design, I created a slightly larger interior space with a lip at the front so the diffuser cannot slip out of the front. I then created a back plate a) for the sticking of the LED strips, and b) to separate the LED strips from the wiring and electronics behind it. The back plate, admittedly, is an afterthought, as after printing the initial version of the light (without back plate) I noticed that the side lighting was not ideal and that the wires/electronics required to make it WiFi capable was creating shadows on the diffuser. </p><h5>Assembly of the light</h5><p>Ok, so you want to make the light. It's actually fairly easy, but I'll walk though the steps if you've never created something like this before.</p><p>First, lets go over the materials required for it:</p><ul><li>LED strip (can be any kind, but try to aim for getting a NeoPixel strip, <a href="https://www.amazon.ca/ALITOVE-Programmable-Individual-Addressable-Non-waterproof/dp/B01MG49QKD/ref=sr_1_8?crid=3II218HXDHVE7&keywords=neopixel+led&qid=1651702192&s=hi&sprefix=neopixel+led%2Ctools%2C118&sr=1-8">this one</a>, for example but any strip should work)</li><li>Arduino of any kind (if you want smart light functionality, then get a NodeMCU or any other ESP8266 equipped Arduino- <a href="https://www.amazon.ca/Yizhet-ESP8266-ESP-12E-Internet-Development/dp/B08C52BCZQ/ref=sr_1_1_sspa?keywords=nodemcu&qid=1651702369&sr=8-1-spons&psc=1&spLa=ZW5jcnlwdGVkUXVhbGlmaWVyPUExSjUzVFo0NExJNlNaJmVuY3J5cHRlZElkPUEwOTc1NjUyUlowMFZDWkhWS1UwJmVuY3J5cHRlZEFkSWQ9QTA3NjkyMzAyTDkyM0tDOEg1OEQ3JndpZGdldE5hbWU9c3BfYXRmJmFjdGlvbj1jbGlja1JlZGlyZWN0JmRvTm90TG9nQ2xpY2s9dHJ1ZQ==">this is what I have</a>)</li><li>Wires (only for the "Good Looking Method)</li><li>Power cable/wall power adapter (for the Arduino)</li><li>Hot glue (for securing the diffuser and back plate</li></ul><p>Now, for the assembly instructions. There are two methods, to getting the lamp working. One is easy, the other is also easy but just takes a bit of time.</p><p><i>The Quick and Dirty Method:</i></p><ol><li>Take the main body piece and the diffuser. Slide the diffuser in to place (push it through from the back until it hits the little ledge at the front. Use hot glue or whatever adhesive of choice to keep it in place.</li><li>Adhere your LED strip along the wall that is perpendicular to the diffuser (or in other terms, put the strip on the body facing inwards. Make sure its right next to the diffuser for the best effect.) </li><li>Put the back plate on and push it as far forward as possible. Route the cables through the included cable hole on the back plate. Now adhere that in place with whatever adhesive you choose. </li><li>Wire up your LED strip to your Arduino (or whatever you are choosing to control the strip with.) I'd probably follow a better tutorial for this - <a href="https://create.arduino.cc/projecthub/zanycadencedev/getting-started-with-arduino-and-neopixels-013360">this one is solid</a>.</li><li>Do a bit of cable management and secure your electronics with hot glue. </li><li>Done!</li></ol><p><i>The Good Looking Method: </i></p><ol><li>Grab your back plate. This is where the whole light part of our lamp will live.</li><li>Cut the LED strip (along the cutting lines) into several pieces of equal length. In my case, as I have 30 LEDs in total, I can fit 6 lines of 5 led strips.</li><li>Adhere the LED strips to the back plate in a grid pattern.</li><li>Join the now disconnected LED strips back together (I used some basic jumper wires that I got in a random Arduino kit a while back) </li><li>Wire up your now complete again LED strip to your Arduino (or whatever you are choosing to control the strip with.) I'd probably follow a better tutorial for this - <a href="https://create.arduino.cc/projecthub/zanycadencedev/getting-started-with-arduino-and-neopixels-013360">this one is solid</a>.</li><li>Do a bit of cable management. Put the Arduino on the rear of the back plate and route the cables connecting the strip to the Arduino through the pass-through hole. </li><li>Now, slide the diffuser into place (push it through from the back until it hits the ledge at the front of the body). Adhere it to the body with hot glue.</li><li>Finally slide the back plate into the body. I'd recommend turning the LEDs on and looking at the front of the lamp to see what distance the back plate will have to be from the diffuser in order to hide the light from the individual LEDs. Adhere it at that point.</li><li>Finally, adhere the electronics (really just the Arduino) to the back plate with hot glue</li><li>You're all done!</li></ol><p>Let me know if you have any questions when you come to this part. It's a bit tricky, but I can definitely help you out if you run into an issue while building!</p><p>Dimensions: 200mm x 200mm x 75mm</p><p> </p><h4>3. The Planter (and Trestle/Lattice)</h4><p>I added this option towards the end of me working on the project because I wanted a little bit of greenery in my room. As a result, I created a small planter and a little trestle (in the case that you choose a plant that climbs/clings onto objects. </p><p>There are three components to this:</p><ol><li>The planter itself</li><li>The trestle frame</li><li>The trestle itself</li></ol><p>The planter itself is admittedly quite small- but I really designed it assuming that I would end up putting some small, low maintenance plants inside of it just to spruce up to look of the room. </p><p>The trestle frame is actually something that could be used for more than just housing the trestle. It is designed to slot into and extend a neighboring shelf, so if you want you can even use this with the normal single/double shelf to make a funky shape, or you can add it on to the light to give it more of a functional use. </p><p>The trestle is pretty self explanatory. It's designed to be hot glued into place on the trestle frame, which can then be oriented around the planter for plants to grow in/over top of. I used a voronoi design because I discovered a Fusion 360 plugin for that and am now addicted to it. </p><p>Dimensions:</p><ul><li>Planter<ul><li>Outer: 200mm x 200mm x 75mm</li><li>Pot: 180mm x 75mm x 75mm</li></ul></li><li>Trestle Body<ul><li>Outer: 200mm x 240mm x 75mm</li></ul></li></ul><p> </p><h4>Conclusion</h4><p>So there you have it, my modular shelving project. If you found this interesting I would highly appreciate a like or rating as it helps with visibility too. </p><p>If you found any issues with the design, please let me know so I can fix it- suggestions are extremely welcome too, since I always love finding new ways of improving my designs. </p><p> </p><p>With that being said, thanks for reading this very long and probably word vomit-esque description/instruction sheet. I look forward to hearing what you guys think of it!</p><p>Thanks,<br>Simon</p>
With this file you will be able to print Modular Shelving Set - Shelves, Lamp, and Planter with your 3D printer. Click on the button and save the file on your computer to work, edit or customize your design. You can also find more 3D designs for printers on Modular Shelving Set - Shelves, Lamp, and Planter.