Modular Dry Box Dispenser
prusaprinters
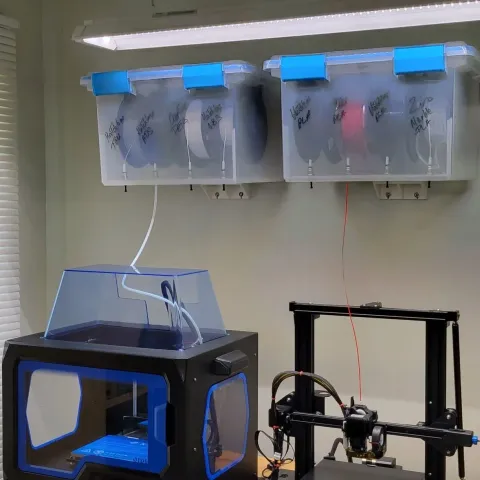
This modular dry box dispenser design is specifically for the Sterilite Model # 1933LAB43/19334304 32 Qt. sealed storage container and features a suspended filament spool carriage where the spools are offset from one another. This offset not only conserves space but also allows for the convenient removal and replacement of a single filament spool without the need to disturb the remaining spools. Among other benefits, is the flexibility offered regarding the location of the filament outlet ports/holes without obstruction from the filament spool carriage, and almost no filament pull resistance. Great for flexible materials, the very reason I design this dry box dispenser in the first place. And weight, the complete carriage assembly weighs just over 1 lb. The container, carriage assembly, and connectors (w/o filament spools) total just over 4.2 lbs.The design came after I found this Sterilite container at my local Target store for just under $10.00 (US) at the time. It included the gasket, latches and it has a fairly rigid design around the top lip area which led to this suspended spool carriage design and was well suited for the way I intended on mounting it onto the wall.The suspended carriage is surprisingly strong for its weight and is actually at its strongest when all the spindles are under a load. This is because for it to fail it would practically need to collapse in onto itself. I provided a picture below that demonstrates the load capacity. Note: all spindles should remain installed with or without a spool for the carriage to function properly.The completed dry box can be used from a benchtop (recommend using rubber adhesive footpads), shelf, or you may elect to use the Wall Mount also provided.Final Note: I have been using the four-piece center frame design because of printer size restrictions I had at the time, for just over three years now. The only issues I’ve run into were with the wall mount layer separation mentioned below. Besides that, I love the convenience and flexibility this design offers. Dry Box Dispenser Specifications/Items:: Container: Sterilite 32 Qt. / 30L Gasket Box (Model # 1933LAB43/19334304): Container Size: 18 1/2”L x 14 7/8”W x 11 1/8”H: Container Weight Empty: 3.140 lbs.: Weight: container, carriage assembly, and connectors (without filament spools or humidifier): 4.236 lbs.: Maximum Spool Capacity: 4: Maximum Supported Filament Spool Dia.: 9.250” or 235mm: Maximum Supported Filament Spool Width: 2.980” or 75mm: Minimum Supported Filament Spool Hub Dia.: 2.160” or 55mm (using spindle component assembled): Recommended Maximum Filament Spool Weight: 3.3 lbs. or 1.5 kg ea. (1.0 kg ea. if using a wall mount): Bearings: 608 Open Fidget Spinner Chrome Steel Ball Bearings 8x22x7 (x8): Dowels: 8mm x 25mm soft metal dowels (x8) (only used for dowel spindle option) : O-Rings: #215 or #216 (used as anti-slip vibration dampener) (x8)Note: almost any O-ring with an inside dia. 1.0625”/26.98mm to 1.125”/28.58mm should work fine.: Connecters: 6mm Tube OD x 6mm Tube OD Push to Connect Air Fittings (x4): PTFE Teflon Tubing 6mm OD x 4mm ID (used as filament guide through connectors): Push-to-Connect Plug 6mm: (used to hold the filament in the fitting in-between uses (see photos provided). What I found works is to place a small cutting from a flat rubber band roughly 1/8” wide x 1/2" long into the hole in the plug with some sticking out. To hold the filament, I first cut the end of the filament at an angle then press the filament into the plug hole between the rubber band and the outer wall of the hole in the plug while slightly rotating/turning the plug until I feel it lock. That usually holds it nicely in place. To remove, rotate/turn the plug in the opposite direction while lightly pulling on the filament.: Recommended filament material: PLA or PETG (PETG for wall mount): Cyanoacrylate Glue: recommend a Gel Cyanoacrylate Glue to help fill gaps and voids leading to a stronger bond.: Dehumidifier: I’ve been using the “Eva-Dry Wireless Mini Dehumidifier Model E-333” in my modular dry boxes. I affix them inside the dry boxes using stick-on Velcro strips. Printing Information:I’ve designed the components into multiple segmented part options to allow the makers’ to select the best part model option based on their particular printer’s bed size. Note: all required components can be printed on a bed as small as 150mm x 150mm.Note: All models are pre-positioned in the recommended printing orientation.**Parts to Print****Frame Carriage Components**(4 pcs. Center Frame Design)Frame Four Piece Left - (3 pcs.)Frame Four Piece Left Cent. - (3 pcs.)Frame Four Piece Right Cent. - (3 pcs.)Frame Four Piece Right - (3 pcs.)(2 pcs. Center Frame Design)Frame Two Piece Right - (3 pcs.)Frame Two Piece Left - (3 pcs.)(3 pcs. Center Frame Design)Frame Three Piece Center - (3 pcs.)Frame Four Piece Right - (3 pcs.)Frame Four Piece Left - (3 pcs.)(1 pc. Center Frame Design)Frame Single Piece - (3 pcs.)(Frame End)Frame End - (2 pcs.)Frame End R Ear - (2 pcs.)Frame End L Ear - (2 pcs.)**Spindle Components**(2 pc. Spindle design)Spindle Half - (8 pcs.)Locating Ring - (4 pcs.)Flange - (8 pcs.)Support - (8 pcs.)(Spindle design with 8mm dowel)Spindle Whole - (4 pcs.)Flange - (8 pcs.)Support - (8 pcs.)**Spacer Components**(4 pc. Per Side design)Spacer Center Right - (2 pcs.)Spacer Center Left – (2 pcs.)Spacer End - (4 pcs.)(3 pc. Per Side design)Spacer Center – (2 pcs.)Spacer End – (4 pcs.)**Optional Wall Mount**Wall Mount Top – (1 pcs.)Wall Mount Lip – (1 pcs.)Bottom Wall Mount – (1 pcs.)Note: recommend printing the wall mount components with PETG for increased layer adhesion. If this is not possible PLA or even ABS (don’t forget to adjust the model scale in your slicer to compensate for shrinkage if using ABS) will suffice but you may notice layer separation on the upper mount developing over a period of time that may require reprinting the Top Wall Mount again.**Please reference the included Assembly Instructions.pdf file for assembly information. **Print Profile Settings**Printer: Qidi X-ProMaterial: Hatchbox PLA Black (Overture White PETG for Wall Mounts)Print Temp: 185 C PLA (225 C for PETG)Nozzle: 0.4 mmLayer Height/Resolution: 0.3 mmInfill: 15%Print Speed: 60.0 mm/sRaft: NoSupports: NoPrint Time and Material Usage (estimated based on four-piece frame and three-piece spacer designs)Frame Assy. each (4 pieces) - Time: 3:53 Hrs. – 45g. - 15.15m (x3)Frame Ends Complete (2@ Frame Ends, 4@ Frame End Ears) - 3:50 Hrs. – 42g. – 14.21mSpindle Halves (8 each) – 6:45 Hrs. - 91g – 30.66mLocating Rings (4 each) – 0:18 Min. – 3g – 1.10mFlanges (8 each) – 1:45 Hrs. – 21g – 7.14mSupports (8 each) – 4:17 Hrs. – 45g – 15.07mSpacers (2@ centers, 4@ ends) – 3:31 Hrs. – 37g – 12.39mTotal Estimated Print Time: - 32:22 Hrs.Estimated Material Usage: - 377 grams – 127.09 meters**Please reference the included Assembly Instructions.pdf file for assembly information.Additional Notes:: Recommend printing a minimum of 3 walls on the Spindle axle (top of Spindle).: When printing the spindle halves, if possible, use a variable infill or some other available means so that the axle area (top) has a higher infill density than the lower larger dia. section. The reason is that if you select let's say 15% infill, although adequate for the lower larger section would result in hardly any infill within the top smaller axle dia. section. Refer to your particular slicer for infill options that may be available to you.
With this file you will be able to print Modular Dry Box Dispenser with your 3D printer. Click on the button and save the file on your computer to work, edit or customize your design. You can also find more 3D designs for printers on Modular Dry Box Dispenser.