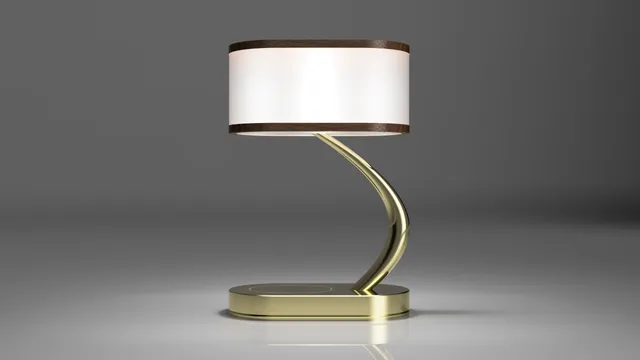
Modern Table Lamp with Wireless Charger
prusaprinters
To compete in Let There Be Light Contest from MakerWorld, I designed this modern lamp. But I didn't simply want to design a light fixture. Instead, I wanted to make it a bit more functional. Considering our usual need to find charging places, I decided to add ability to wirelessly charge your phone.Also, as usual, I have uploaded RAW step files for anyone to be able to customize it based on their needs. (I hope more and more makers start sharing step files for easier modifications.)Print SettingsUse 0.10mm or less layer height profile for better look and quite less post processing.Main Body doesn't need supports as printer can bridge without any issues, but if you're having issues with bridging, then enable supports. Very small surface requires supports anyway.Diffuser parts must be printed in Spiral Vase mode with 3 bottom layers, 0 top layers and 0.45mm line width for all.Filaments UsedDiffuser Top & Bottom – IIIDMax Vanilla Cream PLA+Diffuser Frame and Charging Ring – Hatchbox Wood PLAMain Body – Bambu Lab Gold PLA SilkRequired HardwareWireless Charging Module – https://amzn.to/3umrnfY5V USB COB LED Strip Light – https://amzn.to/4849oZm2 Pin Mini Rocker Switch – https://amzn.to/3SqWord8 6x3 Magnets – https://amzn.to/481W6N8Minimum 15watt Wall ChargerSoldering materials and wirePost-Processing StepsRemember, these are the steps that I took. You do not have to do this, but it will surely make the lamp look much better and additionally the time required will be quite less if you printed with 0.10mm or less layer height. Overall time for post-processing was little less than hour excluding the drying wait time.Lightly sanded main body at the seam and joints with 180 gritFill the seam and joints with Bondo Spot Putty – https://amzn.to/4b6PmjHLightly sanded seam and joints again to make it smooth with 180 gritUsed filler primer on all bodies – https://amzn.to/3Oir1O2Lightly sanded all bodies with 320 grit for final timeFinally sprayed all bodies with regular primer and metallic gold paint – https://amzn.to/481bl91All wood filament parts are lightly sanded with 320 grit and stained with Dark Walnut Wood Stain – https://amzn.to/3UyLMZIAssembly and Circuit Connection StepsFirst glue middle connector 1st and 2nd half using pin for alignment.Insert 8 magnets in Base top & bottom parts.Cut off the USB plug from LED strip as we will be soldering those wires directly to the wireless charging module later on for power supply to LEDs.Glue on Middle Connector tube on base top.Glue bottom diffuser to one of the diffuser frames.Glue bottom diffuser with frame onto middle connector.Stick COB LED to the wire tube and finish soldering wires.Glue on support rods on wire tube. (See pictures for proper orientation)Fish power supply wire from wire tube and middle connector to the bottom of the lamp.Glue wire tube on middle connector now.Glue another diffuser frame onto top diffuser.Glue top diffuser onto support rods and bottom diffuser frame.Solder led strip wires onto USB-C module of the wireless charging module and solder rocker switch in between.Glue wireless charging module under base top at the recessed area.Close base top with base bottom.
With this file you will be able to print Modern Table Lamp with Wireless Charger with your 3D printer. Click on the button and save the file on your computer to work, edit or customize your design. You can also find more 3D designs for printers on Modern Table Lamp with Wireless Charger.
