Mobile Phone Toy
prusaprinters
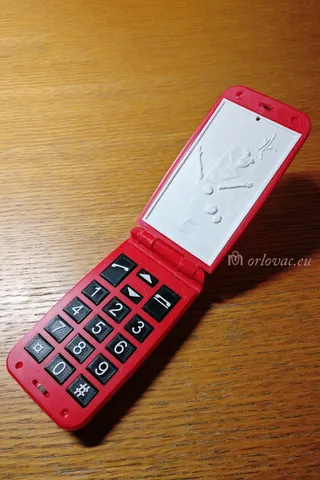
A foldable mobile (cell) phone toy with Olaf lithophane as display, keys with movement and battery compartment for candy. I was a little bit surprised when my grandchild ask me if I could make a mobile phone toy for her. Despite that she has an old real, full functional, cell phone, she wanted a toy phone too. We have not to forget that toys are very important for small children. I started designing according to my ideas. I chose foldable version, a display with Olaf, as he is her favorite. Here it is 3D printed picture called lithophane. I decided that keys have to respond when pressed. Battery? Not real battery, but this compartment could be filed with her favorite chewing gum…Body: need to be printed with print support (already generated in the gcode file). Body is the only detail which need a littel bit print support. Display: Under files, you can find my own picture, from which I have generated a lithophane for the display and get STL file, using this site. I have orientated it horisontally for print, to minimize vibration inpact on the 3D printed picture. Keyboard: Keyboard is designet to keep keys assembly. At last, need to be glued to the phone's body by help of some kind of instant glue. Keys: we have three different sizes of keys. Each key has two angled slots on rear side. The distance between them is the same for all keys. The slot lenght does very. The slots do keep a bit of plastic foil from ordinary binder plastic A4 sleeve. You have to cut three ribbons with follwing width: 3, 7 and 14 mm, as one picture shows. The length of each string for all keys are 14 mm, not more. Place this piece with its ends inserted in keys slots to get a little arc, which will be a springy part of the key. It will maintain the keys movement when pressed. Battery: not really, but this compartment may be loaded with some energy like chewing gum, or choclate coins, as it can be seen on presented picture. If you choose chewing gum, a Juicy Fruit Slim Pack is a good choice, because it has ribbon form and could be placed in this space (a little bit hard to find in Sweden). Another brand is Wrigley's Hubba Bubba, chewing gum in form of wounded band. Need to be cut in strings with kitching scissors… Bear in mind, the compartment is not deep. The highest object placed there has not to be more than 6 mm tall. From time to time, the battery may be charged with new energy ;). Phone's box: As a real mobile phone, it must have its own box. The enclosure is slightly larger than the phone. You have to wrap it into thin paper prior closing the case. The gift looks better, stored in this box. I chose ironing before slicing both box parts with stunning effect on the upper layer. Bill of material: all printed details, as mentioned above.neodimium magnets DIA5x3 mm or less, 2 pcs to keep the phone closed. one binder sleeve A4, material for elastic key's arcs suspension.43 mm of a PLA filament of any colour for the hinge.Assembly instructions: In the phone body a neodimium magnet need to be installed in the hole in the front of lower central part. You do not need neither to glue it nor to think about its polarity now. If you have magnets with smaller diameter, than glue it centered in this hole by help of epoxy glue. The keyboard: put it on the table upside down and start to arrange its keys. Each key has its plastic arc. Use supplied pictures to see how I did it. When all keys are in place, lift up the keyboard carefully to see it from the bottom and check that every key is on the place as it should be, and is correctly oriented. Put the keyboard back on the table. You can check that each key loop does suspension when pressed by fingertip. Apply tiny amount of liquid super glue in the 7 small holes on the body dedicated for keyboards 7 assembly pinns. Add very tiny drops of glue inbetween these holes. It is better not to use very fast glue to have time to assembl keyboard with the body, otherwise, the glue will dry and it will be impossible to mount these two parts together. Be very careful and put the phone's body over the the keyboard trying to get the keyboard pins in the pin holes on the body. When finished, use some clamps to tighten the keyboard to the body and leave it for some time allowing the glue to dry. When you remove clamps, test each key's movement. The keys should respond when pressed and moved back when released. Now use another magnet and test its polarity against the magnet in the phone's body. The magnets should contract each other! Put this magnet in the display magnet pocket. Put display part over the body and test that magnets atract each other. Secure this magnet in place with a drop of super glue. Now is time to glue Olaf lithophane into the display body. Do it according your own wish. Here you can use, rapid or epoxy resin glue. Leave it to dry completely. Drill a hole from outside of the display through the “camera” hole. You will make a hole through lithophane too. When done, if you look through unfolded display, you can see something through this hole. All in all, the pinhole camera does exist. Install the white bar on the rear part of the display by gluing it. Cut a bit of PLA filament to the lenght described above. Put display in the hinge and over the phone's body. Install filament bit in the hinge's holes. Do not glue it! Squeeze a little outer part of filament, not more than 3 mm by help of a pliers. This will privent the filament to fall out the hinge. Open phone now: keep the body and pull up the display. When you close display, the magnets will keep it closed. Install battery lid on the rear side of the body. You can exercise it back and forth several times to get it slide nicely. It may be needed to adjust with scalpel the part of the body where the lid's notch rest. It has to keep the lid closed, but allow it to be easily opened. Load battery compartment with some candy. Wrap the phone in a thin papper, not more than two layers or use thin tight fabric pouch. Test if everything does fit in the enclosure. Put it in the enclosure. The enclosure itself, may be wrapped in the gift paper too. Now you are finished. The Christmas gift is ready. You have only to load the “battery” from time to time. Here is another potential Christmas gift.I put here 3MF files instead of STL, because 3MF does have more advantages. Another interesting toy is here.
With this file you will be able to print Mobile Phone Toy with your 3D printer. Click on the button and save the file on your computer to work, edit or customize your design. You can also find more 3D designs for printers on Mobile Phone Toy.