MMU2 PINDA Idler Endstop
prusaprinters
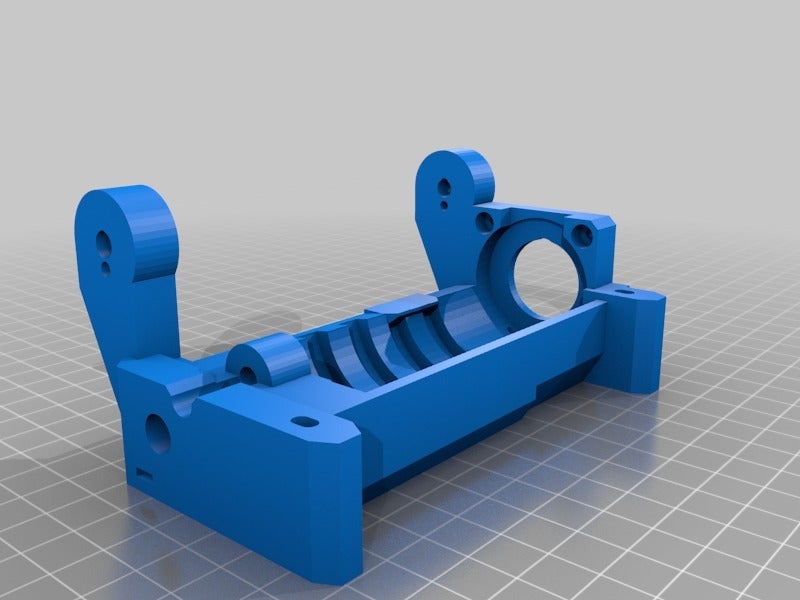
<p>Added hole for Endstop mount (PINDA Probe)</p> <p><a href="https://youtu.be/pV_1MMs1W3E">https://youtu.be/pV\_1MMs1W3E</a></p> <p>on the idler drum you need to insert a metal in the second hole from the left. on the picture it looks like its the third, but the first i drilled for tests. i inserted aluminium foil. take care that it is not too long, because it could block the bearing.</p> <p><a href="https://github.com/chriswal/MM-control-01/tree/Pinda_Endswitch">https://github.com/chriswal/MM-control-01/tree/Pinda\_Endswitch</a></p> <p>this branch is version 1.0.6 with workaround for missing buffer capacitors (homing issue/led flickering/motor humming) and additional use of and endstop. it should also work without endswitch (with the loud idler homing) if you need the fixes.<br/> pinout on sensor connector: 1 +5v 2 GND 6 Sensor</p> <p>update: 21.8.2019 i changed the aluminium foil to M6x5 worm screw<br/> i tried cutting a thread but then its too loose. if you screw it in without cutting it can work but it can break the drum. the best would be to screw it in with a little bit of heat.</p> <p>update: 18.10.2019 uploaded compiled hex files configured to flash with slic3r prusa edition<br/> the file with usb is for controlling it over the usb port</p> <p>update: 29.07.2020<br/> this hex files dont work (i didnt set the build number) have to upload another one<br/> prusa printer firmware checks the build number not the version.</p> <p>uploaded new version<br/> (as this was/is a Thingiverse thing and i cant upload a hex file here)you can find the file here<br/> <a href="https://www.thingiverse.com/thing:3783694/files">https://www.thingiverse.com/thing:3783694/files</a></p> <p>26.11.2020<br/> This are the build instructions from Prusa for Arduino:<br/> Arduino</p> <p>Recomended version is arduino 1.8.5.<br/> in MM-control-01 subfolder create file version.h<br/> use version.h.in as template, replace ${value} with numbers or strings according to comments in template file.<br/> create file dirty.h with content if you are building unmodified git commit</p> <h3>define FW_LOCAL_CHANGES 0</h3> <p>or</p> <h3>define FW_LOCAL_CHANGES 1</h3> <p>if you have uncommitted local changes.<br/> Adding MMUv2 board</p> <p>In Arduino IDE open File / Settings<br/> Set Additional boards manager URL to:<br/> <a href="https://raw.githubusercontent.com/prusa3d/Arduino_Boards/master/IDE_Board_Manager/package_prusa3d_index.json">https://raw.githubusercontent.com/prusa3d/Arduino_Boards/master/IDE_Board_Manager/package_prusa3d_index.json</a><br/> Open Tools / Board: / Boards manager... Install Prusa Research AVR Boards by Prusa Research<br/> which contains only one board:<br/> Original Prusa i3 MK3 Multi Material 2.0</p> <p>Select board Original Prusa i3 MK3 Multi Material 2.0</p> <p>Bootloader binary is shipped with the board, source is located at <a href="https://github.com/prusa3d/caterina">https://github.com/prusa3d/caterina</a><br/> Build</p> <p>click verify to build<br/> Flashing</p> <p>Windows<br/> Arduino</p> <p>click Upload</p> <p>For Firmware flashing with Prusaslicer you have to add to the begin of the hex File.</p> <p>; device = mm-control</p> <p>so the hex file looks like this</p> <p>; device = mm-control<br/> :100000000C9441010C9469010C9469010C946901F0<br/> :100010000C9469010C9469010C9469010C946901B8<br/> and so on</p> <p>as the comments are not working i answer in the text.<br/> i used a chinese pinda 2 clone this has an additional temperature sensor in it.<br/> a pinda 1 should be ok . but dont look at the color of the wires in my picture. they could be different. you have to find out with the plug of the prusa mainboard which pin is +5v gnd and sensor.</p>
With this file you will be able to print MMU2 PINDA Idler Endstop with your 3D printer. Click on the button and save the file on your computer to work, edit or customize your design. You can also find more 3D designs for printers on MMU2 PINDA Idler Endstop.