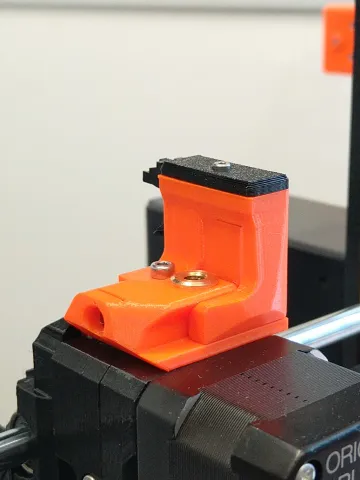
MK3S+ MMU2S Precise Calibration Chimney
prusaprinters
___________________________________________Make sure to also check out the MMU3 UltiMulti printable parts___________________________________________Chimney and Chimney-base parts are an alternative to the Prusa ir-sensor-holder-mmu2s and fs-cover-mmu2s.Due to it being in one piece with the adapter-printer block, it doesn't wobble around and give you false sensor readings as often. Also, this makes the filament path aligned with less posibilities of filament jam above the bondtech gears. Easy to calibrate due to the capability of precise movement by rotating the M3x30 bolt. Extra material required: 1pc M3x30 bolt as a calibration bolt.1pc M3n square nut1pc M3 washer (8.75mm OD, 0.8mm thickness, used for MK3S+ heatbed power cable connectors.)A version is a default that runs the calibration bolt from the left side.B version is an alternative that runs the calibration bolt from the right side.Chimney preparation: Recommended layer height is 0.15mm. Use enough part cooling and orient the part so that the overhangs print correctly. Deburr after printing. Compatible with Tappex Microbarb M5 threaded insert (from the original prusa fs-cover-mmu2s)The insert can be pressed in place using the heated-up printer's nozzle. Make sure the nozzle is clean though and that there is no filament in it. Clean the thread afterward. It is very important that the fitting is pressed in correctly!M6 versions with printed M6 thread are directly compatible with PC4-M6 bore version pneumatic fitting and the PTFE tube then goes all the way above the Bondtech gears - which helps in some cases when the filament is stringy and is often getting jammed. (See the last photo.)Clean up all the strings and overhangs on the part using a knife. You can chamfer the protruding part which goes into the extruder body so that it goes in smoothly.Extruder preparation: Extruder has to be prepared the same way as it does for the original chimney assembly.Adapter-printer-mmu2s (small orange block) has to be removed from the extruder.Extruder-idler-mmu2s has to be removed (one M3x40 bolt on the back and the idler tension bolt on the left)Chamfer the filament entry opening under the adapter-printer part, if necessary.Assembly of the A version chimney: 1. - Insert the Chimney-base onto the extruder, press it in.2. - Insert the M3x30bolt all the way in into the cover from the right side.3. - Insert the M3 washer into the slot from above to disable the bolt head from sliding out.4. - Insert the M3n square nut into the slot on the bottom of the Chimney. (Pro tip: There is a thin opening next to the nut slot. By squishing the thin wall between the nut and this opening, you can help to retain the nut inside the printed part, if it doesn't hold in properly.)5. - Insert the filament sensor cable into the groove on the bottom of the Chimney.6. - Slide the Chimney onto the Chimney-base until the M3x30bolt reaches the nut. 7. - Rotate the calibration bolt on the left side until you reach approximately the optimal position.8. - Insert M3x18 bolt into the opening on top of the Chimney. Don't tighten it fully yet.9. - Insert the IR-sensor into the slot on top, cover it up with the cover and fix in place by M2x8 bolt. Tuck the cable into the groove on the right side and the back.10. - Re-attach the idler door, tighten it by M3x40 bolt from the back and engage the idler tension bolt on the left.11. - Insert a filament or 1.5mm hex key into the filament opening and calibrate the chimney by rotating the calibration bolt on the left side.12. - After you reach the optimal position of the chimney, fix it in position with the M3x18 bolt right behind the filament path.13. - Attach the fitting with PTFE filament tube and run a test print.14. - Happy printing with easy re-calibrations.The B version assembly is fairly similar. Only the calibration bolt position is reversed and it can also accomodate M3x25 bolt instead of the M3x30. Let me know how do these parts work for you.
With this file you will be able to print MK3S+ MMU2S Precise Calibration Chimney with your 3D printer. Click on the button and save the file on your computer to work, edit or customize your design. You can also find more 3D designs for printers on MK3S+ MMU2S Precise Calibration Chimney.
