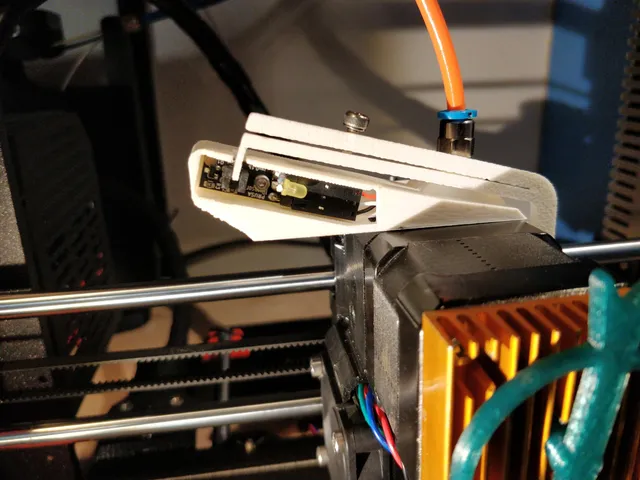
Mk3S MMU2s Long Arm IR sensor
prusaprinters
This was a learning project, and I got a lot out of it. However, now I use The Zero Beast's extruder which is basically all around better. He's got some excellent firmware, as well. Check it all out at https://www.prusaprinters.org/prints/7690-tzb-mk3smk25smmu2s-extruder-mmu2s-no-tower-v2 It's highly recommended. For other Prusa MMU stuff: https://www.thingiverse.com/AbeFM/collections/abes-mmu2-stuff NOTE: WIP! I'm using this with some success, but that does not mean it's bulletproof. I'd seen a couple projects which answered issues I was having - mainly that sometimes: I need to recalibrate the IR flag to fine tune it Soft filaments don't move the idler much (~1/8mm) It's hard to adjust! So I came up with this based loosely on two great projects: https://www.thingiverse.com/thing:3740480 - Screw-adjustable IR sensor flag https://www.thingiverse.com/thing:3554066 - High Motion Ratio "Tall Flag" The tall flag was a little weak and a little hard to print. I broke mine and ran it for months glued together. There's a remix now which might have it work better, but it was a little in the way although conceptually pure. The screw adjustable set up had a direct adjustment (limited by screw pitch) which I thought was a bigger concern than it really is. Still, coarse adjustments required moving the whole chimney. So I decided tipping the chimney so it rests in front of the X-axis motor instead of standing up would give me more room. I have ~2.5:1 gain, so my 1/8th mm deflection becomes nearly 400 microns. Still a small distance but much more compatible with the sensor PR used. For solid filaments the deflection is more substantial, ~4.5 mm. I found the slop in the door to be extreme, I drilled out the hole with a #22 drill bit (~4.05mm), slipped in a short length of 3mm ID/4MM OD PTFE as a bushing, and it controls the door much tighter. This may help to limit noise with small defections. Print Settings Printer Brand: Prusa Printer: I3 MK3S Rafts: No Supports: No Resolution: 0.2? Filament: any Rigid Notes: I had "detect thin walls" on to help the skin print that supports the roof of the FS Cover. You can push the resulting panel out with a fingernail or cut with a razor. I will likely make a version later with a pass though connector for the Bowden tube, but this is totally a WIP and I'm just looking for feedback. You may need to trim a few mm out of the hole in the bottom of the FS cover as well to get the plug to go in nicely. How I Designed This "Designed" in SolidWorks. After using Fusion for a year or two, using SW again is... disappointing. But an existing SW model of the printer was enabling. You can adjust the IR flag's position relative to the sensor by: Loosening bolt fixing FS cover to the Extduer. This will allow you to slide the cover +/- along the X axis and rotating it will let you ensure the flag is fully into the sensor. The screws that hold the arm to the idler door also have slots which allow you to coarsely set the depth into the sensor. This and trimming ~1 mm off the end of the flag should get you a nice edge and also allow for different set ups. Take care that flag is near sensor before you tighten these down. To fine tune the depth, you can insert a screw in any of the 4 holes in the arm. It may be hard to get an M3 started, try to keep it square. The closer to the IR sensor (further from the extruder), the more fine the adjustment. Screwing it in increases the flag's penetration into sensor. Lastly, I have found you can remove sensor door without separating the flag from the door. Category: 3D Printer Parts
With this file you will be able to print Mk3S MMU2s Long Arm IR sensor with your 3D printer. Click on the button and save the file on your computer to work, edit or customize your design. You can also find more 3D designs for printers on Mk3S MMU2s Long Arm IR sensor.
