MK3.9/MK4 External xLCD Mount for LACK Enclosure
prusaprinters
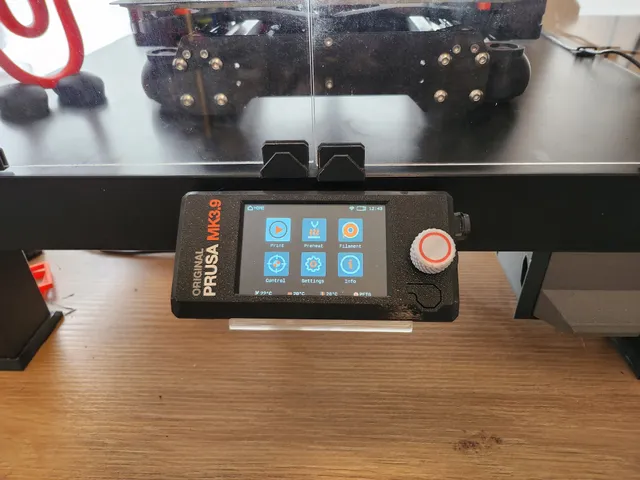
Introduction/CreditsI had been using fasteddy's Prusa LACK Enclosure External LCD Mount (MK2/MK3) for years with my MK3 and really liked how it attached and positioned the LCD outside of the enclosure, but when I recently upgraded my printer to a MK3.9 I suddenly found myself looking for another solution. This design is really more of a remix of fasteddy's model, and I designed this mount heavily borrowing some of the design ideas/elements from the original.The updated support arms are based on the R3 version of the xLCD cover from MK4/MK3.9 printable parts by Prusa ResearchDesignSince I was already using an external mount, I didn't want to drill additional holes in my LACK enclosure. The base uses the exact same mounting hole size/pattern as the original. I also wanted to keep everything very compact like the original so the xLCD wasn't sticking out too far. Other changes/improvements include….Reducing the overall width to match that of the xLCD.Changing the support arm to base attachment to allow for easier printing while still keeping the retaining screws optional.Recessing/removing the top portion of the base to make room for the PE Faston/cable and xLCD cable connector.Adding support for the PE cable to the ribbon cable channel.PrintingPrinting is straight forward. No supports or anything extra are required. The example was printed with a 0.4mm nozzle using the 0.2 SPEED profile in Prusament PETG.AssemblyThe base is designed to be installed along the bottom edge of the LACK table using 2x M4x20 wood screws. This will position the top of the xLCD below the upper edge of the table to not interfere with enclosure doors. The support arms and cables are attached to the xLCD cover as per the Prusa manual. You then thread the PE and ribbon cables through the cable channel. You can refer to the cable routing example in the pictures above. Finally, you can slide the support arms into the base while gently pulling the extra cable from the bottom to reduce bunching and allow the arms to seat fully. (note: The PE cable is a tight fit to provide additional strain relief.) As an optional step, you can secure the arms into the base from the sides with 2x M3x8 screws.Additional InfoParts required to assemble a longer xLCD cable.connector (2x): Ribbon Cable Connectors, Cable-to-Board, 24 Position, 1.27 mm [.05 in] Centerline, Vertical, 2 Row, Plug, Standard Profile, Micro-MaTch IndustrialP/N: 2-215083-4https://www.te.com/usa-en/product-2-215083-4.html or https://www.digikey.com/en/products/detail/te-connectivity-amp-connectors/2-215083-4/1860454cable: Flat Ribbon Cable Gray 24 Conductors 0.050" (1.27mm) from the supplier of your choice…or https://www.digikey.com/en/products/detail/3m/3365-24-100/9479206
With this file you will be able to print MK3.9/MK4 External xLCD Mount for LACK Enclosure with your 3D printer. Click on the button and save the file on your computer to work, edit or customize your design. You can also find more 3D designs for printers on MK3.9/MK4 External xLCD Mount for LACK Enclosure.