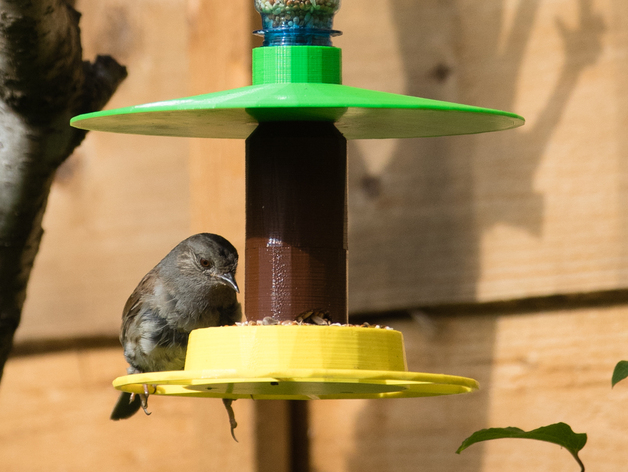
Mix and Match Birdfeeder
thingiverse
I added a hanging loop onto GavinKennedy's bird feeder about several weeks ago. All went smoothly and was an excellent project that allowed me to 'upcycle' quite a number of our used fizzy drink bottles. However .... it did not take long for the pigeons in our garden to figure out how to cling on to the feeder and empty it within a few hours - the little birds just didn't stand a chance and although it was quite amusing to watch the pigeons flap about in an effort to get all of the seed out of the drink bottle, I decided that I wanted to make a bird feeder along the same lines as the one which GavinKennedy had designed but which was pretty much large bird / pigeon proof. I ended up with a few designs and components which has enabled me to do some experimenting - hence the mix and match title. There are two feeder bodies - one of which is pretty similar to Gavins. The second has no outer ring and only three spokes. To make a single bird feeder, you only need one of these. There are three roof types - again, for a single bird feeder, you only need one. The flat roof is the easiest to print and uses minimal plastic. Unfortunately, rain will form pools on this roof which tend to splash the birds as they land. (No so much of a problem in light showers). The slanted and steep roofs requires some careful planning when it comes to slicing. I found that my slicer would print a solid plastic piece - no hollow infill - with my normal settings simply because of the gentle slope on these components. To join the roof to the main body, you will need one of the connectors. These screw into the roof and main feeder body using the same thread type as the drinks bottle. I have experimented with four different lengths and found that all work just as well as each other - so far, I have not seen any pigeons getting under the longest '80' connector and have not found that the 20 connector causes any issues for the smaller birds - it does not bring the roof too close to the bird seed. Attach the loop piece to your drinks bottle - I have tried lots of different sizes with no problems - by making holes in your drinks bottle about 20mm or so (not critical) from its base. The holes should be on opposite sides of the bottle of course - you can either cut slots using a craft knife or use something like a 5mm drill bit. Printer Brand: RepRap Printer: Mendel90 Rafts: No Supports: No Resolution: 0.3mm Infill: 20% - could be less Notes: All of the prints shown in my photographs were done using Faberdashery PLA. Choice of colour is up to you of course but during my brief research I got the idea that the most attractive colour to garden birds is BLUE! Saying that, I have not noticed any preference for the feeder with a blue connector in my garden. My first attempt used Gavin's STL file as a source - I simply cut off the feeder ring and removed, as best I could, three of the 'spokes'. I extended the remaining three spokes in order to give the birds some perch room and although my print wasn't pretty - with only the STL to work with, I found it impossible to get a smooth edge to the main body of the feeder where I had tried to remove the spokes - it DID fool the pigeons ....... for no more than a few days though. At this point, I asked Gavin for his original CAD files but as he had designed this in Tinkercad, he only had the STL. Undeterred, I set about redrawing his original design so that I could make the changes I wanted. First of all, I improved the thread which attaches to the drink bottle as I felt that Gavin's was a wee bit messy when it came to 3D printing - one or two strands of plastic which I had to remove before attaching the bottle. The main job though was to produce a roof which would hopefully deter the pigeons AND provide some rain cover for the seed in the main feeder body. My first roof was simply a flat canopy - easy to print and does not use a great deal of plastic. However, the rain tended to collect on top of the flat roof and it spilled over onto the small birds when they came to feed. The second roof has a gentle slope - more plastic but more functional. You need to watch slicing settings when printing this component - I had something like 5 outer shells as without this number, I found that my slicer cannot generate a hollow structure - my first attempt was a rather heavy, solid plastic roof. To give some space between the main feeder body and the roof, I needed a connecting piece. This carries the same thread type as the drinks bottle.
With this file you will be able to print Mix and Match Birdfeeder with your 3D printer. Click on the button and save the file on your computer to work, edit or customize your design. You can also find more 3D designs for printers on Mix and Match Birdfeeder.
