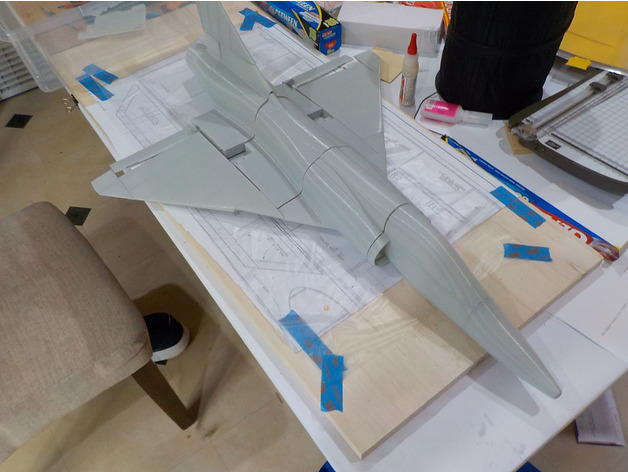
Mirage 2000
thingiverse
Update: This experiment seems to be falling short of expectations. The current EDF is simply not powerful enough to make it fly. However, if you are interested in designing your own planes, this project might still be worth exploring. Follow the printing instructions, run the parts through your slicer, and inspect the results. When designing your own model, remember that 0.6mm is the thinnest section you should use for it to show up on the slicer. You need advanced printing skills to pull this off. It can be printed on a cheap printer like an Anet A8 if you have it properly calibrated. Many thanks to Dave Pinchbeck for helping with design and printing advice, and to 3DLabPrint for the inspiration behind this project. Assembly and specs: The Mirage 2000 model requires: - 400g of PLA filament. - EDF 50mm and esc. - 2x9g servo, and extension leads. - Radio control reciever. - Velcro and styrofoam for battery. - 6mm carbon tube 1x 400mm, 1x 75mm, 2x 170mm. - 4x aileron hinges or print with flexible filament. - Glue, Hobbyking EPP foam glue is good. Option parts include: -"Hs1177cockpit" has a space for a hs1177 or similar camera. -"Nosevents" has vents to help cool any FPV gear and the battery. -"Wingvents" is a version of the batterybox with vents in the leading edge of the wingroot, for extra air to the EDF. -"Middlevents" is the middle section with some vents in the bottom. Assembly requires attention to detail and patience. Don't glue anything yet! Because this is a small plane, keeping the weight down was my main priority. There are no sections or hatches to aid assembly, so it can be a bit tricky. Once it's together, it won't come apart easy, so take your time and get it right. The 3 different size joiners glue into the slots between sections. Mostly this is for alignment, but for the nose it is the only thing holding it on. The fuselage is held together with the carbon tube. All but the nose and rear. The wings and tail also have carbon tube for strength. Cut out some cheater holes. Cut them inside from the wing bracing, so that they are in the intake duct area. Check all your electronics before assembly. You won't be able to get to a lot of it once it's all glued together. Centre your servos, check for correct motor direction, etc. The servo lead should run forward in the "middle" section, then under the floor of the battery compartment to the cockpit. There are very small slots at the bottom rear of "batterybox" or "wingvents" for the servo lead. Run the motor leads through the hole provided. Glue the motor in. Solder your battery connector to the ESC cable. Make sure it's long enough. Place the ESC in the rectangular hole behind the battery compartment. Don't glue it yet. There is a hole in the top brace behind this to cable tie the leads to the motor. Now the tricky parts are getting the ESC connected to the motor, and the servo leads into the cockpit. Cut the rear tabs off the servos, run the cable forward through the section and glue the servos in place. Glue 2 joiners and the long carbon tube into the motor mount section. Connect the ESC and motor leads, then slip the ESC into the slot from behind. Glue the carbon tube and joiners as you push the 2 sections together, make sure the ESC fits in the slot. Glue the ESC in place. Glue joiners in "middle" to fit to the battery compartment section. Slip the battery section on the carbon tube and make sure the joiners line up. Connect servo extension leads and run them under the battery compartment floor. There are small gaps for the leads to slot into at the rear of the battery box, or you can cut slots for them. Same for the esc control lead. Make sure they are long enough to reach your RX in the cockpit. Glue the sections together. That's the difficult stuff done, the rest is easy. Just use the appropriate joiners for joining sections together, don't forget the carbon tube for the wings and tail. If you have flexible filament, print the aileron hinges, or if using bought hinges you need to fill the gap with something or they will be a bit loose.
With this file you will be able to print Mirage 2000 with your 3D printer. Click on the button and save the file on your computer to work, edit or customize your design. You can also find more 3D designs for printers on Mirage 2000.
