Mini Mill Gib Fixture (for LMS 3990, Sieg X2 & X2D, HF Mill, etc) - Used to Make Flats Where Grubs Contact
thingiverse
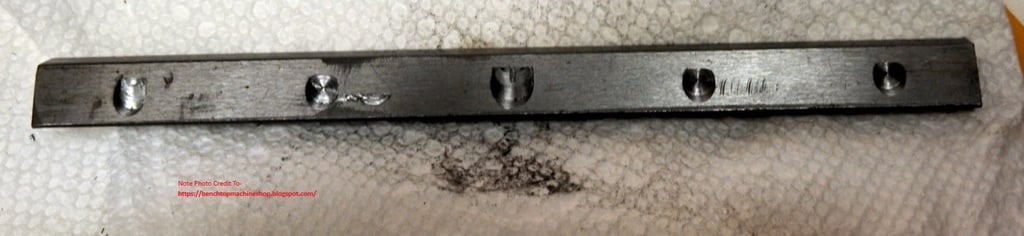
UPDATE v2 Model updated after some real world use.Here's a few tips as well..Print standing on it side (so it's tall). Layers separate when trying to torque on it any other way. Use lots of walls for the strength / torque advantage. I used 5 but I'd go at least 3 or 4.A stronger filament will be advisable here.. layer adhesion is key. I'm using ASA, but it's what I have loaded in the AMS. M5 tap in a hand drill makes quick work of the threads. No need to drill out the holes. The threads are strong enough to break the thing if you torque down at least when printed in ASA.The three bolts on the back may not be needed at all. The four on the front seat the part fully and then I just snug up the back. When it comes time to mill the flats, use the mill or a cross slide table if possible while holding this in a vi for accuracy. It's cast iron, but it's still tough.The dovetails gibs that are designed to take up the extra movement on these X2 / X2D Sieg based Chinese mills are often not sitting correctly due to the geometry of the gibs, dovetails, grub screws. This causes very poor contact and thus very poor rigidity. This one mod / fix can completely change how your machine operates and is HIGHLY recommended for anyone who owns a Sieg or any of it's variants (Littlemachineshop, Grizzly, Harbor Freight, etc). Being the funny shape they are, they can be difficult to hold onto in a vise or on a drill press in order to have them at the correct angle. This printed fixture should help with that and allow you to come down with a spot drill and then an endmill to make a flat. I am not the first to come up with this idea, but I couldn't find any other models. Switching to grub screws / set screws with a flat end to match can also help. Be careful when modifying the gibs. The gibs are fairly cheap to replace if needed but they can be a pain to fit when new so take your time, mark the proper location (ideally with the carriage & punch), spot the location with a center drill, and then come back in to the final depth with a small endmill. Be careful when using these power tools- these parts are replaceable, you or your fingers are not!For more information on this mod / fix, check out this awesome mini mill resource (not mine)-https://benchtopmachineshop.blogspot.com/2017/04/mill-gibs.htmlPrint the part standing up tall. The holes are sized so that a M5 tap can be ran through them, although some may prefer brass inserts. Being a functional print, I would recommend PETG or ABS / ASA but PLA may be adequate too. For personal use only.Cup of coffee always appreciated, but not necessary. Thank you lots!https://paypal.me/kingzeuscleFeel free to ask any questions or to request any changes!
With this file you will be able to print Mini Mill Gib Fixture (for LMS 3990, Sieg X2 & X2D, HF Mill, etc) - Used to Make Flats Where Grubs Contact with your 3D printer. Click on the button and save the file on your computer to work, edit or customize your design. You can also find more 3D designs for printers on Mini Mill Gib Fixture (for LMS 3990, Sieg X2 & X2D, HF Mill, etc) - Used to Make Flats Where Grubs Contact.