Mini Geranium Puzzle
thingiverse
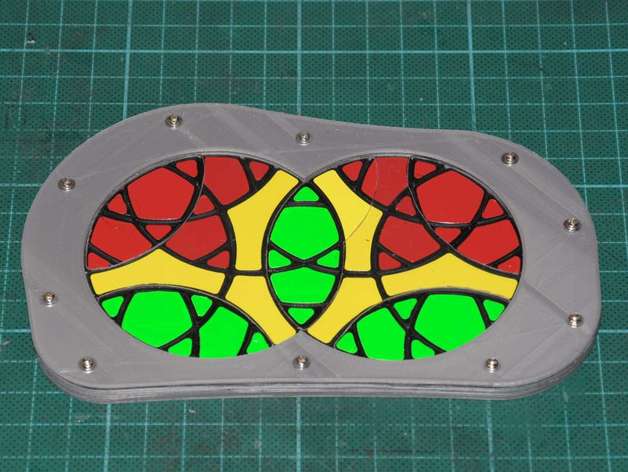
This is a replica of Very Puzzle's Mini Geranium puzzle. The original puzzles in this series are visually appealing, but their price is quite steep when compared to the amount of plastic required. Fortunately, it was easy to recreate the puzzle from scratch. My version has the same dimensions as the original, so the original stickers work flawlessly. However, you may want to print it with a different colored plastic and without stickers for a unique look. Check out my entire series of Geranium puzzles on YouTube: https://youtu.be/a5P3csYjqbY Print Settings: Printer Brand: RepRap Printer: Graber i3 Rafts: Doesn't Matter Supports: Yes Resolution: 0.3mm nozzle, 0.2mm layer Infill: 15% Notes: Number at the end of the file name indicates the number of copies needed to print. Almost all pieces require supports, but I split them into top and bottom parts at a height of 1.8mm, printed separately, and then glued back together. This approach has two benefits: 1) Easier printing with no supports required 2) Smooth outer top and bottom faces as they were printed on the bed Some slicers can automatically split the pieces; let me know if you need assistance and I'll help. Post-Printing: Acrylic Frame: The original puzzle features an acrylic frame, which looks neat and very cool. Use a laser cutter or CNC mill to create it. You will need two types of acrylic: matt and transparent, both with 2mm thickness. Follow this sequence of layers: Matted base (Frame Acryll Matt 1.DXF) Transparent frame with bigger circles (Frame Acryll Transparent 1.DXF) - can be used as a matte alternative Matted frame with smaller circles (Frame Acryll Matt 2.DXF) Glass window (Frame Acryll Transparent 2.DXF) You will also need some nice-looking blind head screws and nuts to assemble everything. 3D Printed Frame: Alternatively, if you don't have access to a laser or CNC Mill, you can print the frame. Although this won't look as nice as the original, it's still an option. Print the frame*.stl parts with the base oriented so that its smooth face is inside the puzzle. This will allow the pieces to move smoothly and make the non-smooth (outer) side feel better. To assemble: 1. Glue Frame1 part to FrameBase. 2. Place Frame2 3. Put all moving pieces in place 4. Add the glass (you can use a plastic box from a cosmetics set as a substitute) 5. Attach the FrameCap 6. Screw everything together with small self-tapping screws Stickers: Original stickers work fine, but you may consider printing a stickerless version for a unique look.
With this file you will be able to print Mini Geranium Puzzle with your 3D printer. Click on the button and save the file on your computer to work, edit or customize your design. You can also find more 3D designs for printers on Mini Geranium Puzzle.