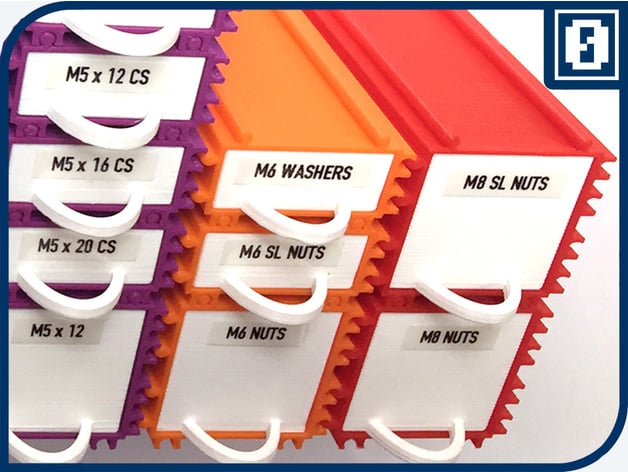
Mini Drawers Ultimate
thingiverse
Here is the rewritten text: This thing is a remix of TrevM's Mini Drawers, an original design that I needed to improve upon. Luckily, TrevM provides the .scad-files, which allowed me to make necessary changes using OpenSCAD. The runners didn't fit perfectly in their slots, and it seems this can be due to individual 3D printer settings. To fix this, I added a global variable "runnersDiameter" to the corresponding .scad-files, making it easy to adjust the runner diameters. My 2.85mm setup worked fine. To prevent drawers from falling out when pulled too far, I added a small stopper on the top/front inside of each house. This simple fix works well. I also added magnet holes to both the houses and drawers' backside. While the aforementioned stopper prevents over-pulling, the magnets prevent drawers from sliding when a house is moved or tilted. The original handles were too delicate for my fingers, so I changed them to oval shapes with increased protrusion. To minimize elephant feet, I added chamfers to both drawer and handle bottoms using the Chamfered primitives library by TimeWaster. Now, you can choose from various sized houses and drawers. If these aren't enough, check out the Logbook below for instructions on creating custom-sized boxes. See the print instructions chapter for details. Post-printing, follow the instructions in the next chapter to mount your magnets (I used similar magnets from AliExpress). Let me know if you need help or have a specific question! Logbook 26.11.2017: Added new sizes 2x3 and the entire 3x1-3x3 series. The mission is complete. 09.10.2017: Reworked filenames, added missing houses/drawers (like the 2x1 magnet versions), and more. I also updated my settings for better print quality and speed. 31.12.2016: A double-sized drawer with divider was missing until masterman274 kindly provided it. Thank you! 15.11.2016: Added a new drawer with two slots. Print Settings Printer Brand: Ultimaker Printer Model: Ultimaker 2 Resolution: 0.16mm Infill: 0% Notes: Some notes on printing: I experimented with various settings in Cura to optimize quality and print speed. My best results so far are: - Layer height: 0.16mm - Shell thickness: 0.4 mm - Bottom/top thickness: 0.8mm - Fill density: 0% (yes, zero!) - Print speed: 70 mm/s - No support or brim A word on zero infill: Since neither houses nor drawers experience much stress, they don't need to be extremely solid. Using zero infill with a shell thickness of 0.4mm creates a spiral effect that only fills the top and bottom, resulting in reduced printing times and sufficient strength. Post-Printing Instructions How to attach magnets: If you printed houses and drawers with mounting holes for magnets, you might wonder how to attach them. I recommend placing a drop of super glue on the rim of a magnet, then gently placing it on your workbench. Next, position the house or drawer on top of the magnet in a circular motion until the magnet is securely attached. Alternatively, apply hot glue to the magnet and carefully place the house or drawer on top. This method allows for minor adjustments by heating up the glue. Nonetheless, be cautious not to apply too much hot glue, as it can interfere with the drawer's movement.
With this file you will be able to print Mini Drawers Ultimate with your 3D printer. Click on the button and save the file on your computer to work, edit or customize your design. You can also find more 3D designs for printers on Mini Drawers Ultimate.
