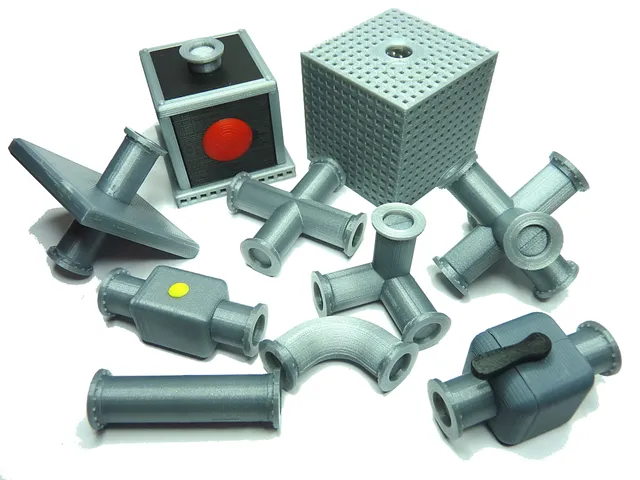
Minetest Pipeworks models
prusaprinters
If you've played Minetest (the open source alternative to Minecraft), you've probably seen my Pipeworks mod in use on some servers. If not, you've probably at least seen someone mention it in a chat somewhere. What, you never heard of it? Oh...well here it is anyway, after a fashion. :-) A while back I had got the idea in my head that I should be able to 3d-print some of the models I've been making for the game, and Pipeworks has always seemed like a good candidate for it. Here then are all of the pipe-related models from the mod, altered to be more friendly to 3d printing. I've kept the outward appearance of the printable models at close as possible to the originals (in most cases, they're identical). In the case of the pump and grating, the metallic mesh look is normally provided by the in-game textures, so I've modified the printable models to create a similar effect using actual model geometry instead. This repository does not include the "tube" items from the Pipeworks project, at least not yet. All of these models are designed to be printed without rafts or supports. I've tried to minimize the amount of curvy top-side surfaces as I was rotating and cutting the pipe models, but there's only just so much one can do when you're dealing with something like a 5-way junction. :-P These models are scaled up to 50 times the size of the original models, but even so, they're still at 1/20 scale (that is, a printed pipe is about 5cm long, versus in-game where it's one node length, or one meter). I've cut the models apart for easy printing and assembly, but this is not a snap-together kit (maybe I'll implement that some time later). For now, I figured you'd just glue everything together the way you want it. These models are solid all the way through, so don't expect to move liquids through them. :-) The pump, valve, and a few others are cut in such a way that, if you tell your slicer to separate them into their respective individual parts (e.g. the "Split" function in Slic3r), you can print the different pieces in different colors (for example, pump body in black or dark grey, its metallic parts in silver, and the light dome in red or green), to try to mimic the in-game appearance of the models. To join the assembled models together, you'll need one or more of the "peg.stl" model. If you need an extra flange or two, I've included .stl's for them, also (there are two types; in the majority of cases, the "hollow" one is what you want). I've also uploaded each of the models' Blender work files, in addition a .blend of the various kibble that went into transforming the original model files into 3d-printable form, though in some cases the models' cutouts do not match what's in that file (deepened holes to account for bridging of their top-inside faces, mostly). If you want the original models from the Pipeworks mod, get them from my Pipeworks repository on GitLab. Print instructionsLicence: Creative Commons - Attribution - Non-Commercial - Share Alike Category: Video Games Print Settings Printer Brand: Prusa Printer: Prusa Clone Rafts: No Supports: No Resolution: 0.1 mm Infill: 10-20% Notes: Important: Make sure your printer is well-calibrated -- accurate part dimensions are important, especially in the peg-and-hole connections throughout these models. That said, I've given all dimension-sensitive holes and pegs a 0.2 mm to 0.3 mm deep 45° bevel on their on-build-plate edges, to help counteract flaring on the first few layers. In any case, pegs fit into their respective holes, and flanges onto their respective pegs, with only moderate force. Expect some pounding and twisting to get parts to settle together right, depending on the printed quality. I recommend printing this slow, at a high-quality setting, as there is a fair bit of fine detail (especially the pipes' flanges). For a ballpark figure, the "6-way" model should take around two hours when printed at 30 mm/sec with 0.1 mm layers and 15% infill. If you're using a metallic filament, please note that the sheen of such plastic will not be consistent from one pipe shape to another, or between an upright-printed pipe and a pipe that had to be laid down for printing (or within a model that has both orientations, such as the 6-way junction). Vapor smoothing may help this. Post-Printing I tried to make sure that everything fits together without any trimming, but do have your hobby knife handy. When you're gluing things together, of course you want to take care to make sure everything is right, but pay particular attention when gluing flanges. You'll want to make sure the flanges are rotated so that the little bolts on one side will align properly with the bolts on the other side of the joint when you put two pipes together. The bolt pattern is symmetrical, so simply aligning any bolt with the split where a pipe was cut in half, or toward the "top" or one "side" of the model is sufficient. Maybe at some point, I'll key the models' pieces to deal with that.
With this file you will be able to print Minetest Pipeworks models with your 3D printer. Click on the button and save the file on your computer to work, edit or customize your design. You can also find more 3D designs for printers on Minetest Pipeworks models.
