Minecraft Nether Portal LED Lamp (WLED Compatible)
prusaprinters
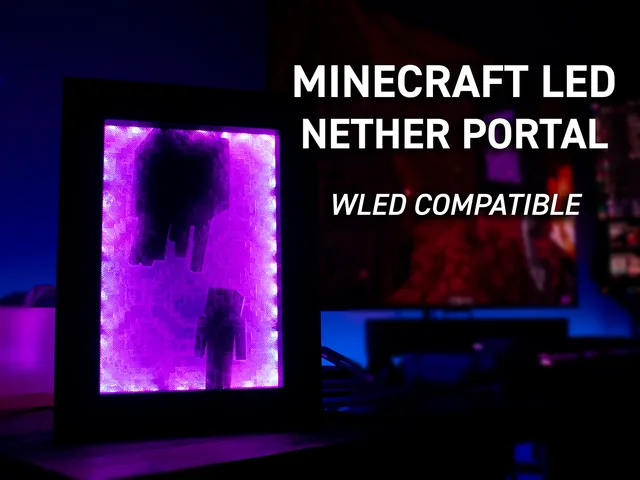
Whatever you do, don't sleep in hell!Say hello to the third instalment of my Minecraft lamp series; The Minecraft Nether Portal LED Lamp. This model is again roughly ~1/8th scale with room added for internal electronics and features a symmetrical design just like the game.This model consists of front and back plates that feature the use of magnets for constant accessibility and easy accessory exchanges. Also included are two transparent plates alongside a WLED module that gives the memorable nether portal animation some recognition. Ive traced some recognisable characters and added the ability to have their silhouette displayed inside the LED portal giving the model a flavour that will complement any room.All press joins have a tolerance of 0.1mm which I was able to achieve with my BBL A1. No screws are required during construction. Glue and zip ties may be used for securing and tidying the internal electronics. This design can be printed entirely on the 0.4 Nozzle, but I recommend printing the transparent material using the 0.6 nozzle. This model is larger than the other Minecraft lamp models posted and currently does not support printing on the A1 Mini.Foreword: Currently, this model only supports 6x3 magnets. Let me know what magnet sizes you want to be added for your own printing. My model was printed on the BBL A1 where the start of the print priming/brim line is outside of the printing area. I understand that the X1 & P1 models have more than one of these lines and can intrude onto the printing area. Let me know your experiences and if the priming line interferes with the portal frame due to its large size. It is possible for the frames to be moved a few millimetres forward to avoid the priming line.Update 18/07/2024: Added commercial licensing through Ko-Fi; https://ko-fi.com/jackalolzMaterials:Filament & Printer Settings:Primary PrintBambu Labs - PLA Sparkle - PurpleBambu Labs - PETG Transparent - PurpleCharacter InsertsBambu Labs - PLA Basic - BlackSunlu - PLA+ - Clear Transparent (Optional)Nether Rack StairsBambu Labs - PLA Basic - BrownSunlu - PLA+ - YellowSunlu - PLA+ - RedThis model can be fully printed using the 0.4 Nozzle, however, the transparent portal insert comes with a 0.6 nozzle print profile which I recommend when printing translucent materials.I have not tested printing the portal insert in generic PLA, however after running a transparent test, I can't see it working with anything that isn't transparent.Electronics & Additional's:6x3mm Magnets (Minimum x8 Magnets, Recommended x12 Magnets, Full Effect x20 Magnets)ESP32 MicrocontrollerLED Strip (Pixel Controllable preferable)DC Power supply (Matching voltage of LED Strip)DC Step Down Module (Matching or similar to LM2596)Model Design & Customisation As seen above, this model features frame guides that can house a silhouette of your favourite character from Minecraft or anything you can dream up. These guides align the transparent portal inserts and leave 6mm of space for your creativity. The guides measure 2mm deep, 8mm wide and 6mm tall. When adding cutouts for your inserts, I suggest you cut out 3mm deep instead of 2mm deep. The extra overhang helps secure the model internally. Make sure you do not fillet or chamfer your cutout edges. Keep them sharp, just like Minecraft!Inside the 'Portal Insert' print profile, you will find a print plate labelled 6mm gap fill. These fillers are to stop the rear transparent portal insert from falling internally exposing the inside of the nether portal model and ruining the magic of its design. If you favour the design of a clear portal frame, it may be helpful to print some of these gap fills to help maximise the air in between each transparent portal insert. Another recommendation would be to print the gap fillers in transparent material so you don't lose any light if the filler covers an LED cell.OPTIONAL: For the added effect on both front and rear displays, I printed the character insert in transparent PLA for two reasons. Firstly, having the character inserts 6mm high helps dearly with removing the possibility of the rear transparent portal insert falling internally into the portal frame. Secondly, the transparency still allows light to flow behind the rear of the character model for greater illumination.Construction:Print the front and back portal frames and the transparent portal insert twice.(Optional) Print character inserts for portal inserts.(Optional) Print nether rack stair accessory.Push magnets into the frame. Pay close attention to magnet polarity. Start with the inside front and rear frame with a magnet in each corner. For a greater seal, fill all holes in the frame with magnets. If you wish to add accessories to the external frame, add magnets on the front face of the front and rear panels. Insert the LED strip into the LED guide on the portal front panel. Have power and data cables come from the top left corner (of this picture above) and feed cables through the cutout in the frame. Complete an LED loop around the frame and cut the LED strip to length. Stick the LED strip to the frame using LED strip double-sided tape or glue. Make sure the LED strip is pushed all the way down into the guide and stuck flush against the wall of the LED guide. Use the circle corners for additional cable feeds or to assist in LED strip corner turning.Assemble electronics. For my design, I've used a 12v Pixel LED strip that is adhesive to the LED strip guide walls. For the brains, I've used an EPS32 controller running WLED. There are a bunch of tutorials on YouTube on how to use WLED from installation to wiring. Lastly is a step-down DC to DC Buck module to send the ESP32 3.3v. If you need further assistance feel free to comment and I will post a more detailed guide. Don't forget to feed your power connection through the hole in the rear panel.Following the gif above, start press-fitting your layers.Portal Transparent Insert. Face down, pattern facing outwards(Optional) Insert Character Silhouettes or 6mm Gap FillPortal Transparent Inert. Face up, pattern facing towards youAdd rear panel sealing model with magnets(Optional) Add nether rack stairs to the front or back of the modelPlug in & enjoyCongratulations & Enjoy!It's that easy! Please rate, comment and enjoy your portal. Have fun in hell!Looking for a commercial license? Buy me a coffee in exchange; https://ko-fi.com/jackalolz
With this file you will be able to print Minecraft Nether Portal LED Lamp (WLED Compatible) with your 3D printer. Click on the button and save the file on your computer to work, edit or customize your design. You can also find more 3D designs for printers on Minecraft Nether Portal LED Lamp (WLED Compatible).