Millenium Falcon 1 - Star Wars - Meccano Expansion Parts
thingiverse
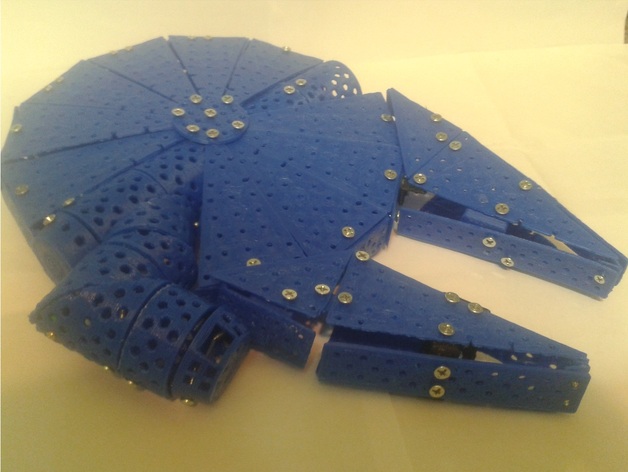
I was fascinated by the Millennium Falcon from Star Wars since I was a kid. I stumbled upon these plans, notes, and instructions on a closet floor; it was like finding a treasure map. Now I thought to myself, why not design and build one? So I did this using my Meccano-style parts. Have fun building! To assemble: Use the SS_FRISBEEcircleWALLedge_30d_15d_5x2a1_58x25x13_p112b WALL EDGE with three Tabs part to connect two 100mm TRIANGLE parts, eight times - that's eight form structures. Next, link two more TRIANGLES to the WALL EDGE with 2-Tab parts, twice - that makes two more form structures; these are for the ends of the semicircles formed. Six of these structures are connected together to form a semicircle for the 12-oclock portion of the disk. The other four Triangle Structures form the 6-oclock SemiCircle portion of the disk. These semi-circles are then linked at the center of the circle shape (via triangles top and bottom points) with the two CIRCLE parts. Finally, link the two CIRCLE parts together through their centers via the thin 40mx8mm TUBE part. Next, connect all the tunnels together using STRIP parts with 2 holes; also add the tunnel-cap pieces to the outer ends of the tubes. Then screw these tube sections onto the triangles (of the disk/semicircle structures) with the 8-hole strips to the bottom of adjacent triangles of the disc - that should make a full disc. To finish the model, sandwich two more 100mm TRIANGLES together separated by the 10-Hole-x2-Hole STRIPs linked by the 2-and-2-Hole 90-degree-angle parts. Then link this triangle section to one front side of the disc with two of the 4-Hole-x-4-Hole 50mm TRIANGLE parts. Use an extra WALL EDGE with 2-tab part as a wall for the 45-degree triangle. Repeat this process for the other front side of the disc. Note: It's recommended to use #6x1/2in bolts or gluegun to assemble. To-do list: * Legs and turrets - in the future. * Add consoles, equipment, seating, and personnel soon... Parts needed: * 20x TRIANGLES * 18x WALL EDGE with three tabs * 4x WALL EDGE with two tabs * 4x 40mmx40mmx40mm TUBE * 1x 20mmx40mmx40mm TUBE * 1x 45-degree CUT 40mmx40mmx40mm TUBE * 1x 22-degree CUT 20mmx40mmx40mm TUBE * 2x FLAT END TUBE CAP 40mm * 1x END TUBE CAP 40mm with WINDOWS * 1x 40mmx8mm TUBE * 1668780 - Space 1999 Eagle - Meccano Spaceship - Parts Model * 1666009 - Meccano Insect Robot - Parts 1 * 1668041 - Meccano Robot Snake & Octopus * 1669029 - Meccano - Base Parts - Plates Struts Angles Printer settings: * Printer brand: RepRap * Printer model: Mendel * Rafts: No * Supports: Doesn't matter * Resolution: 0.2mm to 0.8mm nozzle tips * Notes: I printed these on a Mendel RepRap with 1.75mm fibre using a 0.8mm nozzle tip and 0.5mm layer height setting. Can use any tip from 0.2mm to 0.8mm; it took between 3-10 minutes per part to print. Walls and caps need to be rotated 90-degrees to print properly. Post-printing: Some parts may have burrs - file them to finish. If the bolts seem loose, gluegun might help.
With this file you will be able to print Millenium Falcon 1 - Star Wars - Meccano Expansion Parts with your 3D printer. Click on the button and save the file on your computer to work, edit or customize your design. You can also find more 3D designs for printers on Millenium Falcon 1 - Star Wars - Meccano Expansion Parts.